| Issue 90 | April 1st 2010 | Contact the Editor | How to Contribute |
|
| ||
|
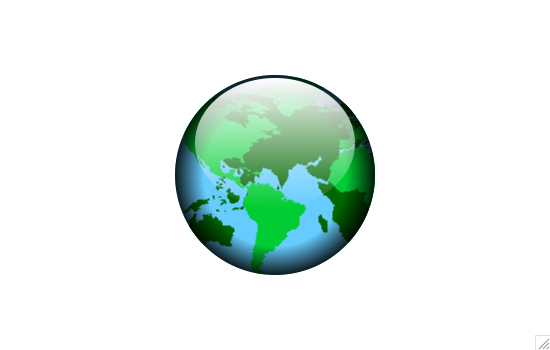
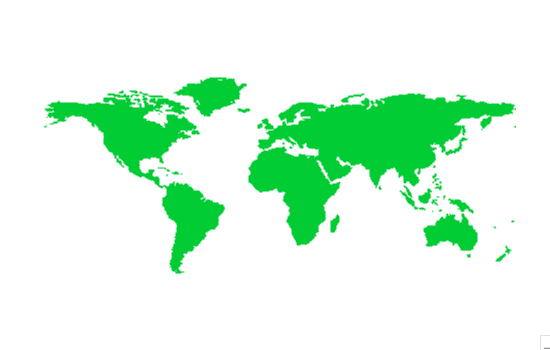
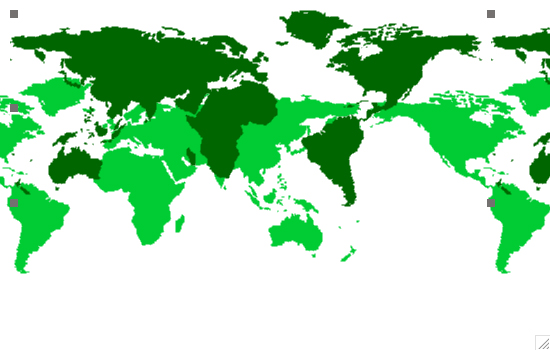
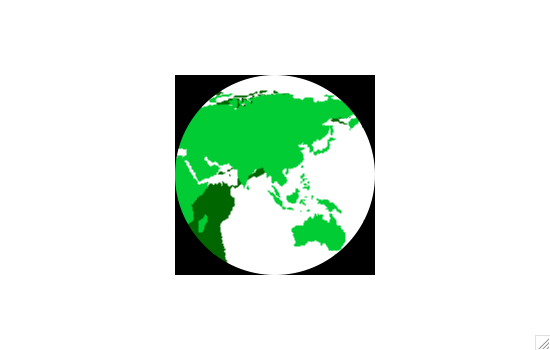
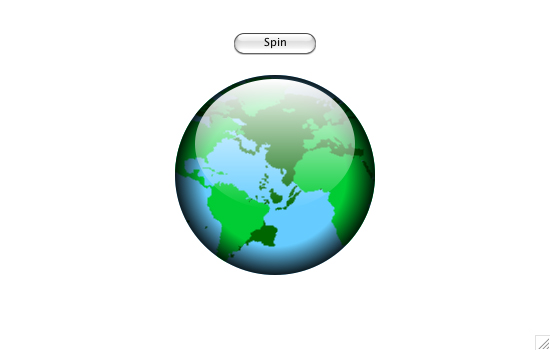
A Globe, a Glass and Galactic Appeal Welcome to Astrophysics 301. Since your regular professor is apparently ill (she seems to have disappeared), I will be your instructor for today. In this class, we're going to study planetary rotation. Or rather, how to create a rotating glass globe effect in Rev. BACKGROUND One afternoon while searching the Web for recent cases of alien abduction, I came across an animated globe effect which I thought would be fun a challenge to replicate in Rev. As it turned out, it was indeed challenging, but after a few hours of hit and miss experiments, I arrived at a solution I thought was worth sharing. If you're feeling brave (you know you are), and if you don't mind getting your hands a little dirty (look at those fingernails), and if you're ready to support the weight of the world on your shoulders, er, stack, then you too can build your own animated glass globe. (A downloadable stack is also available at the end of this article so you can play around with it at your convenience.) First, let's review what we're after: a simulation of a rotating glass globe. If you look closely, you'll notice the globe is not really three dimensional. But the effect is fairly convincing and presents an interesting construction challenge. So how does it work? Is it some form of alien technology left on Earth to evolve our species? Good guess, but no, the animation is a clever combination of images and graphics, ink effects, grouping, and a relatively simple script. A foreground continent image moves to the right, while a background continent image moves to the left. Throw in some graphic effects and you've got a rotating glass globe. No 3D programs, animation apps, or human experimentation is needed to create this effect. MAPMAKER, MAPMAKER, MAKE ME A MAP The one thing you'll need to start is a flattened out representation the Earth, like a world map. I've provided one for you here that you can import into Rev: OK, so now we have a map image. But as it stands, this image isn't wide enough. For the animation to work, we need this map image to be doubled in width. You could open the image in an image editor, but we're hardcore Rev developers -- we don't use any stinkin' image editors unless absolutely necessary. Here's what we'll do: - Duplicate the map image.- Set the topLeft of the second map image to the topRight of the original, so the images fit perfectly end to end (you could select both maps and run the following in your message box:) set topLeft of (line 2 of the selObj) to topRight of (line 1 of \ the selObj) 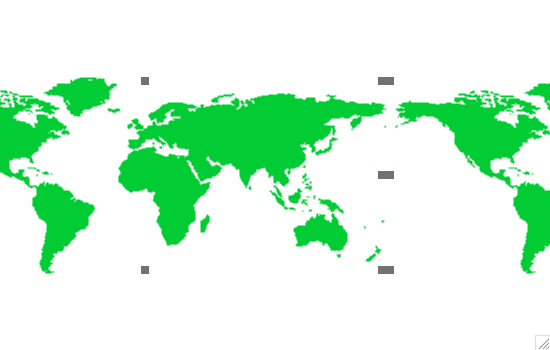 - Group both map images. - Set the margins of the new group to 0. - Select the group and execute the following in your message box: import snapshot from rect (rect of the selObj) of the selObj You should now have a new double-map image that is double the width of the original. Name this image "frontmap", and you can delete the group, since we won't need it to continue. This frontmap image will be the foreground of our globe. We now need to make the backside of the globe, the region that will animate behind the foreground. The backside needs to be a mirror version of the foreground, and colorized darker. Again, we could turn to an image editor, but being the swarthy developers that we are, we'll do this in Rev: - Duplicate the frontmap image.- Set the name of the duplicate image to "backmap". - Flip the backmap image horizontally (Object > Flip Image > Horizontal). - Make sure the backmap image is selected and run the following code in your multi-line messagebox: put binaryEncode("CCCC",0,0,102,0) into tColor repeat (width of the selObj * height of the selObj) put tColor after newImageData end repeat set imageData of the selObj to newImageData
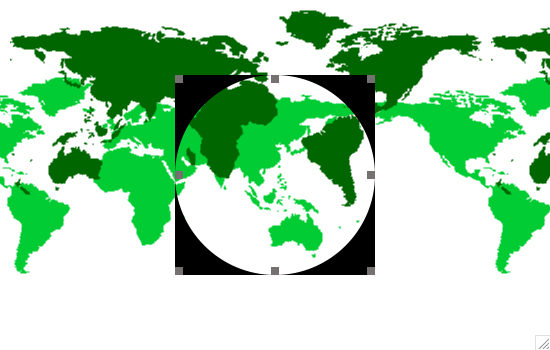
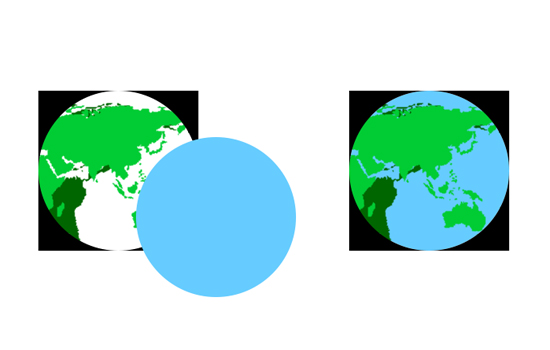
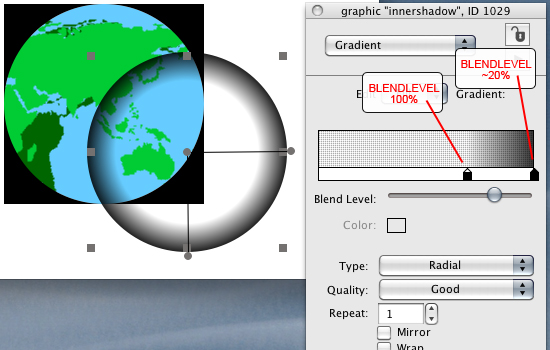
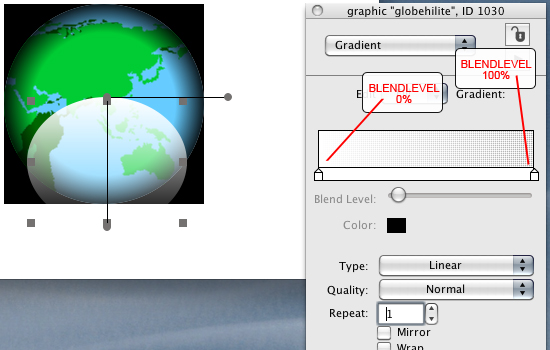
EVERYONE WEARS A MASK Of course, most people know the Earth is a round. Unfortunately, Rev still believes the Earth is rectangular and doesn't offer any easy way to confine our globe animation to a round shape. So what can we do? We'll make a mask -- an overlay of sorts that will keep our globe animation round. Create an oval graphic that is 200 pixels square. Make it opaque, set its lineSize (stroke) to 0, and set its backColor to black. Now set its ink effect to blendDstIn. Name this graphic "globe" -- it should look like the following: ASSUME THE POSITION Now comes the challenging part: we need to position the map images so they sync properly when they move. Quite honestly, there is no simple, out-of-the-box formula for this because of all the variables involved: the size of the map images, the distance the images need to travel before they loop, the desired rate of travel, etc. Some basic trial and error is needed here. But you're in luck: just because you did so well with the previous steps, I've figured out the details for you. Here's what to do next: - Align the map images and the globe graphic along their horizontal and vertical centers.The result should look something like this: 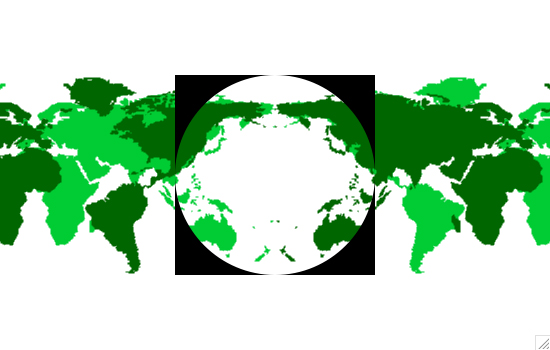 - Look for the Australian continents in each map. Position the frontmap image so its left-most Australian continent is about 30 pixels to the left of the right side of the globe graphic: 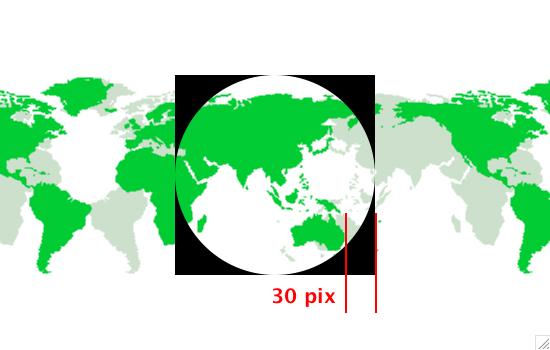 - Position the backmap so its right-most Australian continent is positioned about 30 pixels to the right of the right side of the globe graphic (you may need to temporarily move/hide the frontmap image): 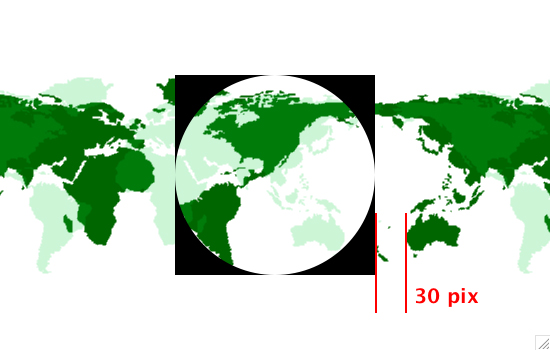 - Select all the objects and group them. Set the margins of the resulting group to 0 and name it "mapgroup". Now we want to size the group to fit the dimensions of the globe graphic. You can either manually pull in the left and right sides of the group until the group is the exact same width as the globe graphic, or you can execute the following block of code in your multi-line message box: put rect of last grp into tRect put left of grc "globe" into item 1 of tRect set rect of last grp to tRect put rect of last grp into tRect put right of grc "globe" into item 3 of tRect set rect of last grp to tRect The result should look like this: Now set the lockLoc of the map group to true so it doesn't resize and we'll continue. SMOKE AND MIRRORS Wow, that was a lot of work. But don't get annoyed with me, I warned you at the beginning of this article that this project would be a challenge. Anyway, your perseverance has paid off -- we're ready to make things move. Drag a new button into your stack, set the autoHilite of the button to false, and name it "Spin". Place the following script in your Spin button. local globeLeft,globeRight,frontRightPos,backLeftPos local mapWidth,frontStartX,backStartX,animRate on mouseUp put left of grc "globe" into globeLeft put right of grc "globe" into globeRight put right of img "frontmap" into frontRightPos put left of img "backmap" into backLeftPos put width of img "frontmap" into mapWidth put globeRight + 6 into frontStartX put globeLeft - 6 into backStartX put 3 into animRate -- ANIMATION RATE set hilite of me to not the hilite of me runAnimation end mouseUp on runAnimation if not the hilite of me then exit to top lock screen -- FRONTMAP if frontRightPos >= (globeRight + mapWidth/2) then -- RESET POSITION set right of img "frontmap" to frontStartX put right of img "frontmap" into frontRightPos else add animRate to frontRightPos end if set right of img "frontmap" to frontRightPos -- BACKMAP if backLeftPos <= (globeLeft - mapWidth/2) then -- RESET POSITION set left of img "backmap" to backStartX put left of img "backmap" into backLeftPos else subtract animRate from backLeftPos end if set left of img "backmap" to backLeftPos send "runAnimation" to me in 50 millisecs unlock screen end runAnimation Now let's test it. Press the button and give your new planet a spin. Is it working? Do you feel like you're watching Earth from space? Pressing the button repeatedly will toggle the animation on and off. How does it work? The simple script above repeatedly moves each map image a few pixels in the appropriate direction (frontmap moves to the right, backmap moves to the left), and once each map has moved the equivalent of an entire "map-width", it is sent back to its starting point and the movement repeats again. ADD A LITTLE POLISH, AND JUST LOOK AT THAT SHINE The animation is all well and good (actually, I think it looks pretty darn good), but I'm sure you're wondering how is this going to look like the glass example shown at the beginning? Time to employ some graphic effects! First we need to give the globe a base color. Most beings in this galaxy portray Earth with blue oceans, so let's make a blue oval that's 200 pixels square and place it centered behind the map group. Now let's give the planet some dimension with a shadow graphic. Create a new 200 pixel oval, make it opaque, set its lineSize to 0, and apply a black-to-black radial fillGradient to the oval that looks similar to the following, with transparency settings applied to the 2 color stops as shown. When you have the gradient just right, position the graphic so it is centered within the globe graphic. We now need to create one more gradient element for our globe: the highlight. Create a white opaque 160 x 130 oval graphic. Give it a white-to-white linear fillGradient that looks like the following (again, note the transparency settings on the color stops), and then position the oval centered on the globe about 4 pixels down from the top This is looking pretty sweet, but those annoying black corners are preventing our globe from looking, uh, globe-like. How do we remove them? The secret is an ink effect. Using the Application Browser, select the map group and give it a blendSrcOver ink effect. And suddently, as if they were hidden by an alien cloaking device, the corners should vanish, and you should now have a crystal-like globe sitting in your stack. Select all the objects that comprise your globe, group them, and you're finshed: you should now have an animating glass globe object that can be placed into any of your stacks. Remember, being the capable developer that you are, you created all the elements of this globe, which means you can change the appearance of the globe to whatever you want, whenever you want. Unlike an animated GIF or a series of PNG images, you can modify the globe's colors, change its axis of animation, even add and remove objects within it at will, all while it is running. You could even add "points of interest" to the map images in your globe, such as small towns with the greatest numbers of UFO sightings...
go url "http://www.tactilemedia.com/site_files/downloads/glass_globe/globedemo.rev"
| 

|