| Issue 125 | December 22nd 2011 | Contact the Editor | How to Contribute |
|
| ||
|
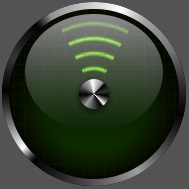
Build A Santa Tracking Device Using Gradient Effects It's that time of year again: temperatures have dropped, the calendar is nearing the end of its lifetime, and it's time to start talking about STD's. No, not those kind of STD's, I'm talking about Santa Tracking Devices. Every year, sites pop up all over the Web offering children young and old the ability to track Santa as he streaks through the skies on his annual mission of good will. Of course, one of the most famous of these Santa trackers is run by NORAD (North American Aerospace Defense Command) which runs a sophisticated system. But instead of relying on the military industrial complex, we're going to look at creating our own Santa-tracking radar effects in LiveCode. With a little gradient ingenuity, you can build some interesting radar-type widgets suitable for games or dashboards by animating gradient properties. And these effects are achieved with no moving parts -- very solid state. The Hardware To get started, we're going to need a display. Because you've all been good little boys and girls, I went down to the local electronic supply, sourced everything you need, and put it all together in a handy little stack that you can download by executing the following in your LiveCode message box: Or if you prefer, you can download the stack here. I realize many of you are lacking in skills with a soldering iron, so I went ahead and took care of the internal wiring, providing you with a working model to reference.
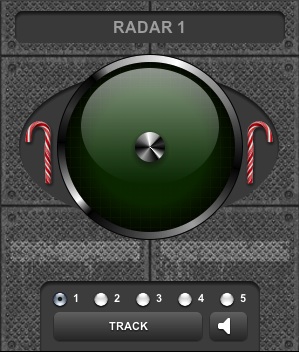
What we have here is a modified Merlin GLX 7000, normally used to to detect and monitor hazardous bird activity around airfields. When you launch the stack, the wireless tie-in to air traffic control at your local airport may kick in. (Don't be alarmed, this is just a precaution. You can mute the radio chatter using the speaker button.) You'll see the unit offers 5 different tracking options via radio buttons: two RADAR, two SONAR, and one HALO. You can switch between each option and see the resulting scans on the display. The device won't display any contacts as I wasn't able to track down an ionized particle detector. Once you find one (try your local RadioShack) you can configure the tracker to search for ionized vapor trails produced by sleigh runners. Under The Hood - RADAR 1
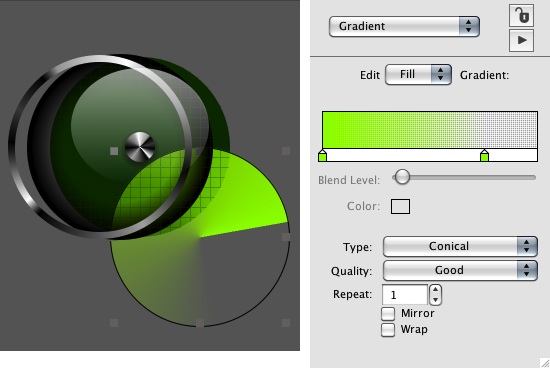
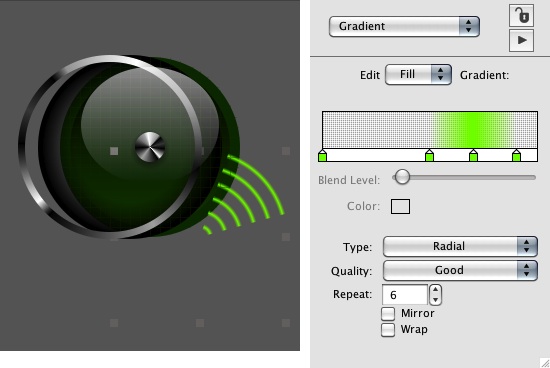
As I mentioned earlier, our device is cutting edge and has no moving parts -- all the rotational and motion effects are produced by repetitively changing gradient values of a graphic (named "scanner" and a number) within each display. In the RADAR 1 display, the scanner graphic uses a simple conical gradient with some translucency (blendLevel) to achieve the RADAR effect. Here's an exploded view with the scanner graphic pulled out to the right:
If you look at the script of the display group, you'll see it has a few parameters that you can adjust to change the speed at which the display updates. And below the constants is the "tracking script" that gives the display its rotation without actually rotating the graphic. The key to this effect involves two items: the ramp of the gradient (its color stops and transparency) and changing positional coordinates in the gradient's array. # THE FOLLOWING CONSTANTS ALLOW YOU TO PROGRAM THE RADAR constant sweepStartAngle = 350 constant sweepDelta = -10 constant sweepDelay = 10 # FOR BEST RESULTS, THE SWEEPDELTA SHOULD BE A NEGATIVE # DIFFERENCE OF THE SWEEPSTARTANGLE # (IE -3,357 OR -4,356 -5,355 OR -6,354, ETC.) # HIGHER SWEEPDELTA RESULTS IN FASTER ROTATION # SMALLER DELAY (SWEEPDELAY) PLUS SMALLER DELTA (SWEEPDELTA) # YIELDS SMOOTHER ROTATION BUT RESULTS IN HIGHER PROCESSOR USE local pAngle on runTracking if pAngle = "" or pAngle < 0 then put sweepStartAngle into pAngle put the fillGradient of grc "scanner1" into gradArray put item 1 of loc of grc "scanner1" into pXorigin put item 2 of loc of grc "scanner1" into pYorigin put height of grc "scanner1"/2 into pRadius put angleToLoc(pAngle,pXorigin,pYorigin,pRadius) into \ gradArray["via"] put pAngle into tempAngle add -90 to tempAngle put angleToLoc(tempAngle,pXorigin,pYorigin,pRadius) into \ gradArray["to"] set fillGradient of grc "scanner1" to gradArray add sweepDelta to pAngle send "runTracking" to me in sweepDelay millisecs end runTracking The "via" and "to" coordinates in the script are the point locations used to position the gradient (the "from" coordinate is the center of the scanner graphic and does not change, so it is not mentioned). By using a bit of math in a function to calculate some rotational positions, the "via" and "to" coordinates are updated every "sweepdelay" milliseconds, producing the rotation effect. Under The Hood - RADAR 2
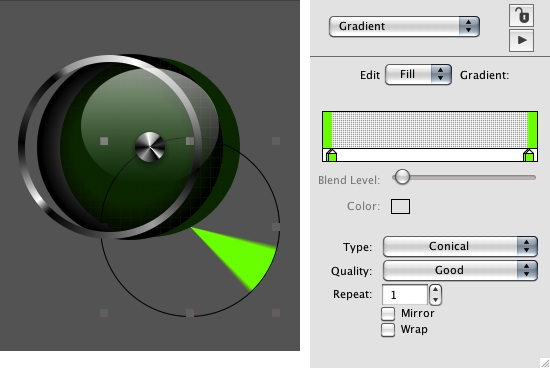
RADAR 2 uses the same rotation code as RADAR 1, but the color ramp of the scanner graphic's gradient is different. The soft edges of the conical gradient are created by setting the blendLevel of the gradient's min and max color stops to 100.
Again, this radar effect has some settings you can program. # THE FOLLOWING CONSTANTS ALLOW YOU TO PROGRAM THE RADAR constant sweepStartAngle = 350 constant sweepDelta = -10 constant sweepDelay = 20 # FOR BEST RESULTS, THE SWEEPDELTA SHOULD BE A NEGATIVE # DIFFERENCE OF THE SWEEPSTARTANGLE # (IE -3,357 OR -4,356 -5,355 OR -6,354, ETC.) # HIGHER SWEEPDELTA RESULTS IN FASTER ROTATION # LOWER DELAY (SWEEPDELAY) YIELDS SMOOTHER ROTATION # BUT RESULTS IN HIGHER PROCESSOR USE local pAngle on runTracking if pAngle = "" or pAngle < 0 then put sweepStartAngle into pAngle put the fillGradient of grc "scanner2" into gradArray put item 1 of loc of grc "scanner2" into pXorigin put item 2 of loc of grc "scanner2" into pYorigin put height of grc "scanner2"/2 into pRadius put angleToLoc(pAngle,pXorigin,pYorigin,pRadius) into \ gradArray["via"] put pAngle into tempAngle add -90 to tempAngle put angleToLoc(tempAngle,pXorigin,pYorigin,pRadius) into \ gradArray["to"] set fillGradient of grc "scanner2" to gradArray add sweepDelta to pAngle send "runTracking" to me in sweepDelay millisecs end runTracking Under The Hood - SONAR 1
Instead of point rotation, SONAR 1 changes the color stop positions of a radial gradient. A blendLevel of 100 is once again applied to the inner and outer stops of the gradient, creating the soft ring appearance.
In this script, the 3 color stops of the gradient are increased in steps of 0.04, from 0 to 1, creating the effect of an expanding ring. local pStops on runTracking if "runTracking" is not in pendingMessages() then show grc \ "scanner3" if pStops = "" then put 0.00,0.04,0.08 into pStops put the fillGradient of grc "scanner3" into gradArray put gradArray["ramp"] into tRampData repeat with N = 1 to 3 put item N of pStops into item 1 of line N of tRampData add 0.04 to item N of pStops end repeat put tRampData into gradArray["ramp"] set the fillGradient of grc "scanner3" to gradArray if item 3 of pStops >= 1 then put "" into pStops send "runTracking" to me in 20 millisecs end runTracking Under The Hood - SONAR 2
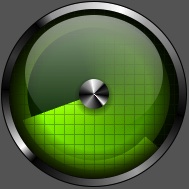
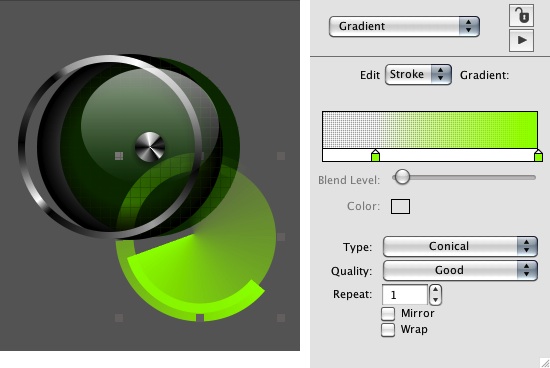
SONAR 2 is a variation of SONAR 1 but the fillGradient in the scanner graphic has a repeat value of 6, which replicates the base gradient 6 times within the graphic. As an added bonus, this display includes an "operator-controlled focuser which restricts the SONAR scan to a specified compass orientation" (that's fancy talk for pointing in different directions).
The focuser effect is created by grouping the scanner graphic with an oval graphic "mask" that has start and arcAngle values, and employing ink effects on the mask and group. The combination of ink effects produces a "window" that allows the gradient rings to be visible only in the visible region of the mask graphic. Adjusting the slider changes the start/arcAngle values of the mask graphic, resulting in the shifting angle appearance of the SONAR waves. And once again, we have used no moving parts. The script for SONAR 2 is much like SONAR 1, except it uses only 4 color stop positions to achieve the animation. Once the color stops have changed 4 times, the script sets the color stops to the starting position and begins again. Animation Tip: for best results, try to create loop animation using a minimum of four positions. Three or fewer positions can often appear a bit jerky, but using four or more steps will usually produce smoother looking animation. constant cColor = ",123,255,0,0" local pStops on runTracking if "runTracking" is not in pendingMessages() then set ink of \ grc "scanner4" to blendSrcOut if pStops = "" then put 0.0,0.2,0.4,0.0 into pStops put the fillGradient of grc "scanner4" into gradArray put gradArray["ramp"] into tRampData repeat with N = 1 to 4 put item N of pStops & cColor into line N of tRampData if N = 2 then put 255 into item 5 of line 2 of tRampData if item 1 of pStops >= 0.8 then put 255 into item 5 of line 4 \ of tRampData if item 1 of pStops = 1 then put 1 into item 1 of line 4 of \ tRampData if N < 4 then add 0.1 to item N of pStops if item N of pStops > 1 then put abs(1 - item N of pStops) into \ item N of pStops end repeat put tRampData into gradArray["ramp"] set the fillGradient of grc "scanner4" to gradArray if item 1 of pStops >= 1 then put "" into pStops send "runTracking" to me in 20 millisecs end runTracking Under The Hood - HALO (Hostile Artillery Locator)
Here we come to the last of our STD mechanisms: the HALO. This is a variation of RADAR 1 but, impressively, gradient animation is employed in 2 directions on a single graphic. The fillGradient points of the scanner are rotated clockwise, while the strokeGradient points are rotated counterclockwise.
# THE FOLLOWING CONSTANTS ALLOW YOU TO PROGRAM THE RADAR

constant sweepStartAngle = 350
constant sweepDelta = -10
constant sweepDelay = 10

# FOR BEST RESULTS, THE SWEEPDELTA SHOULD BE A NEGATIVE
# DIFFERENCE OF THE SWEEPSTARTANGLE
# (IE -3,357 OR -4,356 -5,355 OR -6,354, ETC.)
# HIGHER SWEEPDELTA RESULTS IN FASTER ROTATION

# LOWER DELAY (SWEEPDELAY) YIELDS SMOOTHER ROTATION
# BUT RESULTS IN HIGHER PROCESSOR USE


local pAngle1,pAngle2
on runTracking
   if pAngle1 = "" or pAngle1 < 0 then put sweepStartAngle into \
          pAngle1
   if pAngle2 = "" or pAngle2 < 0 then put sweepStartAngle into \
          pAngle2
   put the fillGradient of grc "scanner5" into fillArray
   put the strokeGradient of grc "scanner5" into strokeArray
   put item 1 of loc of grc "scanner5" into pXorigin
   put item 2 of loc of grc "scanner5" into pYorigin
   put height of grc "scanner5"/2 into pRadius
   put angleToLoc(pAngle1,pXorigin,pYorigin,pRadius) into \
          fillArray["via"]
   put angleToLoc(pAngle2,pXorigin,pYorigin,pRadius) into \
          strokeArray["via"]
   put pAngle1 into tempAngle1
   add 90 to tempAngle1
   put angleToLoc(tempAngle1,pXorigin,pYorigin,pRadius) into \
          fillArray["to"]
   put pAngle2 into tempAngle2
   add -90 to tempAngle2
   put angleToLoc(tempAngle2,pXorigin,pYorigin,pRadius) into \
          strokeArray["to"]
   lock screen
   set fillGradient of grc "scanner5" to fillArray
   set strokeGradient of grc "scanner5" to strokeArray
   unlock screen
   add sweepDelta to pAngle1
   add -sweepDelta to pAngle2
   send "runTracking" to me in sweepDelay millisecs
end runTracking
Get Tracking Using the techniques in this guide, you should now be able to build a wide array of Santa Tracking Devices using several types of detection. As you can see, there's lots of fun to be had with gradients and their properties. But regardless of which method you choose, make sure you use your tracker for purposes of "good". Santa does not take kindly to bad behavior and use of a tracker for nefarious purposes could earn you a visit from the "Men In Red" up North... Here's wishing you a healthy and happy holiday season!
| 


|