|
In the 10th issue of the newsletter, Heather and I talked about Salery and why Salery
would be a suitable applications for the U3 platform. I also promised to tell more about my experiences with developing for U3, as soon as Salery is ready. Economy-x-Talk
is currently beta testing the next release of Salery, which includes the version for U3 Smart Drives. The U3 company has been very kind and helpful testing the application
and giving advice. In fact, they have sent me a free U3 Smart Drive for testing. If you qualify as a
developer, you can get one yourself at u3.com. Revolution, too, was eager
to provide me with some additional
information that hasn't made it to the official documentation yet. I am very grateful to both U3 and Runtime Revolution for their help. We are now sure that Salery will be
certified for U3 Smart Drives very soon and I am ready to share my experiences with you.
So, why Salery for U3? Salery is typically one of those applications that you want to take with you, just like your e-mail, messenger and VoiP software. For those who
always have their laptop with them and always have a wireless internet connection available, and for those who work at home, we have a regular version that you can
install. If you are working in an office with flexible work places, though, you may be switching computers all the time and you need to have your work on a USB stick. If
you travel a lot and are a frequent user of internet cafés, you probably have your work on a USB stick, too. By putting your software on a U3 Smart Drive, you don't
only always have your files with you, but you can also easily protect sensitive information like your Salery password and financial information related to your sales.
To me, it seems that any application that is personal in one way or another is a good candidate for the U3 Smart Drive. Not just commercial software, but particularly
Revolution standalones created for your own personal use, because this is what you want to have with you all the time while you want to be sure that your personal data are
safe. Still, U3 is interesting for commercial developers as well, because it gives you access to a new distribution channel. If your software becomes certified, it will be
included in U3 Software Central, which provides you with an additional marketing instrument.
If you want your standalone to be fully U3 compatible and have it certified, you need to comply with a number of requirements. This article tells you how to fulfil
these requirements. While I worked on Economy-x-Talk's Salery web store software, I wrote down the steps necessary to make it U3 compatible and I am using my notes as a
guideline for the article. If you follow the instructions below, which we applied to Salery, you can be almost completely certain that your software will be certified,
too.
Below, only scripts that are directly related to U3 compatibility are included. Handlers that perform specific tasks such as reading and saving data files are not
included.
Requirements
Let's start with the end. To get a well-working application for U3 smart drives, the application should be able to quit without leaving any trace on the host computer.
If you look into the directory \System\Apps of your U3 drive, you will find a Data folder and an Exec folder as well a U3P file. When you start an application by choosing
it from the U3 Launch Pad, the two folders are copied to your hard disk and the U3P file is extracted. The contents of the U3P file is installed on your hard disk as well.
Additionally, while your application is running, you will want to be able to open files by double-clicking them. For this, you will have to include file information in the
registry of the computer. Under all circumstances, you will have to remove the files from the hard disk and delete the file information whenever the application quits or
the drive is removed. One more requirement for U3 applications is that no more than one instance of the application will run. Now that we know the requirements, we can
create our U3 compatible standalone.
Storing Preferences
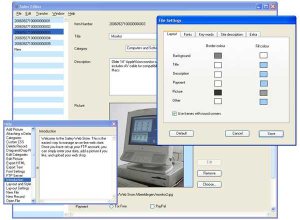
A feature that almost all applications including Salery need is a preferences files. Normally, you store this in a special folder of the hard disk, but a U3 compatible
application stores the preferences file in the directory \System\Apps\\Data where is a unique hexadecimal number. The trick is to make
sure that you store the preferences file in the correct directory, regardless of drive letter and user language. Revolution helps you with this by providing the path to
the application data folder in the variable $u3_app_data_path (Malte provides a simple script to retrieve all U3 variables in his article about
Revolution at IFA).
Salery
uses a function, which returns the correct path to the preferences file for each platform. This
function uses the following lines to return the path to the preferences file on the U3 drive.
function preferencesFile
put "file:" & $u3_app_data_path & slash & "Salery Preferences" into myFilePath
replace backslash with slash in myFilePath
return myFilePath
end preferencesFile
This makes it rather simple to store the preferences data:
on storePreferences thePrefsData
put preferencesFile() into myPrefs
open file myPrefs
write thePrefsData to file myPrefs
close file myPrefs
end storePreferences
Reading preferences is just as easy.
Setting File Associations
Salery uses files to store the descriptions of all items in the web store. Each application that uses files, should allow for opening these files by double-clicking
them or by choosing Open from Windows' File menu. To make this possible, we need to associate a file extension with the standalone. The file extension used by Salery is
".sal". For this purpose, Salery contains a handler that can be used by any other application. The handler is called setFileAssociations and takes three
parameters, the name of the application (Salery), the extension used by Salery (".sal") and the current location of the application.
The application name and the extension are obvious. The current location needs special attention. As I explained already, the U3P file is extracted when you choose an
application from the U3 Launch Pad and its files are stored on the hard disk. The path to the standalone is different from what you might expect. For instance, my PC
starts up from the D drive while most PCs start up from the C drive and the U3 standalone is stored on the startup disk when launched. Moreover, the U3 Launcher creates a
folder and uses the ID number of the U3 drive as the name for the folder. Inside that folder, another folder is created, for which the ID number of the application is used
as a name. It should be clear by now that the path to the standalone cannot be predicted, but the solution is simple: call the setFileAssociations handler using the
effective filename of the standalone. The preOpenStack script of Salery contains:
setFileAssociations "Salery",".sal",the effective filename of me
I will now discuss the setFileAssociations handler line by line. First, we make the location parameter understandable for Windows by replacing all slashes with
backslashes. Now, we are ready to create keys in the registry. First, we create a key in HKEY_CLASSES_ROOT which associates the file extension with the application name.
Second, we register a document description for the application name. Third, we tell Windows where to find the document icon for documents that have the ".sal"
extension. We also have to enter an icon ID number, which equals 1 in this case. Most icon editors for Windows will show you this icon number when you open an icon file or
extract an icon from an executable. Fourth, we enter a shell command, which is executed when a file is opened from within Windows. This shell command opens the standalone,
which resides at theLocation. The parameter %1 contains the file path and tells the standalone which file to open. If the standalone is U3 compatible, the shell command
needs another parameter "-u3start". This additional parameter should always come directly after the file path %1. If necessary, you can add more parameters after
"-u3start".
on setFileAssociations theAppName,theExtension,theLocation
replace slash with backslash in theLocation
get setRegistry("HKEY_CLASSES_ROOT\" & theExtension & "\",theAppName)
get setRegistry("HKEY_CLASSES_ROOT\" & theAppName & "\",theAppName && "document")
get setRegistry("HKEY_CLASSES_ROOT\" & theAppName & "\DefaultIcon\",theLocation & ",1")
get setRegistry("HKEY_CLASSES_ROOT\" & theAppName & "\shell\open\command\",theLocation && "%1 -u3start")
end setFileAssociations
When the U3 application quits or the drive is removed, we need to delete these registry keys again. The script to do this is rather straightforward.
When you choose an application from the U3 Launch Pad, the Launcher sends the -u3start parameter to the standalone. This way, the standalone knows that it is U3
compatible. However, when we open a file that is associated with the standalone, the U3 Launcher is not involved. Therefore, we need to send the parameter ourselves, using
the shell command that tells the standalone to open the file. By adding the parameter, the second instance of the standalone that is opened knows that it is U3 compatible
too and will look for the first running instance. We will deal with this later.
on deleteFileAssociations theAppname,theExtension
get deleteRegistry("HKEY_CLASSES_ROOT\" & theAppname & "\shell\open\command\")
get deleteRegistry("HKEY_CLASSES_ROOT\" & theAppName & "\DefaultIcon\")
get deleteRegistry("HKEY_CLASSES_ROOT\" & theAppName & "\")
get deleteRegistry("HKEY_CLASSES_ROOT\" & theExtension & "\")
end deleteFileAssociations
It is important to make sure that theAppname and theExtension contain exactly the same values when the setFileAssociations and deleteFileAssociations handlers are
called. Otherwise, the registry is not cleaned up correctly.
Handling U3 Actions
Now that we have scripts to save preferences and set file associations, it is time to use these scripts. We don't need to delete the preferences file or any other files
anymore, because the U3 environment takes care of that if the files are stored in the right place. We only need to make sure that preferences are saved before the
application quits and the application has to respond correctly to particular U3 actions.
The most important script of a well-functioning U3-compatible standalone is its startup script. Whenever a special U3 action is invoked, a new instance of the
standalone is started. Depending on the action, the startup handler of the standalone receives a special parameter. We use this parameter to determine what tasks need to
be performed. There are 5 parameters that need to be handled. The u3launch parameter tells the standalone to start up as a U3 application. If the startup message is
accompanied by this parameter, you should perform any additional set-up tasks and run the startup handler normally. The u3install parameter allows you to show license
conditions, for example. The u3configure parameter is sent with the startup message if the standalone is launched for the first time after installation on the U3 drive.
When this occurs, you might want to create an additional folder on the U3 drive for documents created with your application or perform any other task that needs to be done
before the application is actually used. Use the u3cleanup message for any task that should be performed right before the actual removal of the programme or drive. The
u3uninstall parameter indicates that you should ask the user whether s/he wants to remove any files and folders created by the application, if there are any.
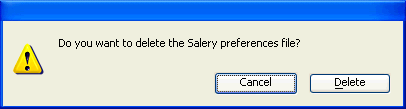
The u3uninstall parameter allows Salery to ask the user whether to delete the preferences file.
Following is a simplified version of the startUp handler used by Salery. First, it puts a boolean into the global variable gU3App. This makes it easy to determine
elsewhere in your stack that the U3 standalone has started normally, with the intention to use it rather than to install, uninstall or configure it. The quitSalery command
closes all stacks, stops externals and cancels pending messages before closing the mainstack and quitting the application.
on startUp theU3Environment
put (theU3Environment is "u3launch") into gU3App
if theU3Environment is "u3Install" then
lock messages
quitSalery
else if theU3Environment is "u3Uninstall" then
beep
answer warning "Do you want to delete the Salery preferences file?" with "Delete" or "Cancel"
lock messages
if it is "Delete" then deletePrefs
quitSalery
end if
end if
pass startUp
end startUp
As you can see, not all U3 actions are handled. Depending on the complexity of your application, you can decide to ignore actions by changing the settings in the
standalone builder. We will discuss this at the end of the article.
Ejecting the U3 Smart Drive
When the U3 drive is accidentally or deliberately disconnected from the computer, the u3eject message is sent. According to the U3 specifications, this should always
result in termination of the application. The tasks to be performed depend on a parameter that is sent with the u3eject message, which is either "physical" or
"safe". If the parameter is "safe", the programme should ask the user to save the current file, if a file is being edited.
Have a look at the script below. The saveInstantly command saves the current file, which may be located on the U3 drive. SaveTemp saves the current file to a temporary
location on the hard disk. This should not be the U3 folder in the Application Data folder of the current user, because the U3 folder will be deleted when the U3 Launcher
terminates.
on u3eject theType
deleteFileAssociations
if theType is "safe" then
saveInstantly
else
saveTemp
end if
quitSalery
end u3eject
You might include the deleteFileAssociations command in the first line of the u3eject script. You can also call the deleteFileAssociations script from the closeStack
handler of your stack, which is what Salery currently does.
Running a second instance
Now we need to explain more precisely what the -u3start parameter stored in the registry is for. When the standalone is started by the U3 Launcher, it receives a
command line parameter -u3start to let it know that it is running from a U3 drive. Without the parameter, it will think it is running as a regular non-U3 application. If a
standalone knows that it is launched from a U3 drive, it will search for another instance of the standalone. If it finds one, the second standalone will trigger the
relaunch message in the first instance of the standalone and it will forward the parameters it received when it was launched.
When we double-click a file, the shell command that was stored in the registry by the setFileAssociations script sends the filepath and the parameter -u3start to a new
instance of the standalone. The new instance searches for the first instance and forwards the file path to it. The relaunch message is triggered and will be accompanied by
a parameter containing the file path.
If you include a relaunch handler in your standalone, like the one below, the first instance of the standalone can read the file, while the second instance quits
without further notice.
on relaunch
if there is a file param(1) then
send ("readFile" && quote & param(1) & quote) to me" in 10 millisecs
end if
return empty
end relaunch
The first line of the relaunch handler checks for a valid file path. The second line runs a handler, called readFile, which reads the file. We use a send command
because we cannot let the relaunch handler wait. The relaunch handler has to finish first, before any other script invoked by it runs. We also have to make sure that the
relaunch script returns empty, because we want the second instance of the standalone to quit before it receives a startup message.
Adjusting the Standalone Application Settings
Now that we created all necessary scripts, we can adjust the Standalone Application Settings. You can set-up the Windows section of the standalones settings as usual.
If you have a document icon, click on the Choose button on the same row as the field labelled Document Icon. The script that associates your files with the standalones
will make sure that your icon will be used for your files. Then click on the checkbox labelled "Make U3 Compatible" and subsequently on the button saying
Advanced U3 Settings. Actually, these settings are not advanced but simply necessary. (In case you happen to have a U3 Prototyper, you no longer need this utility if you have
Revolution 2.7.3 or later.)
There is no need to change the GUID (Globally Unique IDentifier), since this is always unique, as you probably have guessed. You shouldn't delete this ID number,
though. If you want the application to start automatically, you can indicate this by clicking a checkbox. You might simply ignore this setting because it can be changed by
the U3 Program Manager. If you need to add files to your application that are not in the Copy Files section of the standalone, you can drag your files into the Data,
Device or Host field. This might be useful if you want to include documentation.
In the U3 Settings window, there are four U3 actions that can be enabled. If you disable all, the U3 Launcher still installs, uninstalls, configures and cleans up, but
it won't start up your standalone. If you enable any of the actions, you have to handle it and make sure that your standalone quits properly when done. This will not
happen automatically, you have to take care of it in your startup script, as shown above.
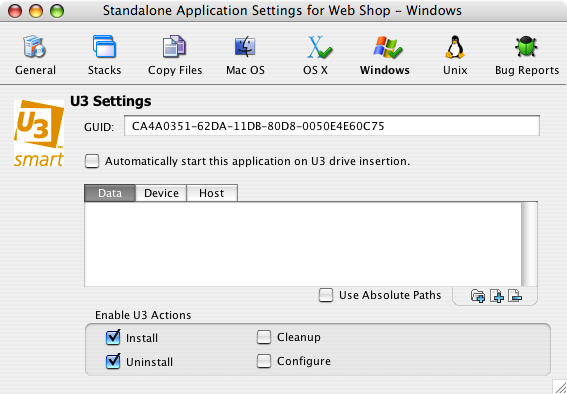
In the U3 Settings for Salery, we turned off the Cleanup and Configure actions.
After having changed the U3 setting correctly, you can click on the Windows logo on any of the other icons in the toolbar of the Standalone Application Settings if you
want to make more changes. When you close the Standalone Application Settings, all options are automatically stored in a custom property of your stack. The standalone
builder will create a U3P file for you.
Building and Installing
The stack is now ready to be built. Just build your standalone like you do with any other standalone. Now open the Program Manager from the U3 Launcher. In my U3
Launcher, there is a menu item Manage U3 Programs, which opens the Program Manager. In the bottom of the Program Manager, you will see a button called Add Programs, which
opens a menu. In this menu, choose Install from My Computer. Find your U3P file in the appearing file dialogue and open it. You can now watch the program Manager
installing your application. If you handled the u3Install parameter in the startup handler, it should run in a moment. When the Program Manager is ready, you can close it
and start your standalone by choosing it from the U3 Launch Pad. If your startup script handles the u3config parameter, it should run now. Next, the standalone will open
normally and you can use it like a regular Windows standalone application.
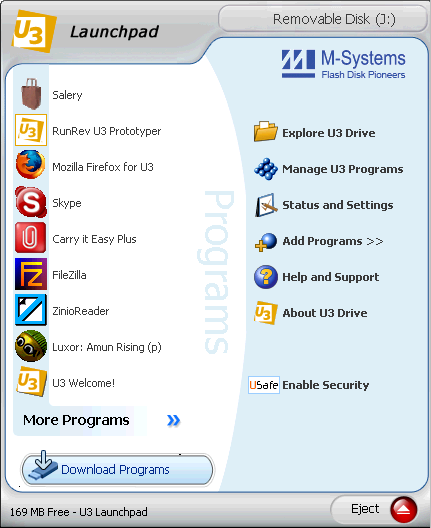
The launch pad with Salery installed.
Note
As stated in the article, Salery is currently in beta stage. You can download Salery at the special preview page and have a
look before the official release. Additional information can be found here. If you
have questions about this article, feel free to contact
the author. |