

Handling Web Forms with Rev
A simple server script that helps you process submissions painlessly
Web forms are everywhere. People use them for guest books, comments boxes, event registration, and many other purposes. If you're going to accomplish anything serious on the web, you'll eventually want to incorporate a form into your site.
Yet even if you know HTML, forms can be a bit confusing, because they interact with the server in a way that static HTML pages do not. A visitor types something into a field, chooses an item from a popup menu, and then clicks a button to send the information to the server. What happens then?
Well, a functioning form always works in conjunction with a program, residing on the Web server, which receives the information and does something with it. The program can do any number of things, such as checking the input for valid content, adding the content to a database, sending an email, showing a confirmation page, or all of the above.
Now, a lot of programs are out there already, based on Perl or PHP, which handle forms. But a lot of them are either too simple and don't do what you need, or too complex and would take hours to understand. Modifying them can be hit-or-miss if you don't know the language they're written in.
In this article, I'm going to show you how to use Revolution to accept input from forms and enjoy the benefits of using a language you already know to write functional server software.
Forms in HTML
A comprehensive discussion of HTML forms syntax could take several pages, so I'm just going to start with the basics here. Fortunately, most web authoring software (like FrontPage, Dreamweaver, etc.) make the construction of a form easy as pie. You probably have one of these tools lying around, and if you don't there's a bunch of free ones on the web, so just use that to build your form. At some point, though, you'll need to understand how the HTML is set up, so it helps if you've used HTML before. I'll use a simple example to highlight the most relevant aspects of a web form.
Here's a form you might encounter in a Web browser:
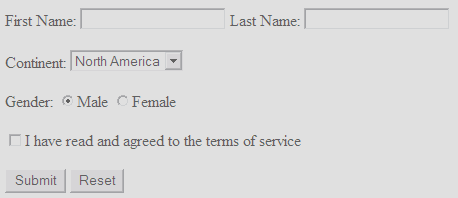
Basic Web Form
And here is the HTML code that produces the form above:
<form method="" action="">
	<p>First Name: <input type="text" name="fname" size="20">
	   Last Name: <input type="text" name="lname" size="20"></p>
	<p>Continent: <select size="1" name="cont">
			<option value="1">North America</option>
			<option value="2">South America</option>
			<option value="3">Europe</option>
			<option value="4">Africa</option>
			<option value="5">Asia</option>
			<option value="6">Australia</option>
			<option value="7">Antarctica</option>
		</select></p>
	<p>Gender:
		<input type="radio" value="m" name="gender" checked>Male
		<input type="radio" value="f" name="gender">Female</p>
	<p><input type="checkbox" name="agreed" value="YES">
		I have read and agreed to the terms of service</p>
	<p><input type="submit" value="Submit" name="submit">
	   <input type="reset" value="Reset" name="reset"></p>
</form>
The form consists of two input fields, a drop-down Option menu, two radio buttons, a check box, and two buttons. Note the following characteristics:
- the entire form is enclosed by <form>...</form> tags
- within the form block, there are several <input> tags
- each input tag has a "type" attribute which defines its appearance
- each input tag has a "name" attribute
- some input tags have a "value" attribute
- the Option menu is defined by a <select> tag, with <option> tags nested within
- the form tag has two undefined attributes: the method, and the action
The Method
Web pages use one of two technical protocols to communicate with a server. The POST method and the GET method. The GET method was designed primarily to query a database or otherwise retrieve information from a server without changing any data. The POST method was designed to upload new information that would eventually get stored or acted upon, for example when populating a database or sending email. From a functional point of view, GET puts the information supplied by the end user into URL format and sends it to the server identically to a webpage request. While POST opens a connection and uploads the information as a burst of data in a specific format.
Because the GET method is a little bit more "visible" and straightforward to process, we'll work with this method first, even though the sample form as presented here more resembles a data entry situation than a search.
The Action
The action attribute of the form tag simply specifies the program which will handle the form submission, whichever method is specified. This will be your Revolution server script.
Attributes of Form Elements
You'll notice that every element of the form, whether it's an "input" type or a "select" type, has a "name" attribute. Think of this as analogous to field names in a database, or names of variables in Revolution. It's simply the label of the box you're putting the input into. It's a good idea to stick with only letters, numbers, and underscores when naming your fields, even though HTML allows other characters, it's more readable and avoids potential problems.
The elements of a form which are buttons and menus have a "value" attribute. This is what selecting that button will place into the field name you've specified. For example, if the user clicks the "I have read and agreed..." check box, then the field "agreed" will have the value "YES," otherwise it will be empty.
The two radio buttons, you notice, have the same name, "gender." This not only tells the browser that these radio buttons are in the same group (and therefore mutually exclusive, checking one disables the other), but put the appropriate value "m" or "f" into the gender field. The attribute "checked" indicates the default, preselected button.
The options for the "Continent" drop-down menu each have a value associated with them, too. This means that when a user chooses "Europe" from the menu, the number 3 will be sent to the server, not the text "Europe."
The two text input fields we have in this sample form do not have a "value" attribute; that's because their value will be determined by what the user enters into those fields at submission time.
Submitting the Form
Now that we have some idea of how the form is organizing the information within itself, we can look at how the data will be submitted to the server. Again, the GET method composes a URL that embeds the information. The structure of that URL is:
web address ? name 1 = value 1 & name2 = value 2 & name 3 = value3...
The question mark indicates the beginning of the URL parameters, which are a series of name/value pairs separated by ampersands... one pair for each field in the form. The web browser automatically encodes the data to conform to proper URL standards (for example converting spaces to "+" signs), and then sends it along to the server program you specified in the action attribute of the form.
For example, if a user submitted a form
- hosted at www.ex.com/reg
- with the GET method
- the action ez-reg.cgi
- First name: Al
- Last Name: Smith
- Continent: Europe
- Gender: Male
- And agreed to the terms of use
The form tag would read
<form method="GET" action="ez-reg.cgi">
And the resulting URL after the user submission would be
http://www.ex.com/reg/ez-reg.cgi?fname=Al&lname=Smith&cont=3&gender=m&agreed=YES
Perhaps you can already see why POST is preferred for uploading data. For one, the URL is sent in clear text and shows up in Web server logs, etc. Second, it's not difficult to wind up with extremely long URLS this way. Nevertheless, it's an obvious format that is easily handled in your Revolution script.
The Revolution Server Script
For the next step, you'll need to have Revolution set up on a web server. If anyone asks you, "how do you set up Rev on a web server?" you can say, "Oh just drop the standalone engine up there and set the permissions." This will make you sound like a hip marketing person. Or, you can refer them to one of the excellent newsletter articles on this topic by Jacqueline Landman-Gay, such as this one. Seriously though, if you're using a properly-configured, Revolution-friendly hosting provider like Dreamhost, it's just about that easy. Otherwise, delve into Jacquie's article and website for the nitty-gritty. Needless to say, installing the engine and the basics of uploading Revolution CGIs is beyond the scope of this article.
However, once you have Revolution installed on your server and successfully tested a "Hello World" CGI script, you're ready to tackle something really useful and not too difficult, like a script that handles form input.
We have four fundamental tasks to perform with our sever form-handler script:
- Retrieve the data submitted via the form
- Transform it into a usable format
- Send an email with the form data to someone who will act on it
- Display a confirmation page to the web page user
In an ideal world, it will be more complicated. You could wish to validate the data and give users an opportunity to correct mistakes. You might want to post the validated data to a database. You'll definitely want to use the POST method. We'll cover these topics in subsequent articles; for now these four steps will be rewarding enough.
Retrieving the Submitted Data
Believe it or not, this is the easy part. When the Web server calls your script as a result of the form submission, Revolution will already have obtained some important bits of information about the environment in which it is running. These are stored in special variables called "environment variables" which are available even when running on the desktop. You'll see them if you open the Variable Watcher; they all begin with "$." One of the environment variables holds the parameters of the URL which summoned your script. That variable is:
$QUERY_STRING
Remember how "GET" was designed for querying databases? Well, when your script starts up, all that stuff in the URL now lives in the "query string," ready for you to act upon it.
Transforming the Query String
This is the second-easiest part. It really all depends on what you'll ultimately want to do with the data, but my objective is just to send an email out with the form submission details in a readable format. Here's a code snippet that generates something that could easily be copied and pasted into Revolution or a spreadsheet program:
put $QUERY_STRING into x
replace "&" with return in x
replace "=" with tab in x
put urlDecode(x) into x
Pretty nice, eh? Revolution already provides a function to descramble any transformations done to the text entry to make it URL-compatible. These lines transform x into two columns with the field names on the left and their values on the right.Now I know some people will immediately think of arrays and using the split command. Those fancy pants probably already know how to do this stuff.Sending an Email
Oh, this one is a little bit trickier. You might be familiar with the revMail command in the desktop IDE. But that opens up the user's desktop email client. No such luxury on headless Web servers. Instead, we have "sendmail" to work with.Sendmail is a true workhorse of the Internet. It's simple to work with, easy syntax. All we need to do is to open a conversation with it and ask nicely. I'm going to save you weeks of exhausting research and provide a bare-bones sendmail handler for Rev server scripts right here:
on mailMe theMsg
put "/usr/sbin/sendmail -t" into mailProc
open process mailProc for write
write "From: joe@user.com" & return to process mailProc
write "To: joe@user.com" & return to process mailProc
write "Subject: Form Stuff" & return & return to process mailProc
write theMsg & return to process mailProc
close process mailProc
wait until the openprocesses is empty
end mailMe
So there you have it. Open a process to sendmail, feed it the from, to, subject, and message text, close the connection, and wait till the buffer is cleared. The magic format? plain-English labels for each header item, a space after the colon, and a blank line between the headers and message text. Done.Feedback to the User
Okay, this is the hardest part. When the user clicks the Submit button, they're going to expect something to happen. A blank page probably won't do. At a minimum, you'll want to have something like, "Thanks for your input" and a button to take them somewhere.Now, for this we need the server — specifically, your script — to spit out a nicely formatted HTML page. It's not like desktop Revolution, either, where you can just say, "put myHTML" and have it show up in the message box. No, Web browsers expect some header information and of course, HTML tags.The minimal header information looks something like this:
Content-Type: text/html
Content-Length: XXXX
Where XXXX is the actual number of bytes you're going to send to the Web browser. Therefore we have some "sub-tasks" to perform with respect to giving user feedback:
- Build an HTML pageDecide what we're going to tell the user. Are we going to have any dynamic elements? For example, "Thank you, {First Name} for your response"? If so we'll need to fill in the placeholders with the information from the form.
- Persuade Revolution to send the page to the web browser with the proper headers.
For the purposes of this example, I'm going to keep things REAL simple. All I want is a simple message, "Thanks for your response, {First Name}. Click here to continue." Where "here" is a hyperlink to the home page of the site.Now, I could get real fancy and put an HTML file in the same directory as the form script, then read that file in, massage it, and spit out the merged page with the header info. But instead, I'm going with the "brute force" method and baking the HTML right into my solution.
put "<HTML><HEAD></HEAD><BODY>" after thePage
put "<p>Thanks for your response, {First Name}.</p>" after thePage
put "<p>Click {here} to continue.</p>" after thePage
put "</BODY></HTML>" after thePage
-- fill in the First Name
set the itemdelimiter to tab
replace "{First Name}" with item 2 of line 1 of x in thePage
-- fill in the URL Link
replace "{here}" with "<a href=~http://ex.com~>here</a>" in thePage
replace "~" with quote in thePage
put "Content-Type: text/html" & return
put "Content-Length:" & the length of thePage & return & return
put thePage
What does the whole script look like?
#!rev3 -ui
on startUp
put $QUERY_STRING into x
replace "&" with return in x
replace "=" with tab in x
put urlDecode(x) into x
mailMe x
-- Construct HTML result page
put "<HTML><HEAD></HEAD><BODY>" after thePage
put "<p>Thanks for your response, {First Name}.</p>" after thePage
put "<p>Click {here} to continue.</p>" after thePage
put "</BODY></HTML>" after thePage
-- fill in the First Name
set the itemdelimiter to tab
replace "{First Name}" with item 2 of line 1 of x in thePage
-- fill in the URL Link
replace "{here}" with "<a href=~http://ex.com~>here</a>" \
in thePage
replace "~" with quote in thePage
-- write the headers & the page content
put "Content-Type: text/html" & return
put "Content-Length:" & the length of thePage & return & return
put thePage
end startUp
on mailMe theMsg
put "/usr/sbin/sendmail -t" into mailProc
open process mailProc for write
write "From: joe@user.com" & return to process mailProc
write "To: joe@user.com" & return to process mailProc
write "Subject: Form Stuff" & return & return to process mailProc
write theMsg & return to process mailProc
close process mailProc
wait until the openprocesses is empty
end mailMe
That wasn't too hard, was it?
|


