| Issue 114 | July 15th 2011 | Contact the Editor | How to Contribute |
|
| ||
|
Distribute for Android This lesson describes how to sign an Android application and deploy it to an Android device. Two signing methods are described and screen captures are provided. IntroductionIn order to release an Android application, it first needs to be signed with a digital signature. This lesson guides you through two ways of signing your application and launching it on an Android device. Note: This lesson requires LiveCode 4.6.2 (dp1) or later. Consider Signing StrategiesBefore signing your application for release, you should be familiar with the implications that certain signing strategies can have on the future development of your application or group of applications. If you are only planning to release one application and do not plan to provide updates, then this is something you do not have to concern yourself with in too much depth. If you plan to create and update your application, wish to develop applications that communicate with each other or share information, then you should consider signing all of your applications with the same certificate. Note: Refer to the Android website for further information on signing strategies and signing requirements. Getting a Self-Signed CertificateThe self-signed certificate is essentially the key you need in order to sign your application. Generating a key is not covered in this lesson, but you can get further information on creating your own private key in lesson: How do I Create a Self-Signed Certificate for an Android App? That lesson runs you through the basics of finding the required key generation tools on your machine and creating a key that could be used to sign your application. Saving and Signing your Standalone ApplicationThere are fundamentally two ways to create a signed application for deployment to Android devices: 1. Save as standalone with reference to the .keystore file. These two approaches achieve the same objective, but there are variations in the steps involved. You can try both and test which method is best suited to your development environment. Saving and Signing your Standalone Application (option 1)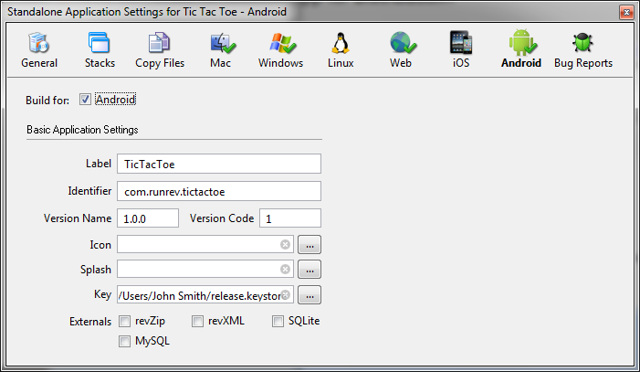
The easiest way to save and sign your standalone application is by allowing the Standalone Builder to sign your application for you. Follow the standard steps for building a standalone Android application in the LiveCode IDE but include the location of the .keystore file in your Key path, as is shown in the figure of this step. Once you select Save as Standalone Application... you are prompted to specify a location into which to save your application. The generation process then builds your application and prompts you further for information required by the signing process. This is the alias that you specified when creating the key, the .keystore password and the private key password. The saved application is now signed and ready to be deployed to Android devices. Saving your Standalone Application (option 2)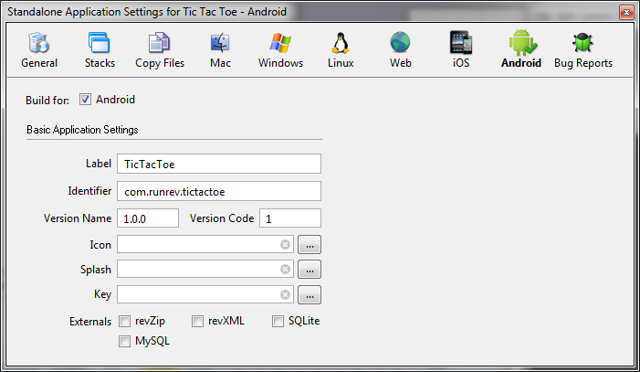
The second way to sign your application is by following the standard steps for building a standalone Android application in the LiveCode IDE but without including the location of the .keystore file in your Key path, as is shown in the figure of this step. Once you select Save as Standalone Application... you are prompted to specify a location into which to save your application. The saved application is functionally complete, but it has not yet been signed and will not run on Android devices. You now need to sign the application manually. Signing your Standalone Application with Jarsigner (option 2)
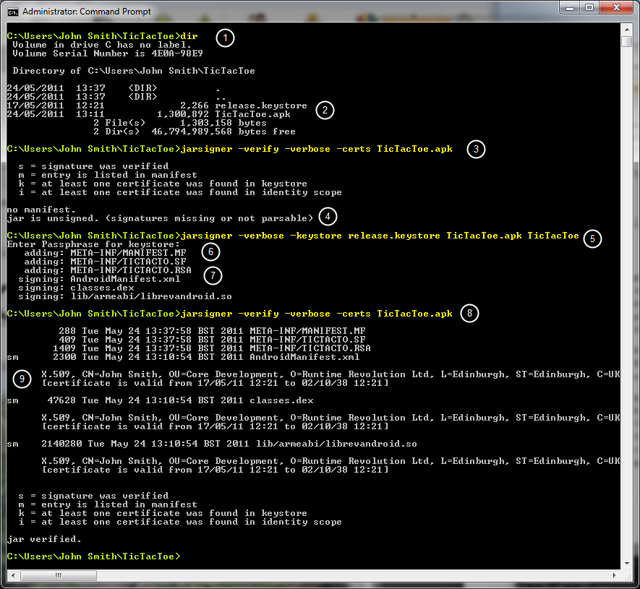
Click the image to zoom You can sign your application using jarsigner. This is a command line application that comes with your Java installation. If you were able to follow lesson: How do I Create a Self-Signed Certificate for an Android App? then you should now have access to jarsigner on your machine. The screen capture shown in this step provides you with an example of signing an application and then testing the signature to ensure that the correct signature was applied. The prompt is colored in green and the commands entered are colored in yellow. The sequence of commands used is for demonstration purposes and you will not need all of them to complete the signing process: 1. First determine that the required files are in the directory from which you are
Loading the Application onto a DeviceIf your device has access to the Android Market, you can download a signed application to your Android device and run it, using a USB cable. Note: Some service providers do not allow you to access the Android Market and request the device manufacturers to disable that facility. Download a file manager application from the Android Market and use that to download your signed application from the file system of your development machine. Then select the application you downloaded, allowing your Android device to install it. Note: An application that was not signed will not install on your Android device. Android MarketAndroid applications can be loaded onto your own device as described in this lesson. You can also distribute your applications to other users from your own website or through the Android Market. The Android Market provides features for you to manage your applications and provide updates, if needed. There are also means by which to license or charge for your applications. Information on how to release your applications to the Android Market can be found here: http://developer.android.com/guide/publishing/publishing.html.
| 

 Tweet
Tweet
|