

Localizing Your Software
How to use NativeSpeak to create consistent interfaces and localize applications
Introduction
This tutorial series will enable you to create your first application with Revolution and NativeSpeak. You can download the linked stack here.
Why use NativeSpeak?
An application using NativeSpeak can be localized easily, is faster to write and will have the best look and feel under all platforms.
Application using NativeSpeak
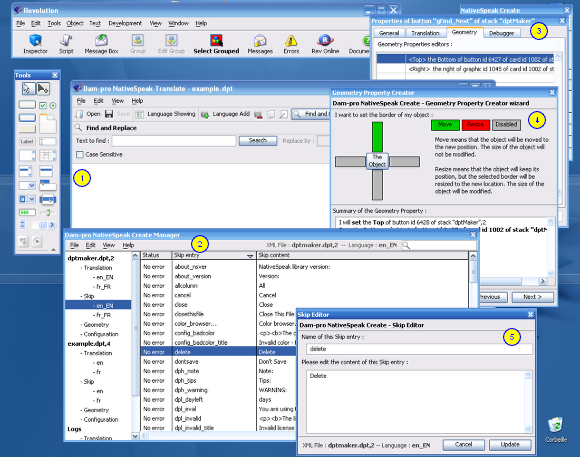
1: NativeSpeak Translate
2: The NativeSpeak Manager
3: The NativeSpeak property inspector under the Geometry Management tab.
4: Editing a geometry property.
5: Modifying the content of a NativeSpeak "Skip". (A text not linked with an object).
At Dam-pro, we use NativeSpeak all the time, which means that we understand the needs of you, the customer, from the inside.
When you know how use NativeSpeak, you'll find it an excellent method to develop big projects efficiently. We used NativeSpeak Create to produce NativeSpeak Translate, the translation tool part of the package, which allows a native speaker to do the translation of your applications' interface.
Requirements
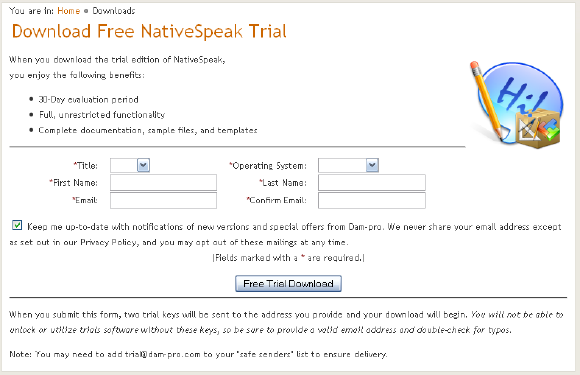
In order to do this tutorial, you must have NativeSpeak Create. NativeSpeak Create is free for 30 days, just fill in the fields and click Free Trial Download.
Click here to request a NativeSpeak Create key and download NativeSpeak Create.
NativeSpeak requires Revolution 2.8.1 or greater.
First contact
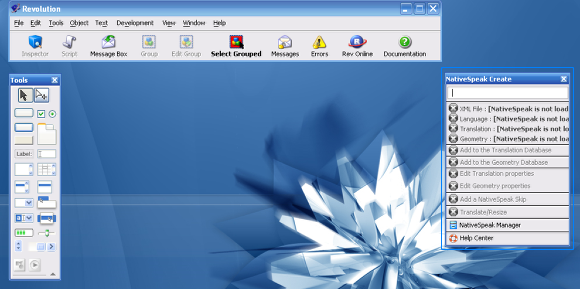
Once you enter your license key and restart Revolution, the NativeSpeak Create palette will appear.
So now we are ready to get started.
NativeSpeak implementation
How to make your application using NativeSpeak. This is the most complicated part of NativeSpeak. If we start by getting it out of the way, later on you will understand the productivity improvements using this program will bring you.
Two methods to implement NativeSpeak
NativeSpeak can be implemented in two ways:
- The Built-In way.
NativeSpeak is bundled inside the application including translation files. It is a good method for small and medium sized applications.
Using this method enables the developer to create a single executable file on Windows/Linux. For example, the NativeSpeak installer uses this method.
- The external way.
The external way is to not bundle NativeSpeak inside your application, but use external files. This is best for large applications that use just the executable file as stack loader. NativeSpeak Translate uses this method.
In this tutorial we will use the Built-in method.
Stack Creation
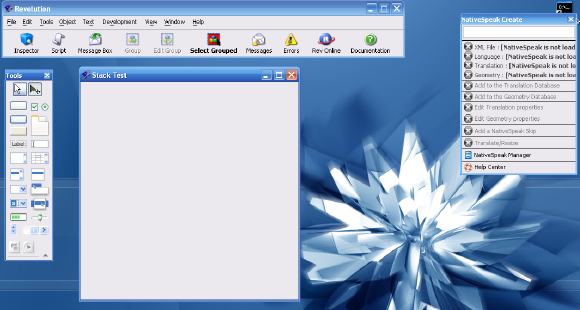
First, you need a stack. Create an empty stack and set its name. The stack name is an important thing.
Note: If you rename your stack later, you will have to tell NativeSpeak that you have renamed this stack.
In this tutorial, the name of this stack is "test" and its label is "Stack Test".
Opening the NativeSpeak Library
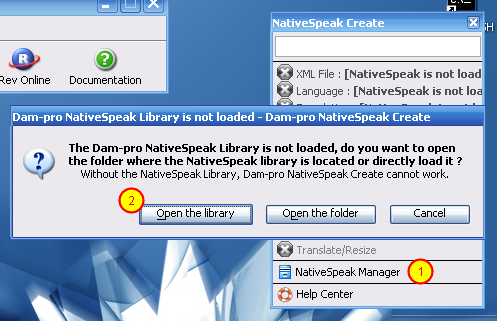
Next you need to open the NativeSpeak Library. To do this, click on "NativeSpeak Manager" (1), then click "Open the library" (2).
Opening the NativeSpeak Library - 2
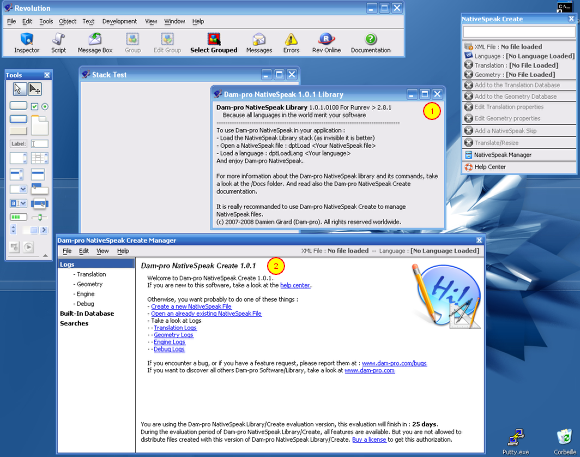
Once the NativeSpeak Library loaded (1), the NativeSpeak Create manager (2) is shown. You can close the manager, as we will not use it immediately.
Including the NativeSpeak library inside our main stack
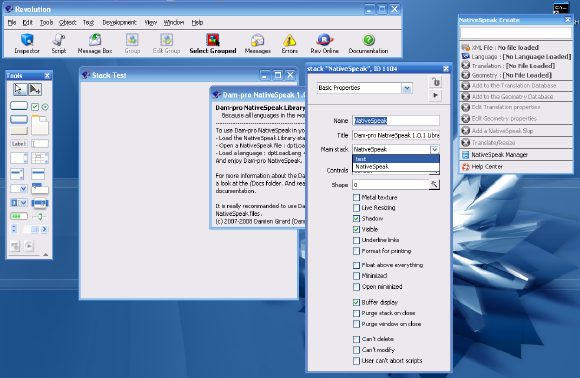
Bring up Revolutions Property Inspector by double clicking the stack, then edit the properties of the stack "NativeSpeak", to set the mainstack of the stack "NativeSpeak" to "Test".
You can use also the following command in the message box:
set the mainstack of stack "NativeSpeak" to "Test"
Once you have done that, you can safely close the "NativeSpeak" stack. (The closestackrequest of the stack "NativeSpeak" hides just the NativeSpeak window.)
Setting up scripts of the stack "Test" in order to use NativeSpeak
NativeSpeak Create has an automatic script generator to help you implement NativeSpeak faster.
The script generator creates a "bugged" script that enables you to find quickly what you need to modify in order to make it work.
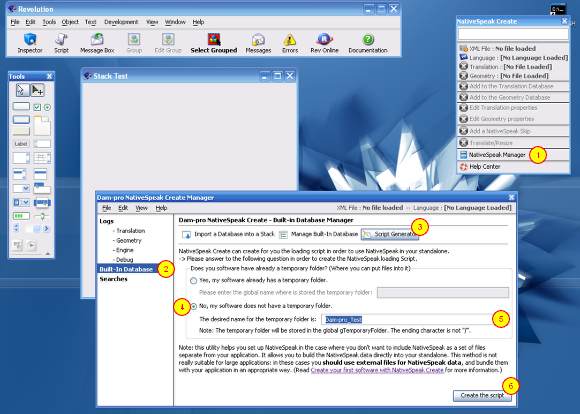
To generate a script, open the NativeSpeak Manager (1), then click on "Build-In Database" and then "Script Generator".
You have now to select one option (4). The first one is for an already existing application that already has a temporary folder and uses it. Our application is new, so select (4) "No, my software does not have a temporary folder." In the field (5), you need to enter the name of the desired temporary folder. It is a good method to set it to "<Your company>_<Your application name>[_<Application version>]"
Here, I chose "Dam-pro_Test".
Now, you only need to click "Create the script" (6).
Adapt the generated script for your application
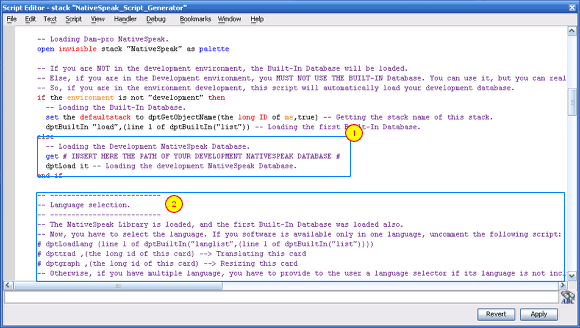
The generated script is highly commented.
The first things you have to do is to modify the line "get # INSERT HERE THE PATH OF YOUR DEVELOPMENT NATIVESPEAK DATABASE #" (1) This line is here because IT IS NOT RECOMMENDED TO WORK WITH ONLY BUILT-IN DATABASES. You can easily lose your work by using an incorrect command.
This is where you write the path of the development databases. Inside the Revolution environment, the application will work automatically with this file. As a standalone, it will load the "Built-In" database.
Here is an example of the path for your NativeSpeak Database:
set the itemdel to "/"
get (item 1 to -2 of the filename of me) &"/test.dpt"
set the itemdel to ","
Note: The NativeSpeak Database that you will create later must be set in the location defined previously.
Next, you need to choose how the user will select languages. NativeSpeak Create provides a template that enables your users to select languages. To open it, launch the following script in the message box:
set the itemdel to "/"
get item 1 to -2 of the filename of stack \
"rev_NativeSpeak_Toolbar"
put "/NativeSpeak.res/Library/Gui_Example/langChooser.rev" \
after it
open stack it
And now we will set it as substack of stack "Test".
set the mainstack of stack "langChooser" to "Test"
# if dptGetLang() is not among the lines of dptLangList("true") then
# -- Showing the language selector.
	Later your language selector will have to execute this script:
# -- call "FinishLoading" of me
# -- The "FinishLoading" handler will translate/resize this software.
# else
# dptLoadLang dptGetLang() -- Loading the language.
# call "FinishLoading" of me -- Finishing the loading of your software.
# end if
By:
if dptGetLang() is not among the lines of dptLangList("true") \
then
   -- Showing the language selector. After your language
   -- selector will have to execute this script:
   open stack "langChooser"
   set the label of btn "Cancel" of stack "langChooser" to \
   "Quit"
-- Check out the script of btn "Cancel"
-- of stack "langChooser" to understand that.
   show stack "langChooser"
else
   dptLoadLang dptGetLang() -- Loading the language.
   call "FinishLoading" of me -- Finishing the loading of your \
   software.
end if
Edit now the script of the button "OK" of stack "langchooser".
edit the script of btn "OK" or stack "langchooser"
And modify the following script:
# Store the language choosed here #
# The language code is stored in the it variable #
By:
dptLoadLang it
And modify also:
# Call here the loading handler of your software to finish it's
# loading #
By:
call "FinishLoading" of stack "test"
Save everything. Now you are ready to use NativeSpeak!
The hardest part of this tutorial is over. In the next section, we will start to use the NativeSpeak power.


 | The Dawning of a Brand New Array |
| Localizing Your Software |
| The White Wall |
| FileMaker Pro to Revolution Conversion Procedure |

