| Issue 96 | July 7th 2010 | Contact the Editor | How to Contribute |
|
| ||
|
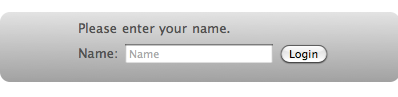
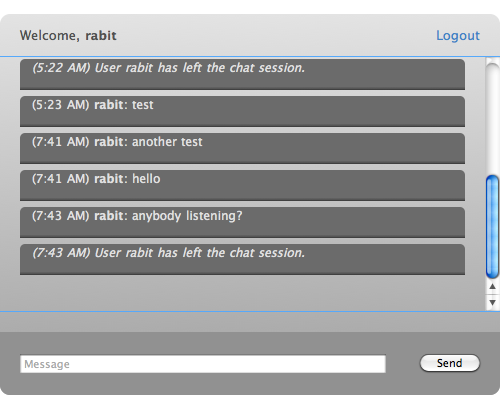
Build dynamic webpages with revIgniter Introduction Using a Model-View-Controller approach, revIgniter allows great separation between logic and presentation. This means your web pages can contain nice clean HTML with minimal revTalk code since the presentation is separate from the revTalk scripting. Tutorial The Chat consists of a Login page, where you enter a name:
and the Chat page with a list of messages and an input field.
In order to accomplish this we need the following files and a database table: • a controller named "chat.irev", the file, that will be associated with the URI. Note: The CSS file (chat.css) used with this tutorial and a database dump are included in the zip file provided for download. Controller Consider this URI: In the above example, revIgniter would attempt to find a controller named chat.irev and load it. When a controller's name matches the first segment of a URI, it will be loaded. The second segment of the URI determines which handler in the controller gets called. The "index" handler is always loaded by default if the second segment of the URI is empty. Controller scripts are stored in your application/controllers/ folder. Our controller consists of two handlers commonly used in revIgniter controllers and three additional ones. The first handler "chat" is named after the file itself and is called before any other handler. It loads all required libraries, helpers and plugins plus models and the database if needed. Don't forget to call this handler at the end of the controller script. The second handler, named index, is the default handler, which is mandatory. This handler is called automatically if no other handler is specified in the URI. Further we need a handler, which adds new messages to the database, a handler, which gets all the messages and displays them, and finally a logout handler, which ends the chat, destroys the session data and reopens the login page. We start with the basic prototype for a controller script: <?rev # DECLARE GLOBAL VARIABLES gControllerHandlers AND gData global gControllerHandlers, gData # PUT YOUR METHOD NAMES INTO THE GLOBAL gControllerHandlers AS # A COMMA SEPARATED LIST put "index,chat" into gControllerHandlers # THE CONTROLLER HANDLER command chat # LOAD REQUIRED LIBRAIES, MODELS, HELPERS, PLUGINS end chat # THE DEFAULT HANDLER command index -- do something here end index # CALL THE CONTROLLER HANDLER chat --| END OF chat.irev --| Location: ./system/application/controllers/chat.irev -- ---------------------------------------------------------------------- Save this script as "chat.irev" in system/application/controllers. This controller is associated with an URI like this: example.com/index.irev/chat/ or, if you use a .htaccess file with appropriate mod_rewrite rules to remove index.irev: example.com/chat/ (read about revIgniter URLs in the User Guide). As you can see, URLs in revIgniter are designed to be search-engine and human friendly. The controller handler "chat" is called first. So, this is a good place to load required libraries, helpers, plugins, models and the database. As we don't want page redraws while sending new chat messages we use Ajax requests and therefore load the Jquery library:
rigLoaderLoadLibrary "Jquery"
To store the user name, so that all messages will be sent with the associated name, we will use a cookie-based session. So we need the Session library:
rigLoaderLoadLibrary "Session"
Now load the database. Note: If the function does not contain any information in the first parameter it will connect to the group specified in your database config file (database.irev). For most people, this is the preferred method of use. Make sure that all these settings are correct, that gActiveRecord is set to TRUE and that your database contains the "chat" table. Add the following line to the chat handler: get rigLoadDatabase() Further we will need the Asset helper to generate javascript and css location html code:
rigLoadHelper "asset"
So far we have not built the model, but we include it here anyway and write the corresponding code afterwards:
rigLoadModel "chatmodel"
Finally we save the page title in the global variable gData. If, in the view, enclosed in double square brackets, like [[gData["pageTitle"] ]], the values of this array will be automatically combined with the view:
rigLoadModel "chatmodel"
Your chat handler should now look like this: command chat rigLoaderLoadLibrary "Jquery" rigLoaderLoadLibrary "Session" get rigLoadDatabase() rigLoadHelper "asset" rigLoadModel "chatmodel" put "revIgniter Chat Application Tutorial" into \ gData["pageTitle"] end chat If no handler is specified in the URI the default handler index is called. This is the handler which does all the work when the page is loaded the first time. With this handler we check if either the user sent a name via the login form or if there is an item "name" in the session data. Insert the following code into the index handler: if rigSessUserdata("name") <> FALSE then put rigSessUserdata("name") into gData["user"] put FALSE into tLogin else put rigVarPost("name", TRUE) into tPOSTname if tPOSTname <> FALSE then rigSetSessUserdata "name", tPOSTname put tPOSTname into gData["user"] put FALSE into tLogin else put TRUE into tLogin end if end if If there is an item "name" in the session data we save the name in the global variable gData and set a flag to skip the Login page and to load the Chat page instead. If the item "name" is missing in the session data we check if the user sent a name via the login form. This is done with the help of the rigVarPost function. Note: revIgniter comes with a Cross Site Scripting Hack prevention filter which can either run automatically to filter all POST and COOKIE data that is encountered, or you can run it on a per item basis. In this case the filter is called by setting the second parameter of rigVarPost() to "TRUE". If the POST data contains a value for "name" we save it in the session data as well as in the global variable gData and set a flag to load the Chat page, otherwise we set a flag to load the Login page. As indicated above we use jQuery to do the Ajax requests. It is beyond the scope of this tutorial to explain the following statements, which build the jQuery part, in detail. So, if you would like to get more information please read about the Jquery library in the User Guide. Basically the code below implements: • an Ajax request named "loadMessages" to load the messages list without refreshing the page, without caching as it is updated with every new message and those updates should be reflected if tLogin is FALSE then # USER SENT A NAME rigJQopen # LOAD MESSAGES rigJQfunctionOpen "loadMessages" rigJQvar "previousScroll," & rigJQgetR("'#chatbody'", "attr" \ , "'scrollHeight'") put "chat/view" into tAjax["url"] put "false" into tAjax["cache"] put rigJQsetR("'#chatbody'", "html", "data") & \ rigJQvarR("currentScroll," & rigJQgetR("'#chatbody'", \ "attr", "'scrollHeight'")) & \ rigJQconditionR("currentScroll > previousScroll", \ rigJQanimateR("'#chatbody'", "scrollTop: currentScroll",\ "'normal'")) into tAjax["success"] rigJQajax tAjax rigJQcb # ADD MESSAGE TO MESSAGES LIST rigJQeventOpen "'#submitbtn'", "'click'", TRUE rigJQxhRequest "post", "chat/addmsg", "userinput:" && \ rigJQgetR("'#userinput'", "attr", "'value'") rigJQset "'#userinput'", "attr", "'value', ''" rigJQeventClose # LOGOUT rigJQeventOpen "'#logout'", "'click'" rigJQvar \ "logout,confirm('Are you sure you want to end the chat session?');" rigJQcondition "logout==true", "window.location = 'logout';" rigJQeventClose rigJQaddStatement "setInterval (loadMessages, 2500);" # THE FOLLOWING COMMAND RETURNS THE JQUERY SCRIPT rigJQclose put the result into gData["JQscript"] # GET DATA FROM DATABASE put getMsgData() into gData["msgList"] end if The last statement gets the messages list from the database with the help of the getMsgData function. This function needs to be implemented in the model later. We need to make sure, that the page will not be cached. So, we set a server header, which the Output library will send for you when outputting the final rendered display. Add the following line to the index handler:
rigSetHeader "Cache-Control: no-cache"
All that is left to do is to load the view files, which we will build later. As mentioned earlier we split the page into view files, which represent the header, the content and the footer. Header and footer are identical as to the Login page and the Chat page. The content is different. So, if there is no user name specified, we load the login content, otherwise the chat content: get rigLoadView("chatheader") if tLogin is TRUE then get rigLoadView("chatlogin") else get rigLoadView("chatcontent") end if get rigLoadView("chatfooter") Your index handler should now look like this: command index if rigSessUserdata("name") <> FALSE then put rigSessUserdata("name") into gData["user"] put FALSE into tLogin else put rigVarPost("name", TRUE) into tPOSTname if tPOSTname <> FALSE then rigSetSessUserdata "name", tPOSTname put tPOSTname into gData["user"] put FALSE into tLogin else put TRUE into tLogin end if end if if tLogin is FALSE then rigJQopen rigJQfunctionOpen "loadMessages" rigJQvar "previousScroll," & rigJQgetR("'#chatbody'", \ "attr", "'scrollHeight'") put "chat/view" into tAjax["url"] put "false" into tAjax["cache"] put rigJQsetR("'#chatbody'", "html", "data") & \ rigJQvarR("currentScroll," & \ rigJQgetR("'#chatbody'", "attr", "'scrollHeight'")) & \ rigJQconditionR("currentScroll > previousScroll", \ rigJQanimateR("'#chatbody'", "scrollTop: currentScroll", \ "'normal'")) into tAjax["success"] rigJQajax tAjax rigJQcb rigJQeventOpen "'#submitbtn'", "'click'", TRUE rigJQxhRequest "post", "chat/addmsg", "userinput:" && \ rigJQgetR("'#userinput'", "attr", "'value'") rigJQset "'#userinput'", "attr", "'value', ''" rigJQeventClose rigJQeventOpen "'#logout'", "'click'" rigJQvar \ "logout,confirm('Are you sure you want to end the chat session?');" rigJQcondition "logout==true", \ "window.location = 'logout';" rigJQeventClose rigJQaddStatement "setInterval (loadMessages, 2500);" rigJQclose put the result into gData["JQscript"] put getMsgData() into gData["msgList"] end if rigSetHeader "Cache-Control: no-cache" get rigLoadView("chatheader") if tLogin is TRUE then get rigLoadView("chatlogin") else get rigLoadView("chatcontent") end if get rigLoadView("chatfooter") end index Now we need a handler, which adds new messages to the database. It takes the POST data, checks if the message is not empty and, along with the session data, hands it over to the model, which is responsible for database related tasks. Add the following handler to the controller script: command addmsg put rigSessUserdata("name") into tName put rigVarPost("userinput") into tMsg if (tMsg <> FALSE) and (tMsg <> "") then _addMsg tName, tMsg end if end addmsg You may notice that the name of the model handler _addMsg has an underscore as the name prefix. This is to hide certain handlers from public access. These handlers will not be served via a URL request. Important: Don't forget to add the handler name "addmsg" to the global variable gControllerHandlers at the top of the page. The next handler to add to the controller script gets the data from the model, stores it in the global variable gData and loads the view chatlist.irev, which consists of the messages list only: command view put getMsgData() into gData["msgList"] get rigLoadView("chatlist") end view Of course, later we need to make sure that the model contains a getMsgData function. Important: Add the handler name "view" to the global variable gControllerHandlers at the top of the page. The last handler is used to end the chat session. If there is a user name, it sends the user name and a "User has left ..." message to the model to add this data to the database. Then it destroys the session data as it is not needed anymore and loads the appropriate view files to display the login page again. Add the following code to the controller: command logout put rigSessUserdata("name") into tName if tName <> FALSE then put "User" && tName && "has left the chat session." into \ tMsg _addMsg tName, tMsg end if rigSessDestroy get rigLoadView("chatheader") get rigLoadView("chatlogin") get rigLoadView("chatfooter") end logout Important: Add the handler name "logout" to the global variable gControllerHandlers. Model We start with the basic prototype of a model script: <?rev put gBASEPATH into gBASEPATH if gBASEPATH is "gBASEPATH" then put "No direct script access allowed." exit to top end if --| END OF chatmodel.irev --| Location: ./system/application/models/chatmodel.irev -- ---------------------------------------------------------------------- Note: This is not mandatory! This is just for security reasons. As specified in the chat handler of the controller script, name this file "chatmodel.irev" and save it in system/application/models. Add the following lines to build the getMsgData function, which is used to get messages from the database: function getMsgData rigDbOrderBy "id", "ASC" put rigDbGet("chat") into tQueryResult end getMsgData First we set an ORDER BY clause, which orders the query result ascending by a column named "id". As this column is auto-incrementing this means that new messages will be located at the bottom and old messages at the top of the list. Then we retrieve the data from the database and store the result, an array, in a variable. Next, we check if the number of rows of the table is greater than 0. If not, there are no messages and we simply return "There are currently no messages.". Insert the following lines right after "tQueryResult": if tQueryResult["numrows"] > 0 then end if return "There are currently no messages." As we don't want to keep outdated chat messages we limit the number of table rows stored to 20. We do this by deleting 11 messages if the number of rows is greater than 20. Note: These figures are arbitrary. Insert the following code right after the conditional statement: if tQueryResult["numrows"] > 20 then get rigDbQuery("DELETE LOW_PRIORITY FROM chat ORDER BY id \ ASC LIMIT 11") rigDbOrderBy "id", "ASC" put rigDbGet("chat") into tQueryResult end if Now we loop through the rows of the chat table and build the messages list adding all the necessary html tags. This list will be returned by the function. Complete the function by inserting the following lines right after the code above: repeat with i = 1 to tQueryResult["numrows"] put rigDbRow(i) into tRowData put tRowData["time"] into tTime convert tTime to short time if tRowData["msg"] is "User" && tRowData["user"] && \ "has left the chat session." then put "<li><i>(" & tTime & ")" && tRowData["msg"] & \ "</i></li>" & return after tMsgData else put "<li>(" & tTime & ") <b>" & tRowData["user"] & \ "</b>: " & tRowData["msg"] & "</li>" & return after tMsgData end if end repeat return tMsgData Note: The table row data is stored in an array where the keys are the table field names. This array can be accessed with the help of the rigDbRow function. Your getMsgData function should now look like this: function getMsgData rigDbOrderBy "id", "ASC" put rigDbGet("chat") into tQueryResult if tQueryResult["numrows"] > 0 then if tQueryResult["numrows"] > 20 then get rigDbQuery("DELETE LOW_PRIORITY FROM chat ORDER BY \ id ASC LIMIT 11") rigDbOrderBy "id", "ASC" put rigDbGet("chat") into tQueryResult end if repeat with i = 1 to tQueryResult["numrows"] put rigDbRow(i) into tRowData put tRowData["time"] into tTime convert tTime to short time if tRowData["msg"] is "User" && tRowData["user"] && \ "has left the chat session." then put "<li><i>(" & tTime & ")" && tRowData["msg"] & \ "</i></li>" & return after tMsgData else put "<li>(" & tTime & ") <b>" & tRowData["user"] & \ "</b>: " & tRowData["msg"] & "</li>" & return after tMsgData end if end repeat return tMsgData end if return FALSE end getMsgData Add the following code to complete the model script: command _addMsg pName pMsg put pName into tData["user"] put pMsg into tData["msg"] put the seconds into tData["time"] get rigDbInsert("chat", tData) end _addMsg This handler is called by the controller. It puts a new message along with the user name and the current time into an array and inserts this data into the "chat" table. Now, that's all about the model script and all that is left to do is to build the view files. View <!DOCTYPE html PUBLIC "-//W3C//DTD XHTML 1.0 Strict//EN" "http://www.w3.org/TR/xhtml1/DTD/xhtml1-strict.dtd"> <html xmlns="http://www.w3.org/1999/xhtml" xml:lang="en" \ lang="en"> <head> <meta http-equiv="Content-Type" content="text/html; \ charset=utf-8"/> This is just the doctype declaration and a meta description. Now add the page title: <title>[[gData["pageTitle"] ]]</title> Remember: We stored the page title earlier, when we built the controller, in the global variable gData. Add the jQuery framework: <? return rigJQuerySource() ?> Here, we call a Jquery library function, which returns a html string linking to jQuery. Add the stylesheet (this is included in the zip file provided for download): <? return rigCssAsset("chat.css") ?> This is an asset helper function, which generates a CSS asset location html code. Add the jQuery script, the code, which is needed to do all the XHTML requests and which is built by the controller:
[[gData["JQscript"] ]]
Complete the chatheader.irev script with the following lines: </head> <body> <div class="page_margins"> Your chatheader.irev script should now look like this: <!DOCTYPE html PUBLIC "-//W3C//DTD XHTML 1.0 Strict//EN" "http://www.w3.org/TR/xhtml1/DTD/xhtml1-strict.dtd"> <html xmlns="http://www.w3.org/1999/xhtml" xml:lang="en" \ lang="en"> <head> <meta http-equiv="Content-Type" content="text/html; \ charset=utf-8"/> <title>[[gData["pageTitle"] ]]</title> <? return rigJQuerySource() ?> <? return rigCssAsset("chat.css") ?> [[gData["JQscript"] ]] </head> <body> <div class="page_margins"> There is not much to say about the footer. Just save the following code as "chatfooter.irev" in system/application/views: <div id="footer"> <hr /> <p>revIgniter Chat Application Tutorial</p> </div> </div> </body> </html> There is nothing special with the content of the Login page either. So, save the following code in system/application/views as "chatlogin.irev": <div id="login"> <p>Please enter your name.</p> <form action="http://example.com/chat/" method="post"> <label for="name">Name:</label> <input type="text" name="name" id="name" size="20" \ maxlength="12" placeholder="Name" /> <input type="submit" name="loginbtn" id="loginbtn" \ value="Login" /> </form> </div> Important: Don't forget to replace the action attribute with the proper URL. Now save the code below as "chatcontent.irev" in system/application/views: <div id="chat"> <div id="chatheader"> <p id="username">Welcome, <b>[[gData["user"] ]]</b></p> <p id="logout"><a href="#">Logout</a></p> </div> Here we display the name of the user, which we stored in our global variable gData. Further there is a link, which is used by the jQuery script to end the chat session. To display the messages list add the following lines: <div id="chatbody"> <ul> [[gData["msgList"] ]] </ul> </div> This unordered list is built dynamically when the page is loaded the first time or whenever the message data is updated by the jQuery script, which loads the chatlist view to replace the data in this list with new data. To complete the chatcontent view add the HTML form, which is used to send messages: <div id="chatfooter"> <form action="http://example.com/chat/addMsg" method="post"> <input name="userinput" type="text" id="userinput" size="64" \ maxlength="100" placeholder="Message" /> <input name="submitbtn" type="submit" id="submitbtn" \ value="Send" /> </form> </div> </div> You may replace the action attribute with the proper URL, if you like, but it is not necessary because the jQuery script prevents the default action anyway. So, this attribute could even be empty. The URI is correct though. It specifies a controller named "chat" and a handler named "addMsg". Check out the jQuery script, and you will notice, that it uses this URI to post new messages. Your chatcontent view should now look like this: <div id="chat"> <div id="chatheader"> <p id="username">Welcome, <b>[[gData["user"] ]]</b></p> <p id="logout"><a href="#">Logout</a></p> </div> <div id="chatbody"> <ul> [[gData["msgList"] ]] </ul> </div> <div id="chatfooter"> <form action="http://example.com/chat/addMsg" method="post"> <input name="userinput" type="text" id="userinput" size="64" \ maxlength="100" placeholder="Message" /> <input name="submitbtn" type="submit" id="submitbtn" \ value="Send" /> </form> </div> </div> As mentioned earlier, the jQuery script contains a function, which loads the messages list. This is done by sending a request to chat/view. Then the view handler puts the messages list into the gData variable and loads the chatlist view, which is used by the Ajax request to replace the HTML code inside the div with the id "chatbody". This view consists of the following three lines of code, which you should save as "chatlist.irev" in system/application/views: <ul> [[gData["msgList"] ]] </ul> That's it. Your chat application should work now as expected. There is still work to be done to turn this into a full featured chat application, but nonetheless this sample illustrates revIgniter's approach to separate application logic from presentation, how to work with built in libraries and how to add dynamic data to view files. revIgniter is available at http://revigniter.com/
| 

|