
| Issue 112 | June 17th 2011 | Contact the Editor | How to Contribute |
|
| ||
|
Edge Detect An Image The lesson continues the discussion of mask based image processing and introduces three masks that detect edges in images, revealing potential objects and their boundaries. This process can often be used to break down an image into regions of interest that can then be analyzed further. The code in this lesson works with both, grayscale and color images, although the performance can be greatly improved, if you tailor the algorithm to work with grayscale images only. Note: The examples shown here access the Stack Script of lesson Vision: How do I Blur an Image?. It is assumed that you have a working LiveCode stack that implements the code shown in that lesson, and that you are familiar with the way that stack works. Creating the X-Edge Detect ButtonDrag a button onto the stack. Then open the Property Inspector and change the name of the button to X-Edge Detect. Next, open the Script Editor for this button and insert the following code: on mouseUp This mask is applied to all pixels in the image and is used to calculate the absolute difference between neighboring pixels that lie vertically to each other. The greater the difference in color or gray level between neighboring pixels, the greater the result of the differencing calculation. As this mask determines the difference between pixels that are vertically aligned, the resulting output highlights regions with a strong color or gray level difference that appear horizontally in the image. Creating the Y-Edge Detect ButtonDrag a button onto the stack. Then open the Property Inspector and change the name of the button to Y-Edge Detect. Next, open the Script Editor for this button and insert the following code: on mouseUp This mask is applied to all pixels in the image and is used to calculate the absolute difference between neighboring pixels that lie horizontally to each other. The greater the difference in color or gray level between neighboring pixels, the greater the result of the differencing calculation. As this mask determines the difference between pixels that are horizontally aligned, the resulting output highlights regions with a strong color or gray level difference that appear vertically in the image. Creating the XY-Edge Detect ButtonDrag a button onto the stack. Then open the Property Inspector and change the name of the button to XY-Edge Detect. Next, open the Script Editor for this button and insert the following code: on mouseUp This mask is a center surround mask and is used to calculate the absolute difference between a central pixel and its eight surrounding neighbors. The greater the difference in color or gray level between an average of the neighboring pixels and the central pixel, the greater the result of the differencing calculation. Loading an Image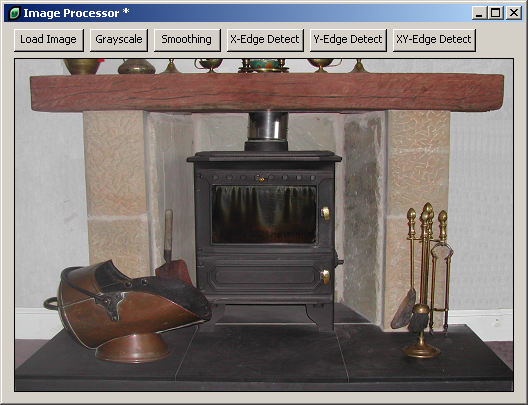
Your application may look something like the one shown in this example. After selecting the Load Image button you should get a file selection dialog that allows you to select an image from your file system. The image is then displayed in the Image Area. Detecting Horizontal Differences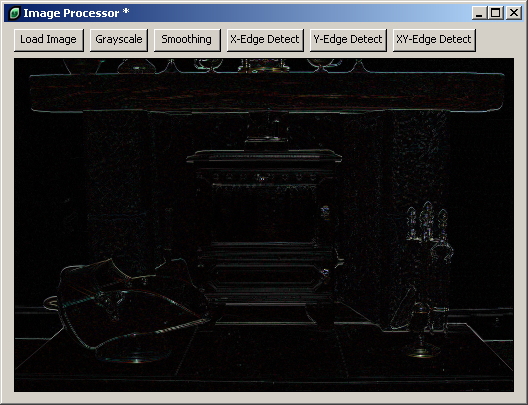
Horizontal differences are detected by selecting the X-Edge Detect button. You can clearly make out the horizontal lines surrounding the timber beam of the fire surround and the lines that separate the insert section of the hearth and the front section of the hearth. Detecting Vertical Differences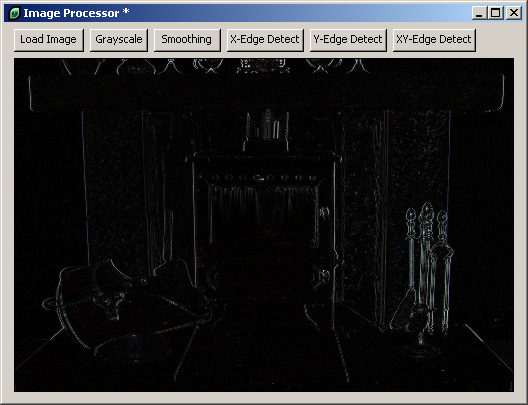
Vertical differences are detected by selecting the Y-Edge Detect button. Horizontal lines surrounding the timer beam of the fire surround are no visible, neither is the line between the inset section and front part of the hearth. Vertical lines along the sides of the sandstone parts of the fire surround are now visible instead. Detecting Center Surround Differences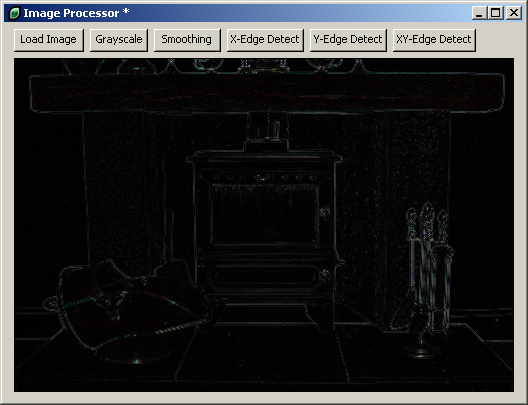
Center surround differences are detected by selecting the XY-Edge Detect button. In this image, both horizontal and vertical differences are visible. Outlines of the entire fire surround are now visible.
| 
|