| Issue 106 | March 10th 2011 | Contact the Editor | How to Contribute |
|
| ||
|
Assets and Screen Resolution
Mobile Devices come in a wide variety of different screen sizes and mobile apps need to reflect this. This is due to the fact that any app run on a mobile device can essentially be thought of as a static, full-screen window the size of the device's screen resolution. LiveCode gives you full scope to match the native screen resolution for any apps you are making.
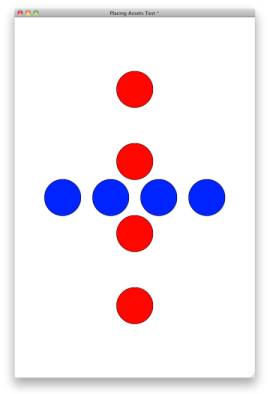
The objective of the functionality we're going to develop is to have our stack look like the one above, no matter what platform it's deployed on. There are 8 oval graphics - 4 are distributed evely on the horizontal (hereafter X) axis, and 4 are distributed evenly on the vertical (hereafter Y) axis. This means that on each axis, oval 1 is 1/5 of the total length of the axis, oval 2 is 2/5, et cetera. The stack we're going to be developing with on the desktop is the same size as an iPod Touch screen - 960 pixels high and 640 pixels wide. The size of the stack in the development environment doesn't matter so much if we are intending to solely deploy the app on mobile devices, but it is useful to size your stack the same as the screen size of your main target mobile device, simply for clarity and ease of use during development.On the desktop we can simply create and place the assets manually, and this will look fine on the desktop (assuming the user can't change the window size) and on an iPod Touch. However, when we try to look at this app on an iPad, there is an expanse of blank space to the right and to the bottom of our objects. This is where LiveCode’s easy resizing functionality becomes really useful.. and brings us on to the first method of handling placement to make your app look and feel like a native iOS or Android application. Manually specifying object locations
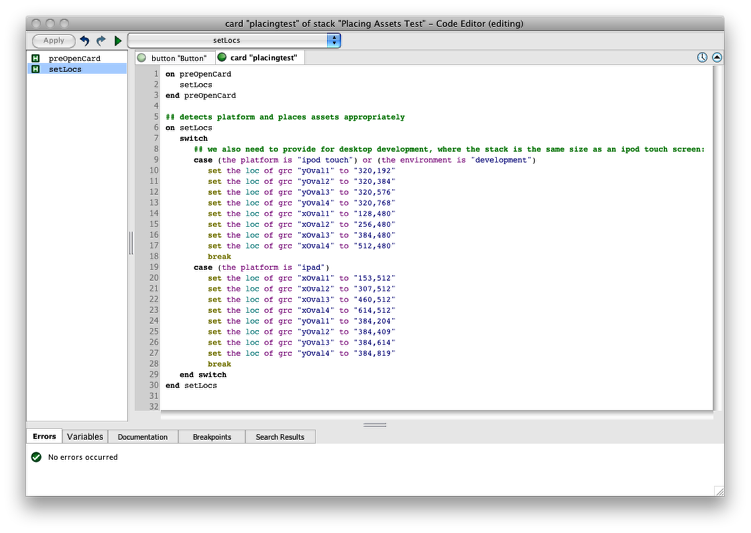
Click the image to zoom Manually specifying object locations is the simplest way of achieving the desired result. Rather than manually placing our objects on the card, we have a handler (generally called from preOpenCard) which will place the objects for us. This means that we can programmatically detect what platform the app is running on, and place things appropriately. Livecode allows us to detect what platform we are on using the 'platform' function. This means that if we want to use our test app on an iPad as well as an iPod Touch, we could do something like the following in our placing handler (called 'setLocs'): ## detects platform and places assets appropriately on setLocs switch ## we also need to provide for desktop development, where the # stack is the same size as an ipod touch screen: case (the platform is "ipod \ touch") or (the environment is "development") set the loc of grc "yOval1" to "320,192" set the loc of grc "yOval2" to "320,384" set the loc of grc "yOval3" to "320,576" set the loc of grc "yOval4" to "320,768" set the loc of grc "xOval1" to "128,480" set the loc of grc "xOval2" to "256,480" set the loc of grc "xOval3" to "384,480" set the loc of grc "xOval4" to "512,480" break case (the platform is "ipad") set the loc of grc "xOval1" to "153,512" set the loc of grc "xOval2" to "307,512" set the loc of grc "xOval3" to "460,512" set the loc of grc "xOval4" to "614,512" set the loc of grc "yOval1" to "384,204" set the loc of grc "yOval2" to "384,409" set the loc of grc "yOval3" to "384,614" set the loc of grc "yOval4" to "384,819" break end switch end setLocs The app will now look the same on an iPad as on an iPod touch. This method, is useful where there is only a minimal amount of placement to be done, or where assets need to be placed in a completely different way from device to device. Note that if using this method on a moderate to large scale, it is much better practice to store such data in something like an XML file rather than having it hard-coded. This quick and easy solution starts to become inefficient when attempting to place an indeterminate number of objects, which is where LiveCode gives us another technique to use: Generating locations based on the dimensions of the stack This is a more comprehensive technique, which allows you to dynamically create locations for placing objects. What this method essentially entails is specifying each dimension of the location as a fraction or ratio of the stack's dimensions. We can obtain the stack's dimensions by looking at the width and height properties of the stack. For example, something in the exact middle of the stack would be placed thusly: ## here the division by 2 could equally be a multiplication by # 0.5 ## which might be simpler/neater depending on the situation put (the width of this stack / 2) into tX put (the height of this stack / 2) into tY put tX & "," & tY into tLoc set the loc of grc "agraphic" to tLoc This works very well when objects need to be placed in a specific pattern, such as with our test stack\
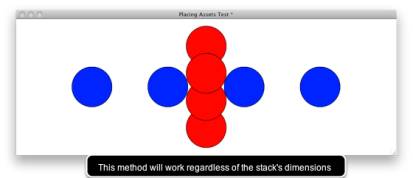
on setLocs ## hides all the graphics so that only the ## right number (tRand) are displayed repeat with x = 1 to 4 hide grc ("yOval" & x) hide grc ("xOval" & x) end repeat ## quick, simple way of getting a random number ## between 3 and 5 (only exits loop when tRand >= 3) repeat put random(4) into tRand if tRand >= 2 then exit repeat end repeat repeat with x = 1 to tRand show grc ("xOval" & x) set the loc of grc ("xOval" & \ x) to (((the width of this stack / (tRand + 1)) * x) \ A great advantage of this technique is that the above code will work easily on all platforms, This method is perfect is you are placing items in a pattern, i.e. using a loop, and is the most efficient method for neat patterns using simple fractions or when placing large numbers of solitiary objects which don’t need to be placed in relation to other objects. For more complex problems the third option, outlined below, sets up a basic function which can then be called repeatedly for each object placement. You can lay your code out in a sensible, readable way. The calculation within the function always works irrespective of screen size.
Specifying locations directly as ratios
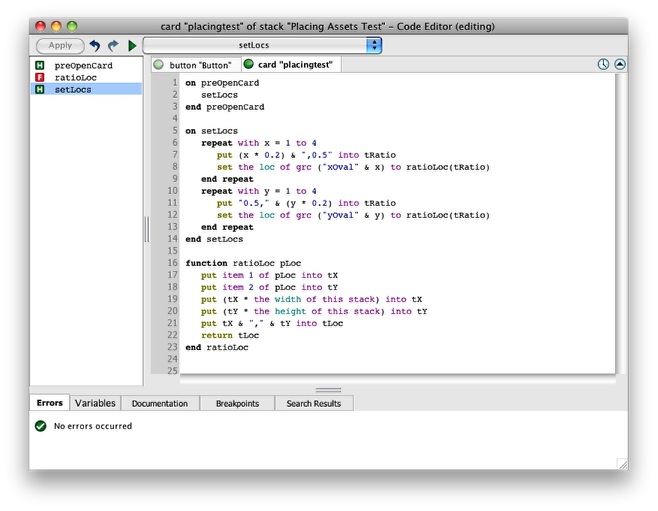
Click the image to zoom This is essentially a variation on the above technique. However, rather than carrying out the calculation all in one go, we can code a function which will return an x,y location when given a ratio of the stack's size. For example, using such a function (named 'ratioLoc') we can do the following to place a graphic in the center of the stack:set the loc of grc "agraphic" to ratioLoc("0.5,0.5") The code for function 'ratioLoc' should look something like the \ following: ## convert a ratio into an x,y location function ratioLoc pLoc put item 1 of pLoc into tX put item 2 of pLoc into tY put (tX * the width of this stack) into tX put (tY * the height of this stack) into tY put tX & "," & tY into tLoc return tLoc end ratioLoc This means that our setLocs handler would look like this: on setLocs repeat with x = 1 to 4 put (x * 0.2) & ",0.5" into tRatio set the loc of grc ("xOval" & x) to ratioLoc(tRatio) end repeat repeat with y = 1 to 4 put "0.5," & (y * 0.2) into tRatio set the loc of grc ("yOval" & y) to ratioLoc(tRatio) end repeat end setLocs This technique gives us the advantage of being able to quickly place large numbers of objects in a dynamic fashion, without the code becoming confusing, as all the real work is done by the ratioLoc function. By using the methods above LiveCode gives you a simple, fast path to cross device, cross platform apps fully sized and with a native look in any environment.
| 


|