As you may know by now, Revolution 2.8.1 has been released. In this article, two of the Runtime Revolution development team explain what's new in 2.8.1, why you should be excited about it, and how to use it.
New features in 2.8.1:
Private commands and functions
Split by row and column
revFont
SQLite
revBrowser
Private commands and functions
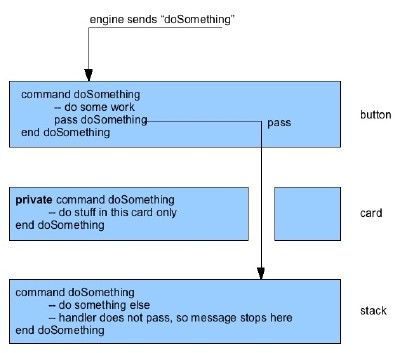
Revolution version 2.8.1 introduces a new feature in the Revolution language itself: the "private" keyword.
The private keyword, as the name suggests, makes a command or function private to the object in which it is defined, making it invisible from the message path.
The primary advantage of this is information hiding and encapsulation and thus the avoidance of namespace pollution.
Many libraries have hundreds of handlers that are never intended to be called by a client of the library directly, yet in previous versions of Revolution nothing stopped it from doing so. The private keyword enables the developer to clearly mark which handlers are private to the library, and which ones form the API and are public. The private handlers can not be called through the use of "send" or "call" and are thus truly private to the object in which they are defined. Furthermore the namespace is less polluted, as we do not have handlers in the message path that we do not need to be there (thus possibly eliminating the need for complicated common prefixes). As private commands and functions are not part of the message path, trying to "pass" them will generate an error.
Bypassing the message path has another advantage: it is faster. The message path no longer needs to be searched each time a private command is called, and this means that private handler calls that are about 5 times faster than non-private handler calls. As such it could be beneficial to make any recursive handler private, and provide a public wrapper: the internal recursive calls will be a little faster.
We have also introduced the keyword "command", which (for the moment at least) is a synonym for "on", however, it is intended to be semantically different. "on" indicates a response to an event (such as "keyDown" or "mouseUp"), whereas command indicates an invocation by script. As private handlers cannot be event handlers, it is recommended you use "private command" instead of "private on", as the latter does not really make sense.
The following illustrates this concept:
Split by row and column
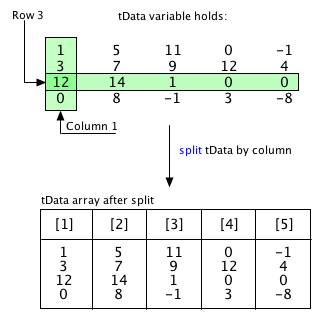
Revolution version 2.8.1 adds another new feature: splitting by row and column. This makes it easier to deal with tabular data, as it avoids the need for repeat loops. Suppose we have a database out of which we have just extracted data which is delimited by tab and return characters (tab to delimit the columns, return to delimit the rows). All we need to do to get an array of the columns is:
set the columnDelimiter to tab
set the rowDelimiter to return
split tData by column
To compare, before we would have to do the following:
set the itemDelimiter to tab
local tNewData
repeat for each line tLine in tData
repeat with x = 1 to the number of items in tLine
put item x of tLine & return after tData[x]
end repeat
end repeat
Apart from there being more code, this code is also harder to read and let's not forget slower than using "split".
It is also possible to do the opposite: if we have some array tArray we wish to output such that for each key x in the array, tArray[x] is a line in the output, then all we need to do is:
set the rowDelimiter to return
combine tArray by row
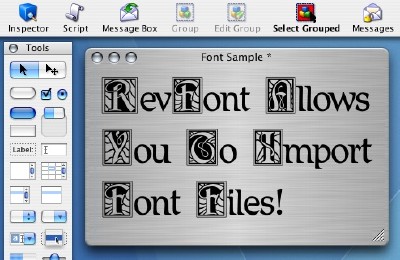
revFont
revFont is an external that allows us to load fonts on demand. Suppose we wish to distribute a custom font with our application, but we may not be able to rely on the user having installed the font. We can then include the font file as a file in the standalone builder, and load it with revFont to make it available to the application.
Suppose we have a font file "FunnyFont.ttf" we would like to use in our application. Let tFontFile contain the filepath to this font, we can then:
revFontLoad tFontFile
set the textFont of field 1 to "FunnyFont"
without this font being installed (as a system font) on the user's system.
If you do not know what the name of the font contained in the fontfile is, you can find out by considering the differences in "the fontNames" before and after loading the font.
If we don't need the font any longer, we can unload it using the revFontUnload command.
SQLite
SQLite is a single file database system in the public domain. Applications that need to store local data in complex formats, or reasonably large amounts of data, may benefit from using an SQLite database. As it is a single file database, it can be stored with the application on disk. No client-server interaction is needed. This makes it fast for many common operations. SQLite can be used just like any database.
I will give a brief example of how to setup and use an SQLite database.
First, we need to create a database, so all we need to do is choose where. Suppose that tDatabaseFile is where we'd like to store our database (for example /Users/Demo/Data/mysqlitedb.db). To create the database, all we need to do is open it:
revOpenDatabase("sqlite", tDatabaseFile,,,)
Important: Even though SQLite does not support users and passwords, we must provide empty arguments or Revolution will throw a syntax error.
The database now exists, and we can add a new table, for example:
revExecuteSQL tSQLiteDatabaseId, "CREATE TABLE Example(" & \
"Id INTEGER PRIMARY KEY AUTOINCREMENT" & comma & \
"firstname TEXT NULL" & comma & \
"lastname TEXT NULL" & comma & \
"email TEXT NULL" & comma & \
"description TEXT NULL)"
We can now use this SQLite database as we would any other database, but remember: it is just a single file!
One should be aware that the SQL syntax that SQLite understands can differ slightly from SQL syntax you may be used to with other database systems. For example, data types are simpler: there is only one type INTEGER and no TINYINT or other refinements of the INTEGER type. For more details on the SQL syntax please see the SQLite website at http://www.sqlite.org.
You can find more information and a sample stack to play with in your installed Revolution folder. Go to 2.8.1-gm-1/resources/examples/SQLite Sampler.rev.
revBrowser
You can download the accompanying stack for this section here.
revBrowser was formerly available as the altBrowser plugin, but is now available as part of Revolution. This allows you to embed fully featured web browser capabilities into your applications. With the 2.8.1 release a number of improvements have been made to the browser functions including the renaming of all commands and functions to fit in better with Revolution. What follows is an example that shows how to get a browser up and running in your application very quickly.
If you would like to work through this example, open Revolution up now, and create a new stack. The example makes use of a single card, and all the main functionality is put in the card script.
The first thing to do is write the code to open and initialise the browser object. For this we use the revBrowserOpen function. A script local sBrowserId is declared in the card script of the card to accommodate the browser's id.
local sBrowserId = ""
# Opens the browser and sets initial url and position.
command browserInit
local tBrowserId
put revBrowserOpen(the windowId of this stack, "http://www.google.com") into tBrowserId
browserEnsure tBrowserId
put tBrowserId into sBrowserId
revBrowserset sBrowserId, "rect", the rect of graphic "Browser Rect" of me
revBrowserset sBrowserId, "scrollbars", true
end browserInit
Note that the browser's rect is set to the rect of a graphic called "Browser Rect" at this point. It is useful when placing a single browser on a card to create a rectangle graphic at the size you wish the browser to appear at. This allows you to visualize the layout of the card without the browser present, and makes adjustment of the browser's size and position easy.
The command browserEnsure is just a stub for now, but in a real application something would be needed to verify that the browser was successfully created.
# Ensure that a browser is present
command browserEnsure pBrowserId
if pBrowserId is not an integer then
# Insert custom error handling here if required, eg close any open browsers and call browserInit.
end if
end browserEnsure
Next we need to write the code that closes the browser when it is no longer required (e.g. because the user has navigated to another card). This is very simple, and uses the revBrowserClose command.
# Closes the browser
command browserFinalise
browserEnsure sBrowserId
revBrowserClose sBrowserId
end browserFinalise
At this point we have a code to create a browser object that displays Google.com, and remove the browser when required. If you create two buttons in the card, "Startup Browser" and "Close Browser". The buttons should simply call browserInit and browserFinalise respectively. Assuming that you also created the graphic "Browser Rect", you should now be able to open and close the browser using these buttons.
The next thing we will add to the card is the ability to control the browser. We will add the following commands to the card script to allow four simple browser operations to be carried out.
# Navigate back
command browserBack
browserEnsure sBrowserId
revBrowserBack sBrowserId
end browserBack
# Navigate forward
command browserForward
browserEnsure sBrowserId
revBrowserForward sBrowserId
end browserForward
# Refresh browser
command browserRefresh
browserEnsure sBrowserId
revBrowserRefresh sBrowserId
end browserRefresh
# Stop current navigation
command browserStop
browserEnsure sBrowserId
revBrowserStop sBrowserId
end browserStop
If you now create four buttons "Back", "Forward", "Refresh" and "Stop" and place them just above the "Browser Rect" graphic. As before, each button just calls the appropriate command so "browserBack", "browserForward", "browserRefresh" and "browserStop" respectively. These buttons should allow some basic control of the browser object.
The main thing missing from our browser now is the ability to type in a url to go to. We will next add this feature and additionally make the browser display its current url at all times in an address bar. First we need to create a field "url" and a button "Go". The field should be placed just above the "Browser Rect" graphic and just below the navigation buttons. The button "Go" should be placed to the right of the field.
We now add the required functionality to the card script. Two commands and a message handler are needed.
# Go to url
command browserGo pUrl
local tUrl
if ":" is not in pUrl then
# No protocol supplied, assume that the user meant http
put "http://" & pUrl into tUrl
else
put pUrl into tUrl
end if
browserEnsure sBrowserId
revBrowserNavigate sBrowserId, tUrl
end browserGo
The command above tells the browser to navigate to a given url using the revBrowserNavigate command. Most browsers will accept urls like "www.runrev.com", automatically assuming that the user means to visit a web page, so we handle that situation here. The button "Go" will invoke this command when clicked, but we will come back to that. Next we need to declare a message handler for the browserNavigateComplete message:
# Callback handler. This message is sent by the browser object when navigating to a url begins.
on browserNavigateComplete pInstanceId, pUrl
browserUpdateUrlField pUrl
end browserNavigateComplete
This message is sent whenever the browser is about to begin loading a new web page, at this point we update the address bar so that it displays the url being loaded.
# Update the url field to pUrl
command browserUpdateUrlField pUrl
put pUrl into field "url" of me
end browserUpdateUrlField
Finally we edit the script of the button "Go" so that it is as follows:
on mouseUp
browserGo the text of field "url"
end mouseUp
And similarly, we edit the script of the field "url":
on returnInField
browserGo the text of me
end returnInField
on enterInField
browserGo the text of me
end enterInField
Assuming everything went ok, you should now have a basic browser working in your stack that allows the user to visit and navigate through web pages. There are many other things you can do with the browser object. You can also explore the browser further by using the dictionary in the Revolution documentation stack, filtering by "browser".
You can find more information and another sample stack to play with in your installed Revolution folder. Go to 2.8.1-gm-1/resources/examples/Browser Sampler.rev. |