If you've been following along with the series, you're ready now to get to work on the nuts-and-bolts of connecting to FileMaker databases with Revolution. You're convinced of -- or at least intrigued by -- the control and cost-saving benefits of using Revolution to connect to FileMaker databases, and you've probably settled upon a strategy for how to connect with them.
To continue along, it will be very helpful if you actually have a copy of FileMaker to work with. While these procedures can be generally used with most recent versions of FileMaker, the steps assume you're working with FileMaker Server Advanced 8. If you don't have this, you can either pick up a trial copy from the FileMaker site or use a desktop version. But remember, if you use the desktop version, you'll only be able to connect locally, not over the network, due to restrictions in the FileMaker license.
Additionally, the procedures I outline are based on the latest version of Revolution 2.8.1. You can obtain it by going here.
In this installment, I'm going to cover what is probably the easiest way (from a programming standpoint) to make the initial setup for connecting to the FileMaker server: using an ODBC connection in combination with the database facilities built-in to Revolution.
Setting Up FileMaker
Before you can connect to your database with Revolution, there are three steps required in FileMaker:
- Setting up FileMaker Server to accept ODBC connections
- Setting permissions in your file to allow ODBC connections
- Installing and configuring the FileMaker ODBC driver on client machines.
It's beyond the scope of this article to provide detailed step-by-step instructions for both Mac and Windows, but the following serves as a "cheat sheet" for the essentials.
Server Setup
Here's how to set up FileMaker Server Advanced for ODBC:
- Start up the FileMaker Server Advanced Admin console and connect to your server
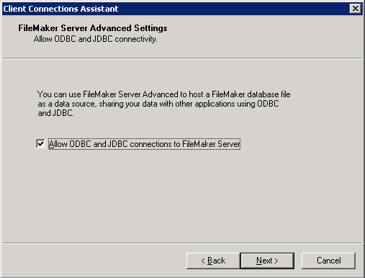
- Open the "Client Connections" icon. You'll see the Connections assistant, which asks you a series of questions about the connections you want to enable.
- Specify an adequate number of simultaneous ODBC connections (you may have up to 250, shared with FileMaker clients).
- Click Next until you reach the screen below, and ensure you enable the ability to connect to the database via ODBC:
- Complete the Connections Assistant; you're done with the server part of setup.
- If you use a firewall, be sure to open port 2399 (and forward that port to the server if you will be accepting connections from outside the router).
Permissions
Next, you'll need to go into each database you want to access with Revolution and ensure that users may connect to them via ODBC:
- Open the FileMaker database you want to be accessible to Revolution.
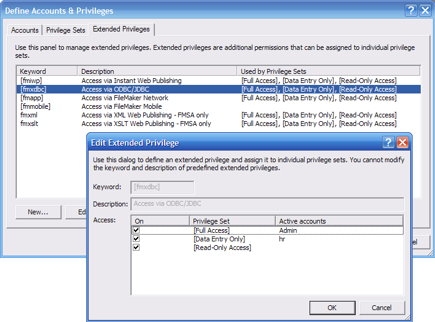
- Choose "Accounts & Privileges" from the Define item of the File menu.
-
Select an account to use for ODBC connections.
In any multi-user file situation, you should have a thoughtful access scheme set up. You would have at least one username and password for the file already -- the Full Access "Admin" account. If you haven't done this yet, give the Admin account a password.
Then, you'll need to create a dedicated ODBC account/privilege set, or decide to allow existing ones to have ODBC access. Managing FileMaker accounts and privileges is beyond the scope of this article, but the basic idea is that you need to go to the "Extended Privileges" tab in this dialog, and grant ODBC access to the desired users/groups.
In this example, I've created an account named "hr" in the "Data Entry" privilege set and enabled xDBC access for the group:
Note that the "Read-Only Access" Privilege Set was also given xDBC access, even though there are no users currently in that group.
- Once you've enabled accounts to have ODBC/JDBC access, you need to turn it on for the database file itself, if you're hosting it with a non-server version of FileMaker on your desktop. Choose "ODBC/JDBC" from the Sharing item of the Edit menu. Select "On" and click ok.
ODBC Client Drivers & Configuration
The final setup step is getting the client driver installed on each machine that will access the FileMaker data with Revolution. FileMaker supplies redistributable custom DataDirect SequeLink client drivers for FileMaker as part of its software, and provides detailed documentation for installing them here.
Once the SequeLink FileMaker drivers are installed, a "System DSN" (Data Source Name) must be defined on the client systems. On Windows systems, this is through the Administrative Tools Control Panel; on Mac OS X systems this is through the ODBC Administrator utility. You'll need to create a "System DSN" based on the DataDirect Driver as follows:
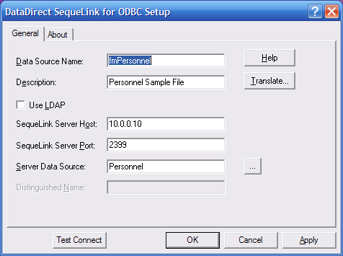
- The Data Source Name and Description can be set by you to whatever is convenient for referencing the connection in Revolution and other ODBC-aware applications
- The SequeLink Server Host is the url or IP address of the FileMaker Server Advanced server.
- The port is 2399, unless you have re-configured that port in the server
- If you've properly configured everything, you can click the "..." button and select the database from a list of files hosted on the server.
- After you've selected the database file, click "Test Connect" and enter the username and password you set up for ODBC access in the FileMaker file. You'll be told, "Connection Test Successful" if everything has been set up properly.
In this case, I've configured the client driver for the "Personnel" sample database supplied with FileMaker that I used in previous articles. The IP address 10.0.0.10 references a server on my local network; you won't be able to access this remotely.
As mentioned earlier, the ODBC option, while easy to program, does have its drawbacks. This lengthy process of setting up the client drivers is one of them. I'll cover the XML approach in a later article, which requires zero client setup, because it uses standard web protocols. But ODBC has the advantage of providing for more simultaneous client connections (250 vs. 100) on FileMaker Server Advanced, and super-easy basic setup in Revolution. How easy is the setup? Let's take a look.
The Moment of Truth: Connecting Revolution
Now it's time to open up your copy of Revolution 2.8.1. Revolution Studio and Revolution Enterprise include built-in support for ODBC data sources and many other kinds of database systems. For example, if you were connecting to a MySQL system (included with almost all web hosting packages), you would not need to go through the client driver setup process above.
With Revolution 2.8.1 open, create a new main stack, then choose "Database Query Manager" from the Tools menu.
-
The Query Manager initially appears blank. Click the "+" icon in the upper-right to begin defining a new Query.
-
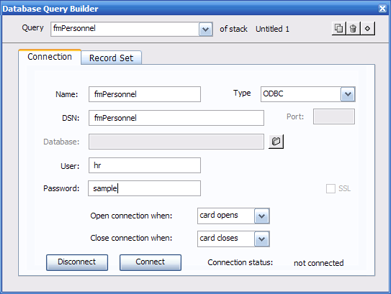
Give the query a name. In this case, for simplicity I've used the same name I used for the DSN, but you don't need to do this. Name is simply whatever you want to use in your Revolution scripts to reference the FileMaker database. (Just like you would give a field or button a name.)
-
The DSN must be the same name you supplied when you were setting up the ODBC client earlier.
-
The Port and Database are already specified by the DSN, so Revolution dims those fields.
-
Supply the username and password you set up in the FileMaker file for ODBC users of this database.
-
Click Connect.
If you've done everything just right, the Connection status will change to "Connected."
If you don't connect on the first try, I find the most common issues are:
- Firewall settings on the server and/or client computer that prevent communication between the two
- ODBC access privileges not configured properly in the FileMaker database
- ODBC access not enabled on the FileMaker Server Advanced server
With a connection established to the FileMaker server, we now need to tell Revolution which data we're interested in. Click the "Record Set" tab and set it up as follows:
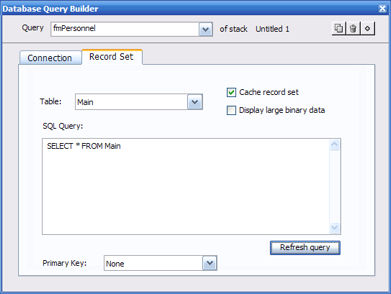
Many ODBC sources support reporting the available tables in a system; FileMaker does not. (Not to mention we're using a restricted password that wouldn't see the tables, anyway.) So you'll have to type in the table name that you're interested in.
Note: FileMaker example files seem calculated to cause the highest level of frustration possible for ODBC and SQL users. This is because the file names, table names, and field names all have spaces in them. SQL doesn't like spaces. So, now is a good time to return to your FileMaker file one more time and check for spaces. If you're using the Personnel sample file, you'll have to do some renaming. I have renamed the file to "Personnel" and the table in it to simply "Main." I've also changed any spaces in field names to underscores.
After you enter a table name, enable the "Cache record set" check box. This will enable you to move both backwards and forwards when browsing records, without executing a new query. (Some database systems support backwards navigation without caching; FileMaker does not.)
Click the "Refresh Query" button. Revolution provides a default query for you, "SELECT * from Main" which will retrieve all records, all fields, from the Main table.
Finally, specify the "Primary Key" -- this is a field that is unique for each record. It enables Revolution to reliably know which record has to be updated when you make edits to data. (And it's a key requirement of any relational database system.) In lieu of "Employee_ID" some databases have a field named "id" or something similar.
Testing Out the Connection
I promised that once we were connected the programming would be easy. And that's because for the common tasks, there is no programming. To see what I mean, let's set up the basics:
- Close the Query Manager by clicking the close box on the palette.
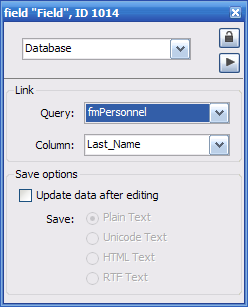
- Drag a new field to your stack from the tool palette.
- Double-click the field to bring up the Revolution Property Inspector.
- Select "Database" from the drop-down menu at the top of the Property Inspector.
- Select "fmPersonnel" (or whatever name you gave your query) from the Query menu in the Link section
- Select "Last Name" from the Column menu in the Link section.
Notice that each time you select a column from the menu, the data in the field immediately reflects information from the first record in the table.
- If you intend for the end user to be able to modify the information in this field, enable the "Update data after editing" check box. Plain text is fine unless you know you'll need one of the other choices.
- Repeat this process for other fields that you want to display in Revolution.
Here's my stack after adding a few of the fields:
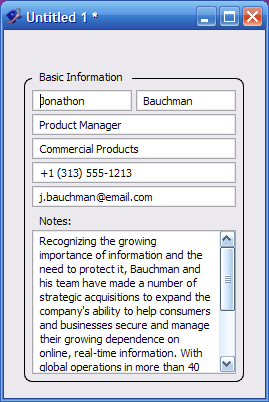
The amazing thing is that so far we haven't had to write a single line of code. We've never even opened the Script Editor! Yet here we have live data from a remote database system right within Revolution. Not only that but if you checked the "Update data after editing" check box (and the access privileges you established allow it), you can make any change to one of the fields and it will be reflected instantly on the server.
(Note: Container fields in FileMaker do not follow the usual formats for "BLOB" fields and must be handled specially. This will be covered in a later article)
Adding Some Buttons
Of course, we want to be able to browse and edit more than just the first record. For this we'll need some buttons. Fortunately, Revolution makes it just as easy to add commands as it does to link up fields.
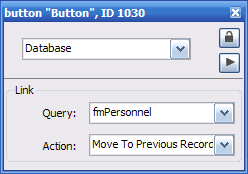
- Drag a new button out on to the stack.
- In the Propery Inspector, give the button the label "<-"
- Switch to the Database section using the drop-down menu in the Property Inspector.
- Choose the Query you're using from the Query menu in the Link section.
-
Select "Move To Previous Record" from the Action menu. Your screen should look like this:
- Repeat steps 1-5 above, but this time, use the label "->" and select "Move to Next Record" in the Action menu.
After you've added these two buttons, you can size and position them as desired. And of course you can use much fancier-looking buttons with icons, etc. As you click them, you see that you can navigate forwards and backwards within the data you retrieved from the FileMaker system. You can also make a change to any record and if the "Update data" check box was enabled for that field, data will automatically be posted back to the server. Pretty swift, eh?
In Closing
In this article, we saw how easy it is to set up a basic database browser in Revolution. The hard part wasn't coding Revolution, it was setting up the database to enable ODBC and configuring the client driver properly. The rest of it was simple click-and-drag in Revolution, no coding required.
I encourage you to play around with the various actions you can assign to buttons and the different kinds of layouts you can create with these basic commands. If you know some SQL, you'll even be able to set up basic searches and reports without writing any Revolution scripts. If your objective is to have a quick-and-easy runtime you can distribute without paying royalties or buy several copies of FileMaker, then you're already well on your way to accomplishing that.
The next article in this series will take a look at going beyond the basic functions built into the Query Manager, to create dynamic, custom user interfaces that truly take advantage of the power in Revolution. |