Window Tricks
You really can make Revolution windows jump through hoops! Here are 10 tricks you can use to enhance your stacks and amaze your friends...
When building an application in Revolution, you may find yourself wishing you could customize the overall container of your content: the window, which we refer to as a stack. Stacks have several built-in properties that can be customized to a certain degree, but in this article we're going to go beyond the default settings and get our windows to do some amazing things.
The WindowShape Property
If you look in Revolution's Inspector palette, you'll see you can choose from several standard system window styles, but what do you do when you want something really custom? It's time to turn to the windowShape property, which allows us to apply almost any shape imaginable to a window. All stacks have a windowShape property that can reference the id of an imported image, like this:
set the windowShape of stack "My Cool Stack" to the \
       id of image 2
For best results, you'll want to use a PNG image which can be generated by almost any image editing application, or even within Revolution. PNG is most suitable for our needs because an image in this format can contain varying levels of transparency, and makes for professional looking results.
Note that when a windowShape is applied to a stack, the visible portion of the stack will span the width/height of the imported image, starting from the top left of current card (0,0), regardless of where the image is located on the card. If the image is located at 500,500 but is only 70x70 pixels, the stack will appear to be 70x70 pixels, and the image will not be visible in the stack because it is located outside the windowShape region (again, the windowShape is always applied from the top left of the card).
As a simple example, you could make a circular or triangular-shaped window just by importing a snapshot from a graphic on card, and using the imported shapshot as the windowShape reference. Here's a quick way to import a snapshot of an object. With the object selected, execute the following code in Revolution's message box:
import snapshot from rect (rect of the selObj) of the selObj
The following animation shows the process of importing an image and setting the windowShape of the stack to the id of the image:
The image referenced by the windowShape property is known as the "mask" of the window. The mask image can be a simple primitive shape as shown above, or a fully rendered interface design, like this:
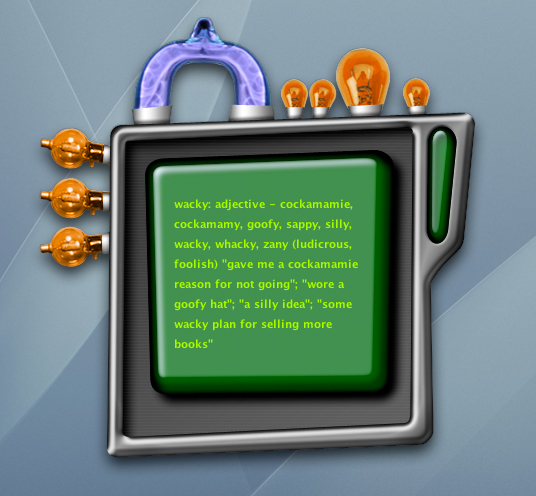
As you can see, the windowShape property is the core of customization, and the possibilities are endless! So let's get into the 10 tips and tricks that will help you get the most out of your customized stacks.
Note: a demonstration stack containing all of the cited examples is provided at the end of this article. You may wish to download the stack and run it while you read about each trick contained here.
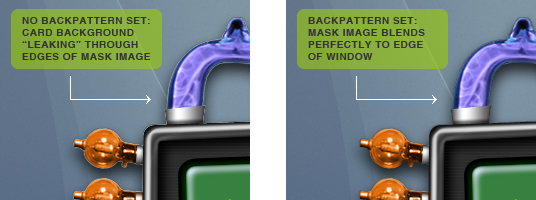
1) How To Create The Perfect Custom Window
Here's a secret: after setting the windowShape of a stack, hide the mask image (it doesn't need to be visible) and set the backgroundPattern of the stack to the id of the mask image. Why? Because using the mask image as the stack's backgroundPattern will prevent the backgroundColor of the card from showing through the edges of your stack.
Another secret: if you want your mask image visible for any reason, set the image's disabled to true and its cantSelect property to true. This will allow you to lay out controls and otherwise drag things around in the stack without accidently selecting/moving the mask image.
2) How To Drag A Custom Window (Or Any Revolution Window)
Once you create a custom-shaped stack, you'll notice that you can't drag it around the desktop because it has no titlebar. Don't panic! You can add a script to your stack to make it draggable just like any window on the desktop. You just need to establish how you want your stack to be dragged: using a defined region, like a custom titlebar or drag strip, or using the entire stack. Usually it's easiest to place the script in a specified object that will serve as the stack's drag "handle." Place this script in your stack's drag object:
local allowDrag
on mouseEnter
     put "" into allowDrag
end mouseEnter

on mouseDown
     put mouseLoc() into allowDrag
end mouseDown

on mouseMove X,Y
     if allowDrag = "" then exit mouseMove
     set topLeft of this stack to \
              globalLoc(X - item 1 of allowDrag & "," & Y - item 2 of \
          allowDrag)
end mouseMove

on mouseUp
     put "" into allowDrag
end mouseUp

on mouseRelease
     put "" into allowDrag
end mouseRelease
If you change the line above that reads:
put mouseLoc() into allowDrag
 if word 1 of the target = "card" then put mouseLoc() into \
       allowDrag
...you can place the drag routine in the stack script, and any clicks that occur outside the controls of a card will initiate dragging of the stack.
3) How To Punch A Hole In A Window
Sometimes in multimedia stacks (or complex multi-window applications) it is desirable to have a hole in a stack through which you can see the desktop or other windows. The way to accomplish this is by using a mask image that contains 100% transparency where the hole is supposed to be.

In this example, clicking in the empty areas of the target will switch you to the desktop. Note that if the hole is not 100% transparent, clicks within this region will be trapped by the stack, even though the hole appears to be "open." You may want this behavior in some situations, but if you need to be able to click "through" the hole to anything behind your stack, the hole region of your mask image must be 100% transparent.
4) How To Fade A Window In And Out
You probably already know you can use transitions when navigating between cards or showing/hiding controls, but what about when displaying stacks? The following handler can be used to bring the stack into (or out of) view via a fade transition, using 3 parameters: a starting blendLevel, and ending blendLevel, and a number of steps which determines how quickly the fade takes place.
fadeStack <starting blendLevel>,<ending blendLevel>,<number of \
       steps>
Running the following in a button will fade the stack completely out, wait one second, and then fade the stack back into view. A smaller steps value will result in a faster fade.
on mouseUp
     fadeStack 0,100,60
     wait 1 second with messages
     fadeStack 100,0,60
end mouseUp

on fadeStack pStart,pEnd,pSteps
     put (pEnd - pStart)/pSteps into tStep
     put pStart into tNum
     repeat pSteps
          add tStep to tNum
          set blendLevel of this stack to tNum
          wait 10 millisecs
     end repeat
end fadeStack
5) How To Float A Window Above All Others
The systemWindow property of a stack is used to force the stack to float above all windows on the user's system. This is handy when building a utility that is accessible across all open applications.
set the systemWindow of stack "My Cool Stack" to true
6) How To Scale A Window In Any Direction
Let's go back to rectangular windows for a moment since scaling custom windows is not as straightforward. The secret to scaling a rectangular window is to use the stack's rect (rectangle) property, which contains the stack's left, top, right, and bottom positions respectively. By changing the values of the stack's rect, you can scale a stack in any direction without changing the stack's initial position. Here's how:
# SCALE THE BOTTOM & RIGHT SIDES OF A STACK
put the rect of stack "xyz" into tRect
add 100 to item 3 of tRect
add 50 to item 4 of tRect
set the rect of stack "xyz" to tRect

# EXTEND THE LEFT SIDE OF A STACK TO THE LEFT
put the rect of stack "xyz" into tRect
add -50 to item 1 of tRect
set the rect of stack "xyz" to tRect
While a custom window cannot easily be scaled, you can create the illusion of scaling by employing multiple mask images, each of which corresponds to a different scaled state of the window. For example, you can create a palette that has an expanded and collapsed state. Each of these states requires a separate mask image to show the appropriate view of the stack.
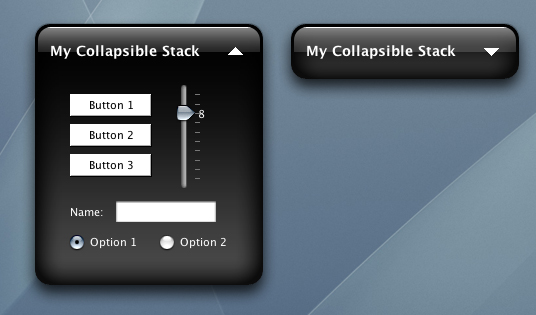
When you "expand" the stack, you set the stack's windowShape to the id of "expanded" mask image; conversely, you set the stack's windowShape to the id of the "collapsed" mask image to show the stack in its collapsed state.
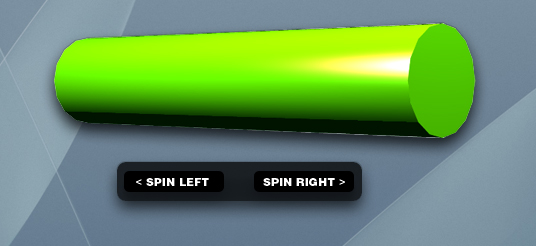
7) How To Animate A Window
Based on the above, you might guess (correctly) that one could set the windowShape of a stack to a series of images. After creating a set of PNG "frames" (images) and importing them into your stack, you can use a looping script to sequentially set the windowShape of a stack to the ids of the frame images. This, combined with the appearance of the images themselves, can give the illusion of an animated window that spins, grows, or moves around the desktop.
Here's the example looping code:
local currFrame
on runAnim pValue

     # THIS HANDLER REPEATEDLY TAKES THE CONTENT FROM ONE OF 19
   # FRAME IMAGES
     # (THE IMAGE'S TEXT), PLACES THE IMAGE CONTENT INTO A MASK
   # IMAGE
     # NAMED "_MASK", AND THEN SETS THE STACK'S WINDOWSHAPE PROPERTY
     # TO THE ID OF IMAGE "_MASK"

     if not the allowAnim of me then exit runAnim
     put currFrame + pValue into currFrame
     if currFrame > 19 or currFrame then put 1 into currFrame
     if currFrame < 1 then put 19 into currFrame
     set the text of img "_mask" to the text of img \
              ("frame-" & format("%04s",currFrame) & ".png")
     set windowShape of this stack to id of img "_mask"
     send "runAnim pValue" to me in 60 millisecs
end runAnim
IMPORTANT: When creating a sequence of mask images, the overall size of all the images should be consistent, otherwise you may get unexpected results while repeatedly setting the stack's windowShape.
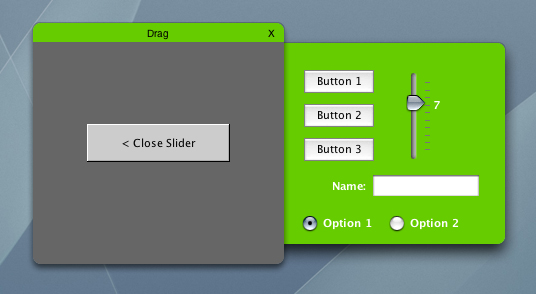
8) How To Create A Drawer Window That Works On Any Platform
Like so many things in Revolution, there is more than one way to accomplish this task. The method we'll look at here is the use of 2 stacks: a palette stack that serves as the main stack, and a toplevel stack that serves as the drawer. By virtue of being a palette, the main stack will always be displayed above the toplevel stack, and the toplevel stack can be moved out in any direction from underneath the palette.
9) How To Shake/Bounce A Window
If you're building a game in Revolution, or just want to get a user's attention, shake things up a little with a window shake, or bounce the window around the desktop! Here's how to perform a window shake (place the following script in a button):
on mouseUp
     shakeUI
end mouseUp

local origTL,tTime
on shakeUI
     put 2 into shakeDuration
     if origTL is empty then put topLeft of this stack into origTL
     if tTime is empty then put the seconds into tTime
     if (the seconds >= (tTime + shakeDuration)) then
          set topLeft of this stack to origTL
          put empty into origTL
          put empty into tTime
          exit shakeUI
       end if
     -- SET SOME EXTENTS FOR THE SHAKE:
     -- HOW FAR THE STACK CAN MOVE IN ANY DIRECTION
     put (-3,-2,2,3) into tSet
     put item random(4) of tSet into xShake
     put item random(4) of tSet into yShake
     set topLeft of this stack to \
              item 1 of origTL + xShake & "," & item 2 of origTL + yShake
     send "shakeUI" to me in 10 milliseconds
end shakeUI
You may have seen that Revolution ships with a demo stack called Bouncy that demonstrates how to bounce a window around the desktop. Originally written by Geoff Canyon, most of the code has been applied to the basketball stack included in the demo stack.

Grab the basketball and throw it around your desktop to watch the results. Hit the escape key to stop the action. (To view the original Bouncy stack, look in the Sample Projects folder located in your Revolution application folder.)
10) How To Build A Translucent Video Controller Window
The days of the default movie controller are over. Most of today's companies building video players use integrated control bars to control video playback, volume level, scaling, etc. By using a custom window and a little creative positioning information, you too can create a custom translucent video controller.

By placing your video controls in their own stack (usually a substack of the main video playback stack), you then set the style of the controller stack to palette, set the stack's blendLevel to a translucent value (around 40 for example), position the controller window appropriately, and presto, you have slick, integrated controller for your videos.
Why do this? In some cases, especially on Mac OS X, layering controls on top of a player whose alwaysBuffer is set to true can degrade video performance. By using two separate stacks, video can run in its own stack, unhindered by the control stack layered above it. See the demo stacks for example code.
Conclusion
Hopefully you've enjoyed this article about Revolution windows, found the 10 tricks useful, and have come to appreciate the significant customizing opportunities Revolution provides. To see the tricks in action, a demo stack is available that provides examples of most everything contained in this article. To get the stack, execute the following in your Revolution message box:
You are welcome to use any code provided in the demo stacks and adapt it to your own needs. And if you build something amazing, remember to share your creation with the community!
|