
| Issue 122 | November 10th 2011 | Contact the Editor | How to Contribute |
|
| ||
|
Social Media API This lesson shows you how to connect to Facebook and access your friends details using LiveCode. We have used Andre Garzia's LiveCode Facebook plugin for accessing the Api's. In this lesson we have developed an example which allows you to post messages to your wall, add photos to your album, get your friends profile picture, show a list of your Facebook friends and get birthdays for today. You can download the associated sample stack here. Step 1: Create a new App in FacebookPlease go to https://developers.facebook.com/apps and click Create New App. Only when we create a new app we will be able to get the App ID and App Secret Key. These are the main variables used to establish a connection with Facebook from LiveCode. Select Website, enter your test url and save the App. Now we have created an App called LiveCodeTest. Step 2: Use Graph Api to get details from FacebookGoto https://developers.facebook.com/tools/explorer/. In order to get details from Facebook you should enable permissions. Here you can use the Graph Api explorer to give the correct permissions and test them. To give the correct permissions, first you have to select your Application from the drop down list and then click on the "Get Access Token". This will pop up a list of permissions. Select the necessary permissions depending on your App. In our case we have selected User_permissions: friends_permissions: Then click the "Get Access Token" button, this will create the necessary permisions for your App. To check whether the permissions are working you can add this path in the Get field: /friends?fields=id,name,picture,birthday This will generate a json which will have your friends id,name,profile picture and birthday. All we have to do now is present the json through LiveCode. Note: You will get details of people only if they have shared them with you. Step 3: Creating the LiveCode stack - Design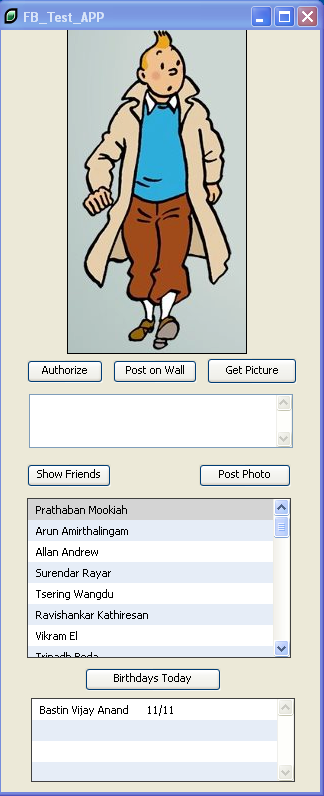
This is the basic layout of the stack. Step 4: Starting the plugins
Now is the time to use Andre's plugins. In the attached example stack you will be able to find two stacks "lib.aag.json" and "lib.aag.facebook". Open both the stacks and check the option "start using this stack". Step 5: Authorization ButtonThis is where we create the link between the Facebook Api and LiveCode. Before doing the code for Authorize button, add the libraries to the stack: on preOpenCard
Authorize button code: local sRefreshCode, sAuthToken on mouseUp -- call the request authorization method if pRefreshCode is empty or sAuthToken is empty then on facebookerror pReason on facebookcallback pRefreshCode, pAuthToken Step 6: Post on Wallon mouseUp --This function will convert the result json to Array Step 7: Get your Profile Pictureon mouseUp
on facebookerror pReason Step 8: Upload Photo to your App Albumon mouseUp --This will post the photo to facebook
on facebookerror pReason Step 9: Show Friends Liston mouseUp ## This will insert friends to the DataGrid repeat for each key element in tA["data"] Note: You will have to modify the DataGrid Row template accordingly. Please see this lesson on creating list of people using Datagrid. http://lessons.runrev.com/s/lessons/m/datagrid/l/7305-Example-Creating-a-List-of-People Step 10: Show Birthday's Todayon mouseUp put fb.get("/me/friends?fields=id,name,birthday") into tR ## This will check whether birthday is available to us or not.
Note: You will have to modify the DataGrid Row template accordingly. Please see this lesson on creating list of people using Datagrid. http://lessons.runrev.com/s/lessons/m/datagrid/l/7305-Example-Creating-a-List-of-People Step 11: Fetch results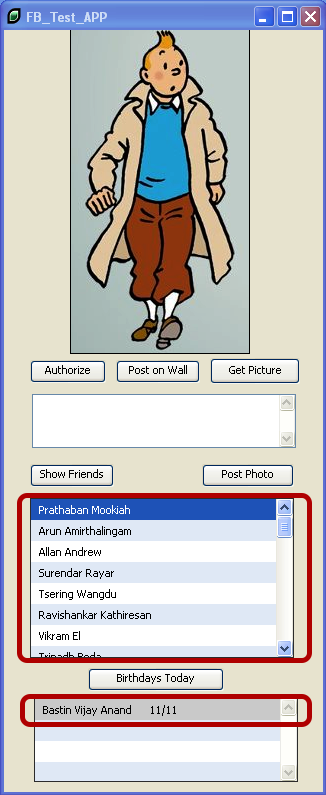
As you can see i am able to list my friends, get my profile picture and get current birthday details. Aditional InfoFor more on Facebook Graphs, please see this link http://developers.facebook.com/docs/reference/api/ With the above example and the Graph Api you can bring in more details from Facebook. This example is just to get you started with the basics of using the Facebook Api with LiveCode. We'd like to express our sincere thanks to Andre Garzia for his great plugin!
| 

|