| Issue 123 | November 24th 2011 | Contact the Editor | How to Contribute |
|
| ||
|
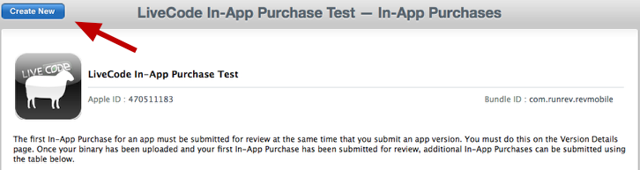
In-App Purchasing This lesson will show you how to handle in-app purchasing in Livecode. This lesson assumes that you have the appropriate requirements for creating and handling in-app purchases, i.e. an apple developer program account. It would also be advisable to have a test account set up in iTunes Connect so that we can test our in-app purchases without spending any money. 1. Creating an in-app purchaseIn order to use the in-app purchase with Livecode, we must first create it in iTunes Connect. From the front page of iTunes Connect, go to "Manage Your Applications", select the app for which you wish to create an in-app purchase, click "Manage In-App Purchases", and click "Create New". From there, follow the instructions to create the type of in-app purchase you wish to use. In the stack for this lesson, we will be using a consumable and a non-consumable purchase. 2. Setting up a stack to access in-app purchases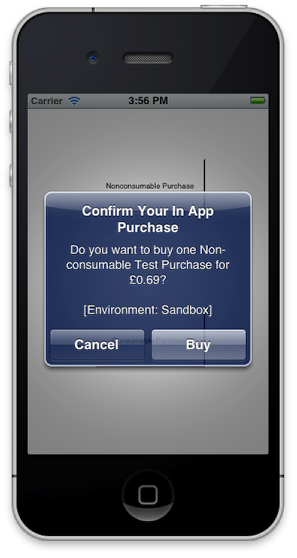
The first thing we will do is two buttons (one for consumable and one for non-consumable) and some code, which will allow us to interface with itunes connect and request the in-app purchases for download. To our consumables purchase button, add the following code: on mouseUp And similarly, add the following to our non-consumable purchase button: on mouseUp Finally, add the following code to the stack script: on purchaseStateUpdate pPurchaseID Here, the mobilePurchaseCreate command is used to generate an in-app purchase request within our app, and put the id of that in-app purchase request into the result. We tell the mobilePurchaseCreate command the identifier of the in-app purchase we are requesting - this must match the identifier of an in-app purchase that you have set up in iTunes Connect for the app. The mobileEnablePurchaseUpdates command will allow us to monitor the status of each in-app purchase request, using a specific built-in message, purchaseStateUpdate, which we can handle to check the status of the in-app purchase. We then use the mobilePurchaseSendRequest command with the ID that has been put into the result - this will send the request and begin the purchasing process. The user will be prompted to enter apple ID details and so forth, in order to buy the product. The purchaseStateUpdate message will now be generated repeatedly while the purchasing process progresses - it is sent with a parameter denoting the ID of the specific purchase that the message is regarding. In the handler, we use the mobilePurchaseState function, passing it the purchase ID parameter, to check what the progress of that purchase is. Here we only want to take action if it returns "paymentReceived" (indicating that Apple has received payment for the purchase), or "error", or "cancelled". In case of an error, we can use mobilePurchaseError with the purchase ID to find out the specifics of the error, and then use the mobileDisablePurchaseUpdates command to indicate that we are done with the purchase process (this is not essential in all circumstances, but is good practice regardless). In case of the user cancelling the purchase, we again want to use mobileDisablePurchaseUpdates. In case of payment being received, we can now take action in our app to finalize the purchase process - as there are multiple possible in-app purchases in this app, we will use the mobilePurchaseGet function to find out which in-app purchase we are dealing with. We pass the ID and "productID" to the function, which will return the identifier of the the purchase matching the ID we pass to the function. We can then take appropriate action for the in-app purchase that has been purchased, and use the mobilePurchaseConfirmDelivery command to confirm to Apple that payment has been received, finalizing the in-app purchase process on Apple's side. One important note: the bundle identifier that you create the standalone application with (as specified in the standalone application settings) MUST match the bundle identifier tied to the in-app purchases in iTunes Connect. 3. Handling in-app purchases once they have been purchased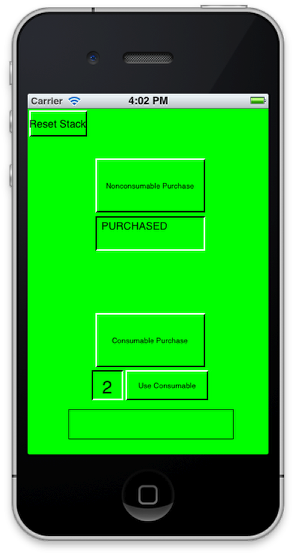
With the above, the purchase has been successfully handled. In this app, we are setting a custom property to indicate to our app that the purchase has been made. With the non-consumable purchase we simply set a custom property to true, but with the consumable in-app purchase, the user can purchase it as many times as they like so we simply increment a custom property to indicate how many times they have purchased it. We can now use these custom properties to take action based on the in-app purchases the user makes (as of course, simply handling the in-app purchase process does nothing other than record the purchases with Apple and transfer money, etc). For this app, we're simply going to use the non-consumable purchase to change the background color of the stack and change the text of a field, and use the consumable purchase to make a graphic flash on and off briefly. For the non-consumable purchase, we can use a setProp to implement this very quickly and conveniently: setProp cNonConsumablePurchased pValue For the consumable purchase, we want the user to be able to activate it whenever they want rather than immediately, so we will use two handlers - a setProp to indicate to the user how many consumable purchases they have remaining, and a button to activate the consumable. Our setProp will look like this: setProp cConsumablesCount pValue And our button should have this code: on mouseUp This will let use 'use up' a consumable each time the user clicks the button, and only let them carry out the action we want if they have purchased a consumable in the first place. 4. Making purchases persistent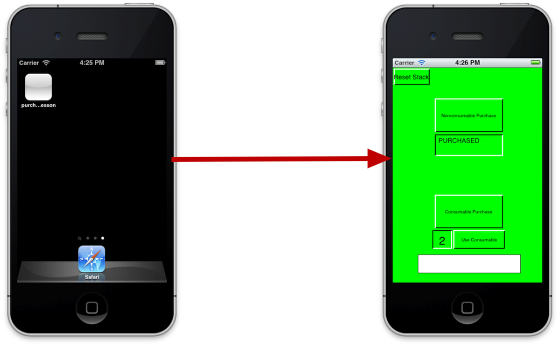
One problem that you may have noticed, is that it is not possible to save a stack that is running under iOS (due to technical restrictions imposed by Apple). Therefore, our custom properties will revert to whatever values they at build-time, each time the app is closed. We therefore need to somehow save our custom properties, so that we can re-load them every time we open up the app on our mobile device. One simple way of doing this is simply to add some code to our setProps which will write the value of the custom property to a text file located outside of the .app bundle - in this case, we'll use the documents folder. To this end, we will add the following handlers to our stack script, and call them at the end of our setProps for each custom property as follows: on saveConsumablesCount on saveNonConsumablePurchased setProp cNonConsumablePurchased pValue setProp cConsumablesCount pValue And we then simply load these values back in each time we open the app, by adding the following code: on loadConsumablesCount on loadNonConsumablePurchased on preOpenStack We now have a system which can control our in-app purchases simply by setting the value of the relevant custom properites, without having to worry about manually saving or loading them, or losing them.
| 

|