Hangman is a fun and simple game that everyone knows how to play. This tutorial will show how easy it is to create a Hangman game in Revolution Media.
Creating a game is a great way of starting out with Revolution Media as it covers many features
- Using basic controls; buttons, fields and groups
- Custom properties
- Basic coding structures such as if statements, for loops and switch
- statements
- Skinning a stack with images
And at the end you have a great looking game that is fun to play and can be extended in any number of ways.
Design and Planning
Once we have decided that we are going to create a Hangman game the first step in building our application is planning and design. We need to decide how we want our
game to look, and think about exactly what it needs to do.
You can download the accompanying Hangman Project. This project contains annotated code to guide you through creating it.
We will start with the design of our user interface - so what do we need to include:
- Gallows
- Hanged man
- Letters for the player to choose from
- Puzzle (the lines representing characters in the answer that get filled in)
- Hint, to let the player know if they are guessing a film, book etc
- Button to start a new game and quit
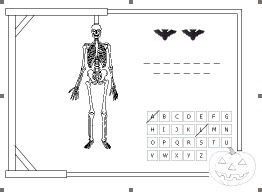
That's a good start, so now we will draw a few sketches of how our game might look. We have also decided to go for a Halloween theme so we will include this in our
sketch. So a design might look something like this:

We can use this later as a guide when we create our user interface (GUI).
We also need to think about what our application needs to be able to do:
- Start a new game
- reset the playing area
- pick an answer
- set up the puzzle
- show the correct hint: film, book etc
Check a letter
- When a letter is chosen by the user if it is in the answer those spots should be filled in
- If not another piece of the skeleton should be added
- The letter should be scored out so it is not chosen again
Check game status
- If all parts of the skeleton are showing the player has lost
- If all the letters in the answer have been found the player has won
These are the main things that our application needs to do. If we are sure we have thought of everything we can move on to the next stage and start creating the
application. First we will create the user interface and then we will start writing our code.
Creating the GUI
Since we already have a design this is relatively simple. Revolution Media allows you to drag controls from the Tools Palettes straight on to your stack and
position them however you want.

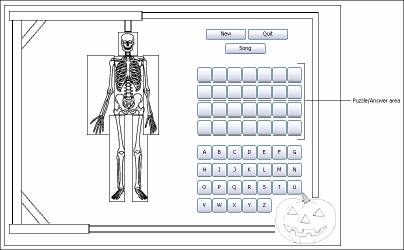
This GUI is made up of
- Background image including the border, gallows and pumpkin
- Six graphics making up the skeleton, grouped together
- Buttons to start a new game and quit
- Images to show if it is a film, book etc
- The puzzle/ answer areas - a set of buttons and lines to represent the puzzle which are grouped together
- 26 buttons each representing a letter of the alphabet again grouped together.
We ensure that we name all our controls sensibly. The buttons and lines in the answer group are named for their position in the group eg button "letter11"
is the button in the first column of the first line. It is always good practice to name controls well but in this case it is particularly important as we need to use
the names of the controls to set up our games.
Coding the application
Now that we have our GUI in place we can start writing code to make our game playable. Earlier we decided what the game needed to do. Now we will plan this further
to make the game as easy to code as possible. There are things to consider, such as are there any actions that we might want to do in more than one place? If there are
it is best to write a handler to do these actions which we can then call whenever it is needed without rewriting code. We also want to consider how best to write the
code to make it simple and readable.
A good example of this is clearing the board. There are a number of actions we need to do to clear the board and reset the game state so we would include these in a
handler which we can call whenever this needs done. Here is some pseudocode for clearing the board
on resetBoard
hide all graphics in group "skeleton"
set all the button in group "alphabet" to show as unused
clear the puzzle/answer area
reset properties storing the game state
end resetBoard
Other things to consider before starting to code are
- Where do the answers come from?
I have stored a list of answers as a custom property of the stack. The application can pick a random line from this custom property to be the answer.
- How do we check letters?
When setting up an answer I set a custom property on each button in group "answer" to store what letter is in that position in the answer. When the user chooses an
answer these custom properties are checked. If the chosen letter appears in the answer those buttons are shown, if not the next part of the skeleton is shown.
- How do we keep track of the game start?
We use script local variables on the card script to store how many correct and incorrect letters the user has chosen. These variables are available to all the handlers
on the card script so we can check if all the letters in the answer have been found or if all the parts of the skeleton have been shown.
- Can we avoid duplicating code on our Letter buttons in the Alphabet Group?
Yes. As all these buttons do the same thing there is no need to repeat code on each button. We can put the code into the script of group "Alphabet" and use the target
function to identify which letter was clicked.
We also need to ensure all our answers will fit within the answer area so none of the ones I have used have more than 4 words and no words have more than 7
letters.
Here is the handler which sets up an answer.
First we display the relevant image for the hint. Then we use repeat loops to step through each word in the answer and each character of that word. Due to the
naming of the buttons and underlines in group "answer" we can set the custom property, icon and visibility of the necessary controls. Each word in the answer is
represented by a line in the group.
on setUpAnswer pAnswer
local tAnswer, tHint, tButtonName, tUnderlineName, tCharacter, tImageName
## Show the Hint image
put empty into sAnswerCharacters
set the itemDelimiter to tab
put item 1 of pAnswer into tAnswer
put item 2 of pAnswer into tHint
show image tHint
## Set a custom property on each necessary button of group "Answer" stating what letter is represents
## Show the relevant underlines to display the puzzle
## This is why naming of the buttons and underlines was important, they are named relative to their positions in the answer
## Set the icon of the button to the ID of the relevant letter image
## When the player chooses that letter the button is made visible and the letter is displayed
## sAnswerCharacters stores the number of characters in the answer
## This is checked against to identify when the puzzle is complete
repeat with x = 1 to the number of words of tAnswer
add the number of chars of word x of tAnswer to sAnswerCharacters
repeat with y = 1 to the number of characters of word x of tAnswer
put "letter" & x & y into tButtonName
put "underline" & x & y into tUnderlineName
put character y of word x of tAnswer into tCharacter
put tCharacter & "Icon" into tImageName
set the cLetter of button tButtonName of group "Answer" to
tCharacter
set the icon of button tButtonName to the id
of image tImageName of card
"Image Store"
set the visible of graphic tUnderlineName of group "Answer" to true
end repeat
end repeat
end setUpAnswer
Skinning the stack
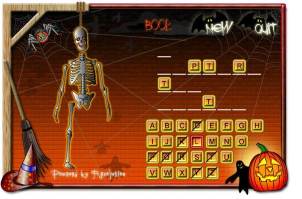
Once you have written all your code and tested your game and are happy with it you can add more images to make it look even better. We have used images for the
letter buttons and to display the answer, for the hints and for the New Game and Quit buttons.
To use images on buttons we store the images out of sight on a second card. Here we import all the images we want using the Import as Controls option in the file
menu. We then set the icon of the button to the ID of the image we want to appear on it. In Revolution Media buttons can have normal icons, disabled icons, hover icons
(shown when the mouse is over the button), Hilite icons (show when the mouse is down on the button) and others but these are the icons we will use.
To ensure our icons display correctly we turn off a number of properties of the buttons including Show Name, Opaque, Three D, Border and Hilite Border.
The background image can be imported directly onto the card as an image. Don't forget to set it to be the bottom layer so all your other controls appear on top of
it.
And there you have it. A fun and great looking game. This game could be extended in a number of ways, more answers could be added under more categories. The game
could be modified into a 2 player game or a game that allows you to choose the number of player. With Revolution Media the properties are endless.

Glossary
Custom Property
Definition: An object property you define. A custom property can hold any data you want to associate with the object.
If statement
Type: control structure
Syntax: if condition then statement [else elseStatement]
Summary: Executes a list of statements if a condition is true.
Repeat Loop
Type: control structure
Syntax: repeat loopForm statementList end repeat
Summary: Executes a set of statements repeatedly.
Switch statement
Type: control structure
Syntax: switch [switchExpression] case {caseValue | caseCondition} [statementList] [default defaultStatementList] end
switch
Summary: Chooses among several possible values for an expression, and executes a set of statements that depends on the value.
Icon
Type: property
Syntax: set the icon to {imageID | imageName} set the icon of {button | stack} to {imageID | imageName}
Objects (or Types): global, button, stack
Summary: Specifies an image that is displayed in a button, or used as the desktop icon of a stack file or application.
For more information see the Revolution Media dictionary.
|


