Using images from the Web
Did you know you can grab images from an internet site and use them really easily in Rev? No? Well, in this example I will show you a neat little application that does just that.
The basics
Ok, so to use an image from the internet, you can simply set the filename of your Rev image to the URL of the image file on the internet. So for example, drop an empty image onto a fresh card. Now enter this command in the message box:
set the filename of image 1 to "http://www.runrev.com/images/logo.jpg"
 If all goes well, you should have grabbed the RunRev logo from the top of our website and displayed it on your card. Cool huh? If all goes well, you should have grabbed the RunRev logo from the top of our website and displayed it on your card. Cool huh?
The example application
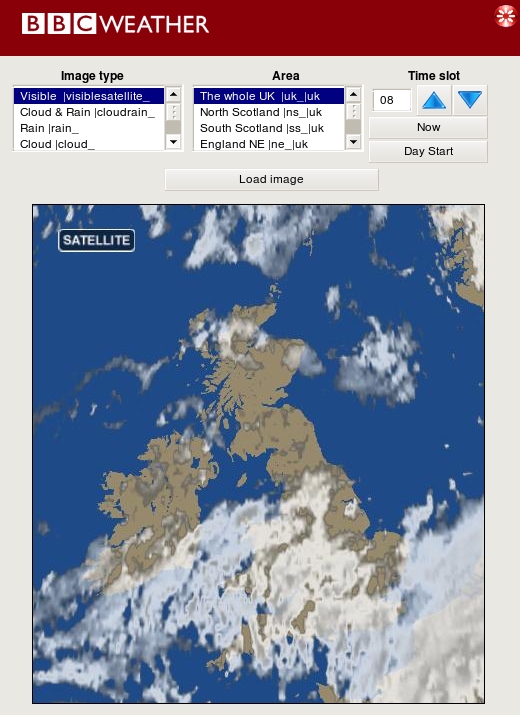
For an example of this I will show you how to create a simple application that will grab weather information (satellite images, cloud cover etc.) from the BBC weather website and display it in your application.
Although this application looks quite complex the key parts of it are very straightforward.
All we need do is create a URL of the correct format that the BBC uses for its images and then set the filename of the main image to that URL.
You can try the application out by typing:
go stack URL "http://www.runrev.com/newsletter/october/issue34/WeatherStation.rev"
into your Revolution message box.
(It should be noted that some images are not available for certain parts of the world, or for certain times. For example, the Visible image is only available for every 3 hour slot for places outside the UK.)
The BBC weather site URL structure
The BBC weather site uses the following structure for the image files on its web servers.
http://www.bbc.co.uk/weather/charts/ <area>/<sub-area>_<chart_type>_<dateencoding>.jpg
Where :
<area> is the main area of the world you are interested in (e.g. UK, World)
<sub-area> narrows down the area to a more specific location ( e.g. NS (North Scotland), NE (North England)
<chart-type> is the type of chart you are interested in ( e.g. Rain, Cloud)
<dateencoding> is a simple string representing the date and hour you want. It is formatted as YYMMDDHH
Now we know the structure of the URL used to retrieve an image from the BBC web server, we need to write some code to create a correctly formatted URL.
The URL and image code
We have two selection fields - the image type and the area. Each line of these fields contains information about the image we want to retrieve.
For the image type each line has a description followed by a bar ("|") and then the text that represents the <chart_type> element of the URL.
For the area field, each line has three elements separated by a bar ("|"). Firstly there is a description of the area, second we have the text representing the <sub-area> URL element and lastly we have the text representing the <area> element.
The main chunk of code that creates this URL from the fields and loads the image is a function called "loadImage" that is part of the card script. The annotated version is shown below :
function loadImage
-- Put the beginning part of the URL into a variable called preURL
put "http://www.bbc.co.uk/weather/charts/" into preURL
-- Set the item delimiter to bar for processing the area etc.
set the itemdel to "|"
-- Get the second item of the image type field as the <chart-type>
put item 2 of the selectedText of field "imageType" into t_type
-- Get the second element of the area (<sub-area>) and the
-- third element (<area>)
put item 2 of the selectedText of field "fldArea" into t_area
put item 3 of the selectedText of field "fldArea" into t_chart
-- We now have most of the URL, all we need to do is decode the hour
-- Set the item delimited to "/" used to separate the elements of the time
set the itemdel to "/"
-- Grab the date elements
convert the date to dateitems
put format ("%02d", item 3 of it) into t_day
put format ("%02d", item 2 of it) into t_month
put format ("%02d", item 1 of it) into t_year
-- Now ensure that we only have the last 2 digits of the year
if the length of t_year is 4 then
put char 3 to -1 of t_year into t_year
end if
-- We can now construct the full URL, using the value of our last
-- field (fldHour) that holds our 2 digit hour.
put preURL &t_chart&"/"& t_area & t_type & t_year & t_month & t_day & field "fldHour" & ".jpg" into tURL
-- Set the cursor to watch so the user knows we are doing something
set the cursor to watch
-- And now to retrieve the image from the internet and display it, in one
-- easy command !
set the filename of image 1 to tURL
end loadImage
The time code
Next, we need code that will adjust the hour field up or down by 1 hour.
Shown below is the annotated code for the "hour up" button. The code for the "hour down" button is similar except we subtract 1 rather than add 1.
on mouseUp
-- Grab the value of the hour field into a local variable for ease of use
put field "fldHour" into t_hour
-- Add one hour.
put t_hour + 1 into t_hour
-- If we have wrapped around midnight, set the time to 0
if ( t_hour > 23 ) then
put 0 into t_hour
end if
-- If our hour is less that 10 then we will add a "0" character onto the
-- front as we need the hour as two digits.
if t_hour < 10 then
put "0" & t_hour into field "fldHour"
else
put t_hour into field "fldHour"
end if
-- Now we have set up our hour field correctly we simply call the
-- loadImage command of the card to create the URL and load the image.
get loadImage()
end mouseUp
There are two other buttons that relate to the time functions - "Now" and "Start of day". The "Start of day" button sets the hour field to "00".
The "Now" button is slightly more complex as it sets the hour field to the current hour minus 3 ( the images on the website appear 3 hours delayed ). This code is shown below:
on mouseUp
-- We need to ensure we are getting 24 hour clock
set the twelveHourTime to false
-- Set the item delimiter to ":"
set the itemdel to ":"
-- Get the first item from the returned time into t_hour
put item 1 of the time into t_hour
-- Subtract 3 hours from the current time.
put t_hour - 3 into t_hour
-- If our hour is less that 10 then we will add a "0" character onto the
-- front as we need the hour as two digits.
if t_hour < 10 then
put "0" & t_hour into field "fldHour"
else
put t_hour into field "fldHour"
end if
-- Now we have set up our hour field correctly we simply call the
-- loadImage command of the card to create the URL and load the image.
get loadImage()
end mouseUp
Putting it all together
So, that's pretty much all we need to do. We have a couple of buttons that will put the relevant hour into the hour field (making sure its two digits) and a function that takes the selected parameters and creates a correctly structured URL, then sets the filename of the image to that URL.
In this application I have also removed all the decorations and border. I have then created a group at the top which contains a red rectangle, the BBC logo and a close button. Look at the code for this group to see how it deals with moving the application around the screen.
And that's it.....
There you go - an application that will grab weather images for various parts of the world that runs on Windows or a Mac or a Linux box in a dozen lines of code....
You could use a similar technique to grab webcam images from the net ... for example, try
set the filename of image 1 to "http://freespace.virgin.net/kings.house/image.jpg"
Any one want a nice desktop webcam viewer in 3 lines of code --- maybe that's a tutorial for another time :-)
|