| Issue 128 | February 10th 2012 | Contact the Editor | How to Contribute |
|
| ||
|
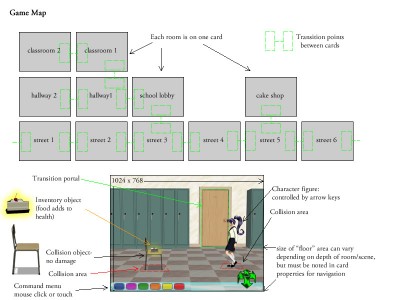
RPG in LiveCode: all about Graphics You can read part one in this series here. One inspiration I really should have mentioned in my first article is another old computer game: Below the Root, originally published by Windham Classics in 1984. You can read about it here, or here. Sample video: http://www.youtube.com/watch?v=jaAqO5zJEis The thing I loved about this game as a teen was the way the story was completely oriented around talking with other people, sometimes negotiating, and exploring. There was no fighting at all in this game, and though various sorts of injuries (e.g. falling out of trees or being bitten by a spider) could cause you to lose game time, there was no dying. The UI of the game is also interesting. Frames are presented to the player, and walking off a frame in a given direction takes one to the next frame in that direction. There are also frames behind doors in some scenes. This should work very well with the "card" metaphor in LiveCode. There is also a simple menu available to the player with a set of verbs which are automatically applied to the nearest applicable object, or a submenu shows all applicable objects if there is more than one. I think this kind of interface should be very workable for my game, and will avoid the problem of writing a natural language parser, which people are often frustrated by anyway. But note that the underlying mechanics are really very similar to the old Infocom games (like Zork), with a graphical interface substituted for the text descriptions of places and objects and the simple typed commands. The logic of such games is well-described in a variety of sources online, so I can use the algorithms for those games as a reference while I set up mine. A full map of this game is found here. I'll need to develop a similar map to link together the scene cards for my game. Naturally, the graphics are primitive in this 25+ year old game. But sometimes I feel the emphasis on super high quality graphics in many modern games is a distraction from subtle game mechanics and storytelling. While I won't be using the blocky character based graphics of Below the Root in my game, I do plan to worry more about game play than flashy graphics. In this article I'm going to cover how I generated the graphics for my game using DAZ Studio, but it doesn't make sense for me to start from scratch with this program. If you've never used a 3D graphics rendering program, you might want to check the tutorials provided by DAZ 3D, starting with this one. A playlist of more video tutorials is here. (I didn't make any of these tutorials, though I did help with adding the captions.) What I'll cover in my posts are the specific techniques I used to ensure visual consistency in my game graphics. Before I get into how to render graphics, I should go over a bit more of the early design. General premise of game: In this RPG, there is a randomly chosen mastermind Foe, not immediately visible, who has a goal that must be figured out and countered. Until this is done, monsters will appear and will attack the player and/or NPCs (non-player characters) in the scene until defeated or convinced to change sides. Find magic items to be able to transform into "Magical Guardian" form to gain magical attacks and other abilities, and collect Heart points to be able to convince foes, heal friends, etc. Meanwhile, other everyday problems occur (exams, arguments between friends, requests for help from npcs) and must be resolved using skills gained by visiting specific places, meeting people, etc. In my original card game, players could construct a custom deck with the various sorts of cards, and game play would be constrained by whatever players currently had in their hands. This becomes important because the three main types of resource cards, magic effects, skills, and hearts, sometimes don't appear in the most optimal way in a card game, so the challenge is to try to work with the other player to resolve as many of the Foes and Encounters as possible. For this RPG, the skills will be tied to finding specific places, objects (e.g. books) and people, magical effects will generally be provided by finding objects, and I need to figure out how to handle Heart points. They could be granted over time, or by completing a number of actions, somewhat randomly, but I think what I will do is tie them to resolving Encounters, particularly Encounters involving NPCs. I may add some other random events (like finding a love letter in your locker) that also grant Hearts. Hearts can be used for a wide variety of purposes in the card game. I may want to tweak this a bit in the RPG. The essential point in game design is to make the game challenging enough to be interesting, but not so hard that it can't be completed. Sketch Again Earlier I posted a "sketch" document based on some of the ideas in Week 4. The document I'm attaching here is based on my hand written notes before that webinar, and I think it's probably more useful for this kind of game. In this sketch, I focus on how different screens will be connected, and what kinds of items can be found on each screen.
Notes on design sketch/map
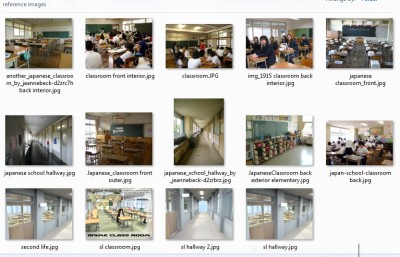
The next step described in the design process in week 4 is "research." At this point it would probably be useful to present some of the images I found while searching for references on the interior of Japanese high schools. I saved these images into a folder as I found them, and this is a screenshot of that folder set to "large icons."
Classrooms in Japan are remarkably consistent, so it will be easy to produce an iconic looking classroom. One key difference between the U.S. classrooms I'm used to and typical Japanese classrooms is the inclusion of windows from the hallway into the classroom. This will require me to tweak my 3D classroom models, as I'll explain shortly. How to render consistent style images for your game using DAZ Studio This is a summary of the points I'm going to cover in this article.
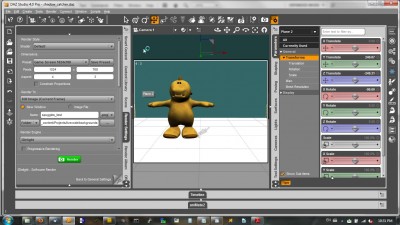
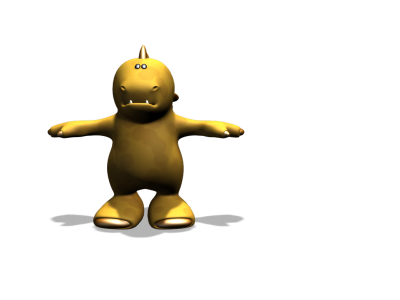
Again, if you are unfamiliar with DAZ Studio, I encourage you to check out some of the tutorial videos on YouTube, and there is also written documentation at the daz3d.com website. Keep camera angle and distance constant I recommend that you create a basic scene in DAZ Studio and load it to start all of your renders for the game. This will allow you to position objects in the scene and keep sizes and perspectives consistent. Here's a sample scene I'm going to start with. This scene includes a free character, "Spuggles," available at the DAZ 3D site.
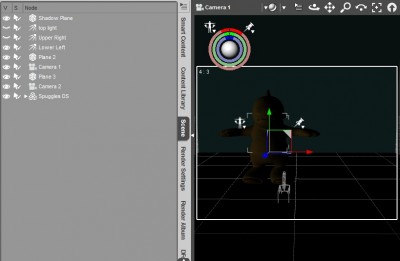
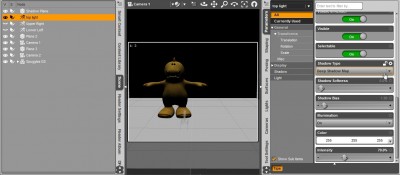
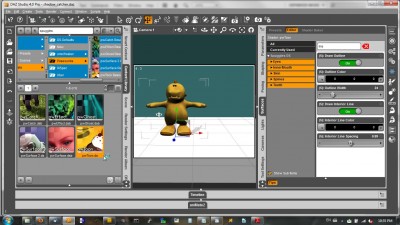
Here, I've created two planes at right angles, one for the floor and one for the back wall, each 5mx5m (about 16ft square) and adjusted the camera until I can get the full 5m width into a 1024x768 render window. This is the screen size I've decided to go with for now. It should look reasonably good on desktop, in a browser, or on an iPad. I'm not sure this game would work well on a phone or similar sized device, due to the level of detail I'm planning to include. Spuggles is about 2m tall in this scene. This is a bit taller than any of the characters I'm planning to use, but it gives me a general idea of how big the area is that I'm including, and how much space I'll have to work with in each scene. It's up to you how big to make each scene, but I think 5m wide is a good choice for human-sized characters. You want enough room for your character to move around, interact with NPCs and objects, etc., but you need to keep the camera close enough that the players can see the detail of the character and the objects in the scene, or what's the point? In the left column, you can see where I've set the render parameters. I've left the render style on "Default" rather than switching it to "Toon," because I like the quality of the pwToon add-on I'm planning to use, but you can get reasonable results with the built-in toon shader. This is where you set the size of your "render," the image that DAZ Studio will produce. In the right column, you can see the parameters of the second "backwall" plane. You won't usually have a backwall if you're rendering a figure, since you'll want a transparent background, and in a scene the set pieces you include will provide the backwall. This plane is included only so I can determine camera distance and angle. I've decided to allocate about half of the screen to "floor" and half to the back wall. This scene is about 3m deep, meaning that the distance from the bottom edge of the image to the join of the floor and the back wall is about 3m. (You can see this in the screenshot because DAZ Studio includes a floor grid by default-- this won't show in the final render.) In some scenes, the back wall or equivalent may be further back, but probably the intersection of floor and back wall will be in the middle third of the screen. We'll need to keep track of where it is for each scene, or mark the edge with a collision object, so the character doesn't start walking up the wall! Lighting for Toon renders Creating photorealistic images in a program like DAZ Studio can involve a lot of manipulation of lighting to get a believable render, but lighting a toon scene is generally much simpler. Two or three distance lights are generally enough. I'm using three lights in this scene. First, I like to have my primary lighting in a toon render coming from the upper right.
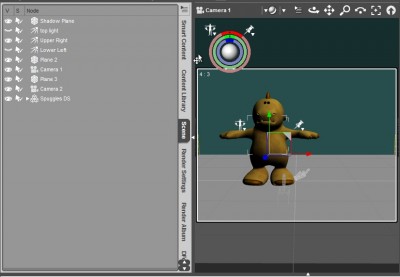
DAZ Studio makes it easy to position lights by looking through them like a camera:
This light won't cast any shadows. I'm going to use shadows specifically to indicate where objects are with respect to the floor, as I'll show below. I've set this light to 75% intensity. If I were not going to also include a top light for shadows, I'd probably set this to 100% intensity. I tend to leave the color of lights set to white unless I'm trying to achieve a particular effect. If I only used one light, the opposite side of my figure would be completely in shadow, which generally is not what I want, so I'm going to add a lower left "fill" light:
This light will keep the parts of the figure that aren't affected by the primary light from being too dark to see. Finally, I want to generate a shadow for most of my objects to show where they lie in relative position to the floor. This will provide an important visual cue to the player when moving the character around.
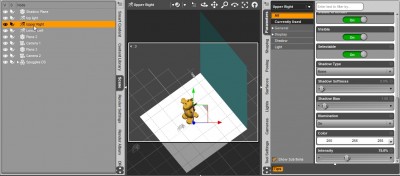
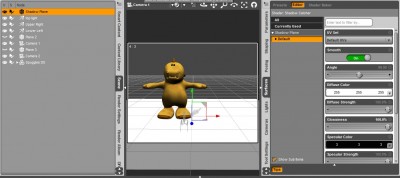
I've set the shadow type to "Deep Shadow Map," which renders more quickly than "Raytrace" and will work well enough for my purposes. I've set the intensity to 70%, a bit lower than my main light. Now we come to a particularly useful trick. I'm going to make the "floor" plane into a "shadow catcher." This will allow me to render the figure with a shadow that I can overlay onto the final scene. The shadow will be semi-transparent, so the floor of the scene will still show through. When I start to render the animation cells, the shadow will always look correct for the figure as it moves around the scene. To work this bit of magic, I select the floor plane and its surface in the Scene and Surfaces tabs, respectively, and apply a special shader I've created called "Shadow Catcher." (I'll make this whole test scene available for download shortly.)
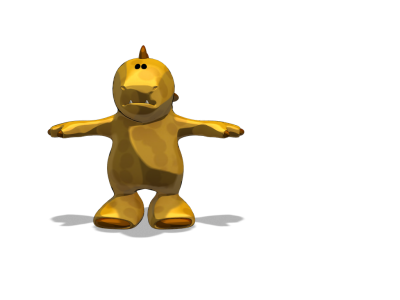
When I render, the plane will disappear, leaving only the semi-transparent shadow. By saving the file as a .png, the background will be left transparent. The background is white in the image as posted to the forum, but you can download this image and composite it with your own background to see how it looks. The Toon Render Style Our last render gives the impression of a smooth 3D object. We could stay with that image, but I want a "toon" look to match the anime/manga theme of my game. Now we'll apply thepwToon shader to the surfaces of the Spuggles figure:
This image forces colors to show higher contrast between light and shadow, and lower contrast within the lit, shadowed, and highlight areas. This also creates a black outline around the figure.
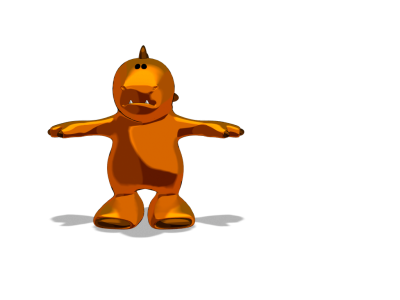
In this image, Spuggles uses a "diffuse map" to color skin, spines, teeth, and eyes. This is a jpg image that acts like a piece of cloth that is cut out and sewn over the surface of the Spuggles shape to provide the right color at the right location. However, we will generally get a better effect if we replace the diffuse map with plain solid colors. Here, I've picked a gold color for the skin, brown for the spines, black for the eyes, and white for the teeth. I've also tweaked the "Shading Color" and "Rim Exterior Multiplier" to be a darker shade of the "Diffuse" color, so the shaded parts aren't grayed out.
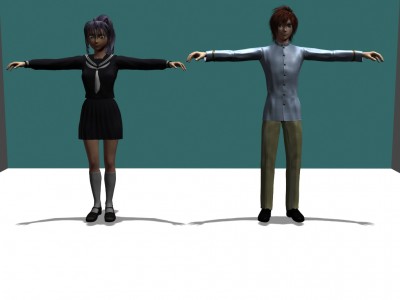
We've now got a good general method for rendering toon figures. Let's see how that applies to the human/anime characters I want to use in my game. Rendering Anime Characters As I mentioned before, I'm using anime-style figures from DAZ 3D as the characters and NPCs in my game: Aiko 4 and Hiro 4. Here they are, loaded into the same scene I've been using with Spuggles (meaning I have the same camera distance and angles, and the same lights), with their default textures. They look pretty freaky, but we'll fix that in a moment.
First, we'll replace the skin and eye textures by using this set of character textures: Animeyes for A4 H4. I replaced most of the clothing diffuse maps with flat colors, as I did with Spuggles. Also, note that the hair in the first image has fine wisps that would look out of place in a toon render. Hair details like this are handled using something called a "transparency map" in DAZ Studio. The original hair models come with a very fine-grained black and white image with thin vertical stripes-- where the image is black, the hair is transparent, and where the image is white, a thin wisp of hair is displayed. I replaced this transparency map with a coarse jagged black and white image to give the hair a more toon-ish appearance.
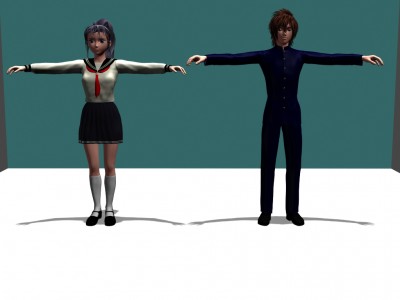
This already looks a lot better. But as we saw with Spuggles, the default render creates a gradually shaded surface to give a 3D appearance. I want to use the pwToon shader again to give me cell shading and outlines:
This gives us our basic characters for the game. I can easily change clothing and hairstyles, and even tweak face and body shapes to make different characters. Choose 3D Assets of Consistent Style The last point I want to make in this installment is the importance of picking assets of consistent style. For the initial sets in my game, I'll be using three primary sources of content: Shade Complete Collection Volume 2: Japanese City (exported to .obj and imported to DAZ Studio). Manga is usually fairly realistic other than the stylized faces of the human characters, but you may want completely realistic characters, or you may want to go further in the "toon" direction. Vendors like 3D Universe and The3dZone specialize in "toon" figures and props, including a wide range of expressive toon animals as well as human figures, stylized buildings, and anthropomorphic cars and gadgets. Or maybe the quirky "DeadWater" series by The AntFarm will appeal to you more. The point is to look for assets that have the general shape you're looking for, whether it's the exaggerated, rounded features and unrealistic geometry of classic cartoons, a clean, contemporary realistic style, or a dark horror motif with rags and tentacles. There's 3D content out there for every genre. Here are a few more helpful links: Toon Category at DAZ 3D: In addition to being the vendor for DAZ Studio, this is the largest store for 3D content, and offers very high quality. They have a no-questions-asked 30 day return policy. This link goes directly to their "Toon" category, but they also carry a wide range of fantasy and science fiction content. ShareCG: This is one of the best sources for free 3D content. Generally you can be confident that the free items here are legally shared, not pirated. (Remember, you don't want to have your hard work in developing a game be ruined by an accusation of using unlicensed content!) Check the "Usage Rights" in the description to make sure you are allowed to use renders of the content in commercial works, if you're planning on charging for your game (or even including advertising that generates revenue). The entry must state "Unrestricted use," "Commercial renders OK, contents not for redistribution," or "Commercial & Personal Use." If there is any other notation, including "Limited use with credits" or no indication of usage rights, don't use the content without contacting the creator for permission. Many creators will happily allow you to use their content with credits, even if they haven't said so in the entry on ShareCG, but you can't assume that. Renderosity Market Place: After DAZ3D, this is one of the most popular online sources for 3D content. Quality varies, but most of it is reasonably good and moderately priced. There are no particular themes-- there are categories content can be included in, but they carry all kinds of content. Runtime DNA: This is a smaller 3D content shop, but the quality tends to be very high. They also tend to carry a lot of "toon" content and fantasy/horror. There are well-maintained themes you can use to look for related content. Vendors often work together on collaborative content designed to go together. Content Paradise: This is the 3D content website operated by SmithMicro Software, owners of Poser, which is software with similar features to DAZ Studio. Poser has been around longer and uses a "whole package" sales model rather than the "a la carte" model at DAZ 3D, so the software requires a larger up-front investment to get started. PoserAddicts: This is a smaller independent vendor, but quality tends to be very high and prices tend to be extremely reasonable. There is no particular theme-- they have a little of everything. Poser Direct: This independent store probably has the lowest prices of any, and plenty of "freebies" as well. Their motto is "Fun stuff for happy people." Their content tends to be science fiction or fantasy oriented, with lots of fun toon robots. They also have a wide variety of vehicles, so if you're making a game about planes, trains, and automobiles, definitely check this site. Poserworld: This is a "subscription" site, meaning that you have to buy a subscription for a period of time, during which you can download as much content as you want. A lot of the content here is more realistic in theme than at other sites. 9MBi: Another shop specializing in more realistic content, though costumes are also included. In particular this is a good site for models of well-known political figures and related props and sets. If you want to make a game simulating running the country from the Oval Office or running a political campaign, or you want to cast a president or candidate as an action hero, this is a great resource. Xurge 3D: Very high quality independent vendor, specializing in fantasy and science fiction. If you want the "look" of contemporary fantasy RPGs, this is a good place to look. Mirye: Mirye is a reseller of LiveCode, and also a seller of the Franklin 3D game engine for Live Code. They also sell Shade, a 3D modeling and rendering program, and a wide variety of themed content for multiple software platforms including DAZ Studio (look for "Poser" format). As a reminder, if you are rendering images to use as animation frames or backdrops in your game, you do not need to purchase a "game developer" license for the content at any of the stores. You only need this extra (and more expensive) level of licensing if you're going to use an add-on product like Franklin 3D (or a separate game engine like Torque) to make a 3D game that will include the models themselves and render them in real-time. Watch out for the next installment!
| 
|