Creating a user interface list with blind effect UI control using general groups.
In Revolution the use of groups of controls allows us to write general UI controls that can be easily extended by editing the content of the individual groups, without effecting any overall functionality. This article is about writing a blind effect, where one can click on a blind pane such that the blind opens up pushing the underlying blind panes down in the process.

First we need to start by creating a UI element template. We can then clone this template to create a list of elements making up our blind.
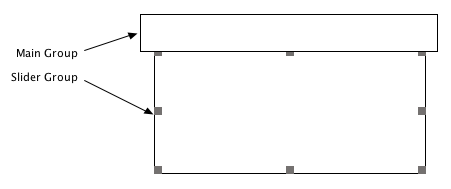
We start off by creating two rectangular graphics, that will form the backgrounds of our element. We place these underneath each other so that we can see what the blind element would look like in its extended form. We then group both rectangles seperately naming the top group "Main" and the lower one "Slider", say, as it will be the group that "slides" out. We group both of these groups together in an umbrella group we shall call "Element Template".
We do not wish our groups to have any visible margins, so we set the margins of all our groups to 0. (You can do this by going to the "Text Formatting" pane of the property inspector, or issuing the command directly in the message box).
We now have something that looks like this:
Now we have the two groups inside the "Element Template" group, we wish to add the sliding functionality. In order to achieve this we put two scripts in the umbrella "Element Template" group:
on showMe
repeat while the top of group "Slider" of me < the bottom of group "Main" me - 4
set the bottom of group "Slider" of me to the bottom of group "Slider" me + 4
wait 10 milliseconds with messages
end repeat
end showMe
on hideMe
repeat while the bottom of group "Slider" of me > the bottom of group "Main" of me
set the bottom of group "Slider" of me to the bottom of group "Slider" of me - 4
wait 10 milliseconds with messages
font color="#980517"> end repeat
end hideMe
Both handlers work similarly: repeat whilst the slider is [in]visible, move slider up [down] by 4 pixels. Notice that "me" here is the "Element Template" group, which contains the groups "Slider" and "Main". As we do not want to unnecessarily lock up messages we wait 10 milliseconds with messages. It is also possible to use the "move" command in Revolution to make an object move, however, in this case we want to send messages during the movement of an object, such that other objects can update their layout.
In order to call this code to see it working, we add a small button to the "main" group to open/close the slider.
Create a button in group "Main", and give it a name, setting its label to +. In the button script put the following simple script:
on mouseUp
if the label of me is "+" then
showMe
set the label of me to "-"
else
hideMe
set the label of me to "+"
end if
end mouseUp
This code is part of group "Main" (as that is where the button is), thus calling showMe will send a message "showMe" to the underlying umbrella group "Element Template".
If you notice that the Slider group slides over the Main group, then in group edit mode (for group "Element Template") make sure you move the "Slider" group to the very back, so that it is behind group "Main".
If the height of your "Slider" group is greater than the height of group "Main" you will notice that the slider group moves behind but past the "Main" group. Thus, in order to avoid this we will make some handy use of group clipping in revolution. In addition, we will also make use of the fact that if a groups "lockLoc" property is set to true and we set the height of the group to a lesser value, the top of the group remains the same.
Thus, make sure that lockLoc is set to true for group "Element Template". Unless otherwise required by your program, it is recommended you lockLoc all your controls in the template so to avoid any unexpected results. If you need to temporarily move a control, you can unlock it in the property inspector, move the control, and lock it again.
In order to make the clipping work, when the slider is moving up or down, we need to adjust the height of the umbrella group "Element Template". By setting lockLoc to true, the top of this group stays fixed so that the Slider group can move past this top causing clipping to occur.
on showMe
repeat while the top of group "Slider" of me < the bottom of group "Main" me - 4
lock screen
set the bottom of group "Slider" of me to the bottom of group "Slider" me + 4
set the height of me to the height of me + 4
layoutChanged the short name of me, 4
unlock screen
wait 10 milliseconds with messages
end repeat
end showMe
on hideMe
repeat while the bottom of group "Slider" of me > the bottom of group "Main" of me
lock screen
set the bottom of group "Slider" of me to the bottom of group "Slider" of me - 4
set the height of me to the height of me - 4
layoutChanged the short name of me, -4
unlock screen
wait 10 milliseconds with messages
end repeat
end hideMe
We added the line layoutChanged, that can be intercepted higher up in the message path. So, in order to intercept this message, we first need to create a list of elements, group those and put a layoutChanged handler in this new group.
For reasons of simplicity we shall create a list manually, but this can of course be easily automated with individual list elements depending on certain data.
So, let's clone the "Element Template" group. You can do this very easily in the IDE by holding down Option (or Alt on the PC) and dragging the "Element Template" group to another location. You will see that instead a copy is made. This new copy will not take over the lockLoc property of the template, so make sure that you set the lockLoc property to true. Also, name this new copy "Element 1", we will make handy use of the fact that word 2 of the name is a number so that for all subsequent template clones we increment this number thus creating groups "Element 2" to "Element 4".
After having created 4 elements in this fashion, we group all of these together by selecting them in the IDE and clicking the "group" button. Call the new umbrella group "List". We may wish to make this "List" group slightly wider, so to allow space for a scrollbar for example. After having done this make sure you set the lockLoc property to true again.
We may now see a list of four elements, however, the sliding functionality no longer works, because the other elements do not yet move and thus overlap any sliders.
To make sure that the sliders work in group "List", we add the layoutChanged handler to its script:
on layoutChanged pGroup, pSize
lock messages
local tElementCount
if pGroup is "Element Template" then exit layoutChanged
put word 2 of pGroup into tElementCount
add 1 to tElementCount -- look for the next one
repeat while there is a group ("Element" && tElementCount)
set the top of group ("Element" && tElementCount) to the top of group ("ElemenT" && tElementCount) + pSize
add 1 to tElementCount
end repeat vscroll of me to the vscroll of me
unlock messages
end layoutChanged
pGroup is the group whose slider is moving by a number of pSize pixels (be it up or down). So, because the layout has changed by pSize, we need to adjust the top of each group coming after the one that sent the message layoutChanged accordingly.
Instead of doing the above, we could also simply do
set top of group ("Element" && tElementCount) to the bottom of group ("Element" && tElementCount - 1)
We now have a working blind effect!
In order to speed things up it is a good idea to use "lock screen". This will defer a screen refresh until unlock screen or the end of a handler for that matter is encountered. Good locations for lock screen have been marked in the above code.
We may now have a blind effect, however, we are left with the problem of content moving out of view in the group "List". To resolve this, we need to update the scrolling of the "List" group accordingly in the layoutChanged handler of the card.
we add the following lines of code to the layoutChanged handler of the card at the end:
if the bottom of group pGroup of me > the bottom of me then
set the scroll of me to the scroll of me + pSize
end if
Thus, if the bottom of one of our list elements becomes greater than the bottom of group "List", we need to update the scroll of the umbrella "List" group, so that the element stays in view.
Finally, we wish to make sure that the scrollbar is only present if we need it, to achieve this, we can add the following lines to the layoutChanged handler:
set the vScrollBar of group "List" to the formattedHeight of group "List" > the height of group "List"
set the vScroll of group "List" to the vScroll of group "List"
in other words, if the height of the contents in full is greater than the visible height of the group, we need to allow scrolling, else disallow it.
The second line makes sure that the scroll of the field gets updated correctly, as its contents change size. In other words this forces an update of the scrolling of the field.
It is really easy to create UI controls in Revolution. The great advantage of the above example is that it mainly made use of group controls, this means that we can add anything we like to our "Main" and "Slider" groups, yet maintaining the functionality we created without any worry. We need simply edit the template, and we can then create an advanced UI list that looks good.
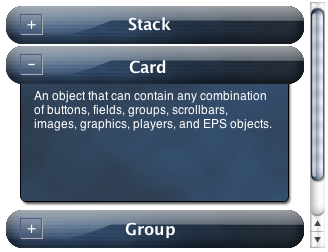
Skinning the template one can create all sorts of lists. For example
|