| Issue 111 | June 2nd 2011 | Contact the Editor | How to Contribute |
|
| ||
|
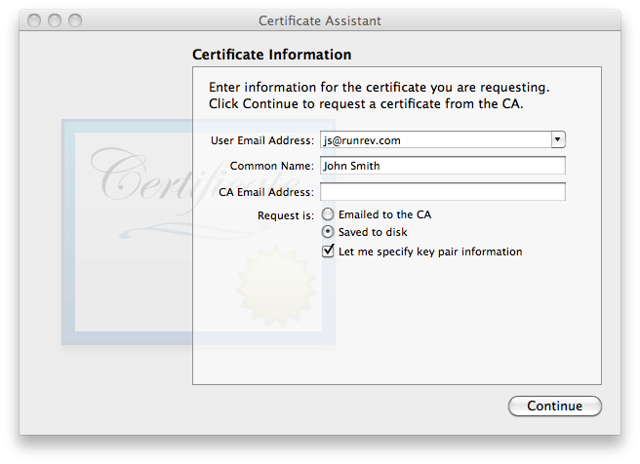
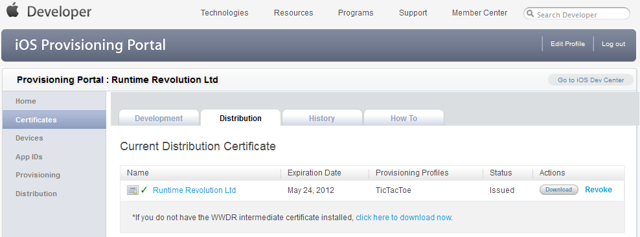
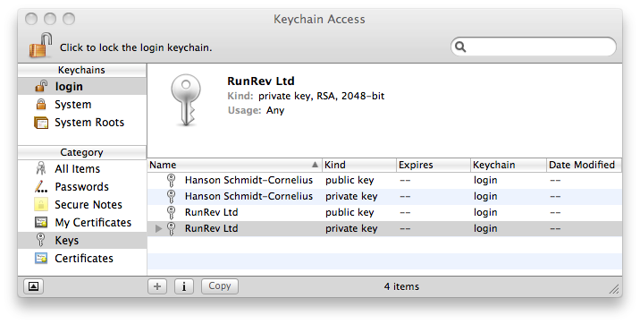
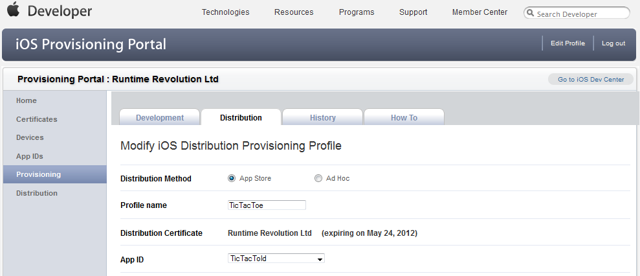
Create a Distribution Profile for iOS This lesson describes how to set up a distribution profile that can be used for applications built with LiveCode. It is assumed that you have signed up to the iOS Apple Developer Program. Screen captures are provided. IntroductionA distribution profile is required if want to release your iOS application through the online Apple store. The information discussed here is reduced and is also covered on the apple iOS Provisioning Portal website. You can access that additional information by logging into the iOS provisioning portal that is accessible from: https://developer.apple.com/. Select the Member Center and use your login credentials to log into your account. Depending if you are a developer for Mac apps and/or iOS apps your login screen may differ. You may have to follow a link to the iOS Dev Center. Then follow the link to the iOS Provisioning Portal. The iOS Provisioning Portal provides you with a link to Distribution. Select the Prepare App tab and select the highlighted headings in order to expand the steps provided by Apple. Generating a Certificate Signing RequestThe first step in setting up a distribution profile is to create a certificate signing request. You can do this on your Mac. Launch the Keychain Access.app that is stored in Applications/Utilities. Then execute the following steps in your Keychain Access application: Submitting a Certificate Signing RequestAfter you have generated a certificate signing request, you need to submit your certificate for approval. Log into the iOS Provisioning Portal that is accessible from: https://developer.apple.com/. Select the Member Center and use your login credentials to log into your account. Depending if you are a developer for Mac apps and/or iOS apps your login screen may differ. You may have to follow a link to the iOS Dev Center. Then follow the link to the iOS Provisioning Portal. The iOS Provisioning Portal provides you with a link to Certificates. Select the Distribution tab and follow these steps: Downloading and Installing a Distribution CertificateRemain on the same page as the one you were on when you submitted the certificate signing request, then follow these steps to download and install the certificate: Backing up your CertificatesIt is important that you backup the keys you created. This allows you to develop on multiple Macs or reinstall the keys after unexpected data loss. You can export your private keys and certificates through the Keychain Access application: Downloading the Distribution ProfileLog into the iOS Provisioning Portal that is accessible from: https://developer.apple.com/. Select the Member Center and use your login credentials to log into your account. Depending if you are a developer for Mac apps and/or iOS apps your login screen may differ. You may have to follow a link to the iOS Dev Center. Then follow the link to the iOS Provisioning Portal. The iOS Provisioning Portal provides you with a link to Provisioning. Select the Distribution tab and follow these steps: You are now ready to move on to lesson: How do I set up an App for Submission to iTunes Connect?
| 


|