
| Issue 95 | June 25th 2010 | Contact the Editor | How to Contribute |
|
| ||
|
Create an 8-Puzzle Game This article describes how to create a simple interactive 8-Puzzle game. Sample code is provided that can be placed in and run from the main stack. The board and game tiles are automatically generated. You can download the accompanying stack here. In the next edition of revUp we will show you how to solve the puzzle using Rev and a commonly implemented Artificial Intelligence algorithm. This article is reprinted from lessons.runrev.com. IntroductionThe 8-Puzzle is a popular single person game that comes in many shapes and sizes. It fundamentally consists of eight squares or tiles that can be moved around a 3X3 board grid. Tiles can be moved one at a time to take up the empty place on the board. The purpose of the game is to create an ordering of letters, numbers or to restore a picture that is printed on the eight tiles of the puzzle. In our game the tiles are numbered 0 to 7. You will be able to shuffle the tiles and slide them individually to restore the initial numerical ordering. The Components of the GameWe discussed the physical components of the game in the introduction; what we need to focus on now are the computational components that make up the game in RevTalk. Soft components that simulate the physical components are the stack card that serves as the game board, eight square buttons that make up the tiles that slide around the board, and a rectangular button that is used to trigger the shuffle algorithm. In the background we need to simulate physical constraints that are inherent in the physical design of the game. This is the ability to move tiles and at the same time restrict the order in which tiles can be moved. Tiles can only be moved that are either horizontally or vertically adjacent to the empty space. Creating the BoardThe board is created as soon as openStack is called. You should only have to run the following code once, but there is no harm in calling the code several times. First set up a variable that stores the offset between the board tiles: # this is a local stack variable that stores the offset between the board squares Now create openStack that assigns the offset value to sOffset and sets up the tiles that are to appear on the 3X3 grid. Notice that we are actually creating nine tiles on the board and then hiding the last one. This makes it easier to keep track of the board state and swap tiles around. The shuffle button is also created in openStack. on openStack Command createBoard places the eight tiles on the stack card. pHorizontal specifies the number of horizontal tiles to place, pVertical specifies the number of vertical tiles to place and pPadding specifies the amount of space that is to be placed between the top and the left edge of the stack card and the grid of tiles. Command createBoard also populates the button scripts that are executed when you select a tile that is to be moved around the game board. command createBoard pHorizontal, pVertical, pPadding Command writeButtonLabels assigns numbers to the labels of the tiles. The tiles are numbered 0 to 7. 8 is the hidden tile that represents the empty space. Argument pButtonLabelNames is the string of labels that is to be assigned to the tiles. command writeButtonLabels pButtonLabelNames Command createShuffleButton creates the shuffle button and populates the script that is called when pressing the button. This command also resizes the card on which the button and tiles are placed. command createShuffleButton The board is now ready, we are just missing the underlying functionality that drives the game. Shuffling the TilesIn order to make the game more challenging, there is a shuffle button that randomly moves the tiles around. The shuffle button randomly selects tiles and moves them a set number of times. pTimes specifies how many tiles are to be moved and pDelay specifies a delay period that is used to control the speed with which tiles should travel around the board when they are being shuffled. command shuffleBoard pTimes pDelay Swapping TilesOne of the most important actions to take is to move tiles around the board. This is easily implemented on a physical board due to the natural constraints that real tiles have. Simulating these constraints in software is somewhat more challenging. The following code implements the physical constraints, but it is easy to change the code to allow for more exotic moves. An example would be to allow tiles to move diagonally. Function isSwapable provides a test that determines if two tiles are either horizontally or vertically adjacent. Notice that we are using the physical location of the buttons to calculate whether or not a move is possible. pButton1 and pButton2 are the two tiles to be tested. function isSwapable pButton1, pButton2 Command swapButtons swaps two tiles around. A test is also performed to determine whether or not tiles can be swapped. The moves are animated to provide more of a physical game experience. As with isSwapable, buttons pButton1 and pButton2 are the buttons to be swapped. pDelay is a delay factor that is used to control the speed with which the tiles move. command swapButtons pButton1, pButton2, pDelay Did You Win?Function boardToBoardState produces a string of numbers that specifies the order in which the labels on the tiles appear. Note how we have to access the physical button locations in order to determine the order in which the tiles are placed. pHorizontal specifies the number of horizontal tiles on the board, pVertical specifies the number of vertical tiles on the board, and pPadding specifies the amount of space that exists between the top and the left edge of the stack card and the grid of tiles. function boardToBoardState pHorizontal, pVertical, pPadding Function checkWinningState tests whether or not the board state produced by function boardToBoardState is the winning board state. pBoardState is a string with a sequence of tiles that is to be tested. function checkWinningState pBoardState The 8-Puzzle Board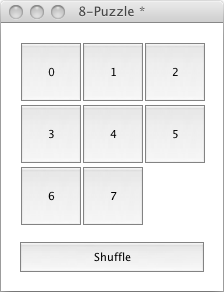
This figure shows you the board you should get when running the code in this lesson. The shuffle button moves tiles around for you and changes the order in which the tiles are displayed. To move a single tile, simply click on the tile you would like to move. In this example, you can only move tiles 5 and 7. I hope you enjoyed this tutorial, if you can't unshuffle your resulting game, then next time I will show you how to solve it programmatically!
| 

|