Chorduroy: Revolution Teaches Guitar
Part 2
Returning to the interestingly named chord generating stack, I'm now going to talk about adding some visual aids and applying the notes it has generated to a particular instrument, the guitar.
The group entitled "Scale View" contains three rows of fields that are an attempt to display the currently selected chord type in relation to its relative scale to make the chord composition a little clearer.
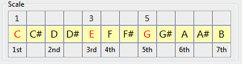
The bottom row is entirely static and simply indicates the position of the 7 notes in the major scale along the 12 semitones that make up the octave. The central row of fields displays the 12 notes in the octave relative to the currently selected key. Chord notes will appear in red. The top row indicates which part of the scale each highlighted chord note is. This whole set of fields is placed inside a group called "scale" that is updated by the command "updateScaleView". This command is located in the card script and is called from within the "refreshCard" command.
So let's take a closer look at the various things this function does in order to update the scale view. The first stage is to populate the central row containing the note names, these fields have been named with the prefix "note" and an index from 1 to 12 as a suffix.
repeat for each item tNote in tScale
   put tNote into field ("Note" && tFieldCount)
   set the textColor of field ("Note" && tFieldCount) to "black"
   put empty into field ("Formula" && tFieldCount)
   add 1 to tFieldCount
end repeat
Here tScale contains the value of the cScale of this card. A variable tFieldCount is incremented with each successive loop to provide the correct suffix for each field. So once these fields contain the notes of the relative scale we need to indicate which of them must be played in order to produce the selected chord. These notes will be indicated in two ways, firstly the text of the field containing the note name will be highlighted red and secondly the top row of fields will be populated with text indicating which part of the chord formula each note represents as shown below:
if tNumericalFormula is not empty then
   repeat for each item tNoteIndex in tNumericalFormula
      set the textColor of field ("Note" && tNoteIndex wrap 12) \
      to "red"
   end repeat
end if
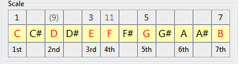
Setting the color of the text is simple, we cycle through the items of the cNumericalFormula of the card (stored in tNumericalFormula) and set the "textColor" of the field whose suffix matches the semitone number. Remember we are using the numerical formula here so for the screenshot above this would be; 1,5,8,12,15,18. You'll notice of course that there are only 12 fields displayed, representing one octave of notes, 15 and 18 are 2nd and 4th notes but typically played an octave higher which is why they are called 9s and 11s. To allow for this in the display I've again made use of the wrap function so that once 12 is exceeded the notes get wrapped back round to the beginning of the scale. Of course the note names do not change so this is still a valid way to display them. Next the top row of fields needs to be updated.
if tChordFormula is not empty then
   put 1 into tChordNoteCount
   repeat for each item tNoteIndex in tNumericalFormula
      # Use wrap here to deal with 9s and 11s (15s and 18s)
      put item tChordNoteCount of tChordFormula into field \
      ("Formula" &&
      tNoteIndex wrap 12)
      if tNoteIndex > 12 then
         # To distinguish octave notes
         set the forecolor of field ("Formula" && tNoteIndex \
         wrap 12) to
         "gray45"
      end if
      add 1 to tChordNoteCount
   end repeat
end if
Here we are cycling through the individual items of the numerical formula and putting the appropriate item of the chord formula into the field in the top row, with the suffix matching the current item of the chord formula. You can see that the colour of the text for the cases of 9s or 11s has been set to a gray rather than the standard black in order to distinguish them slightly from the lower octave notes.
Now we can move on to look at creating a guitar fretboard graphic that can be used to indicate whereabouts you can play these notes on a guitar fretboard. Before creating any graphics though, its important to lay down some template controls that can be used as the framework for placing more graphics over the top. Most guitars have 6 strings, so it seems logical to have 6 adjacent rows of fields to represent the strings. The strings are arranged high to low since this is the conventional way they are written out in musical tablature books.

Typically a person's hands can only stretch between around 5 or 6 frets maximum for the purposes of playing chords, unless they have unusually long fingers or are particularly talented at finger yoga. So for this reason the program allows you to select a region of the fretboard in which you wish to play your selected chord and then will examine only the notes available within that 5 fret space. Even within this limited space there will potentially be many ways of playing the same chord, but we'll examine that problem later. For the moment we'll just look at generating the fretboard diagram.
So there are two controls the user can alter which affect the notes displayed in the diagram, the position and the tuning. The position control consists of a drop down box containing a list of integer values representing the numbers of the frets of the guitar, they run from 0 at the head of the guitar (low notes) up to 12 which is half way up the neck of the guitar (high notes) after which the notes repeat themselves so there is no need to provide illustration beyond this point. The standard tuning of the 6 guitar strings is (low to high) e, a, d, g, b, e. Many people tune their guitars differently however, so this drop down control provides some commonly used alternative tunings. As before both of these controls basically store a custom property of the card, the cFret and cTuning and then make a call to the "refreshCard" command in the card script.
The code responsible for updating these fields is stored within the script of this group of controls. Therefore the command must be sent as an explicit message up the message path to get to the group script.
send "setFretFieldNotes" to group "Fretboard" of this card
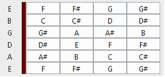
Below you can see the contents of this handler. First off you will notice that when the fret is set to 0 a red bar appears replacing the first column of fields. This graphic represents the "nut" which is simply another name for the point where the strings stop at the headstock end of the guitar. Beyond this the fields still display the notes of the open strings. The code responsible for placing this is as follows:
if tFret is 0 then
   show graphic "Nut" of me
   repeat with i = 1 to 6
      set the opaque of field ("str" & i && "fret1") to false
      set the showBorder of field ("str" & i && "fret1") to false
   end repeat
else
   hide graphic "nut" of me
   repeat with i = 1 to 6
      set the opaque of field ("str" & i && "fret1") to true
      set the showBorder of field ("str" & i && "fret1") to true
   end repeat
end if
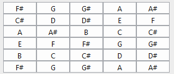
The opaque property controls whether or not a field will be transparent, the showBorder property simply shows or hides the field's border. Now the fields need to be populated with notes, taking into account the fret position and tuning.
repeat with stringIndex = 1 to 6
   set the wholeMatches to true
   put itemoffset(item stringIndex of tTuning,tScale) into \
   tNoteOffset
   set the wholeMatches to false
   # Now adjust for fretting position
   add tFret to tNoteOffset
   repeat with fretIndex = 1 to 5
      put "str" & stringIndex && "fret" & fretIndex into \
      tFieldName
      put item (fretIndex + tNoteOffset - 1) wrap 12 of tScale \
      into
      tCurrentNote
      set the cNoteAssignment of field tFieldName to tCurrentNote
      set the text of field tFieldName to tCurrentNote
   end repeat
end repeat
There is a nested repeat loop here. As you can see the first repeat loop cycles through the six strings i.e. down the rows of fields, the second repeat loop cycles through the frets i.e. the columns. It is important to set the "wholeMatches" property to true at the start of this process. This is because "itemoffset" will take its first match without looking at any suffixed characters e.g. itemoffset(item D, tString) if tString contains D%, d&, d will simply detect the first instance of a D regardless of what character succeeds it. In our case this can cause confusion between for example, D and D#.
This takes care of creating the visual aids to the program. Next we will look at the problem of working out the various arrangements that each chord can be played in at each position on the fretboard. This will be explained in the next newsletter. In the mean time I've supplied a version of the stack that includes this functionality for you to have a look at.


 | The RunRevLive that lives forever |
| Chorduroy: Revolution Teaches Guitar: Part 2 |
| Drops! 2.0 |
| Quick Tip: Easy Toggle Buttons |