revUp - Updates and news for the LiveCode community
Issue 140 | September 21st 2012 Contact the Editor | How to Contribute

Buttons and Embedded
What have juniper wood buttons to do with Embedded LiveCode?

By Heather Nagey and Mark Waddingham

This week has seen a bit of excitement here with the launch of Embedded LiveCode. In a moment Mark is going to get into the nuts and bolts of it with you, but first, a little story:

Buttons. Yes, I'm going to connect buttons to Embedded, bear with me here. Recently, I went on a family holiday to Estonia, a truly beautiful little country way up north on the shores of the Baltic sea. While I was there I saw many things, amongst which were some really gorgeous handcrafted juniper wood buttons. I spent some time fingering them, considering them, wishing I could think of a reason for buying them. Did I really need juniper wood buttons? I decided to be sensible, and firm, and not buy the buttons. As soon as I got home to the UK, I realised what it was I wanted them for. Deep sorrow.

I suspect a number of you are currently walking round Embedded LiveCode, fingering it, maybe even wishing you could think of a reason for buying it... well, now is your opportunity. We've got a great limited time Founders offer* on, and if you pass it up now, you know that next month you will be kicking yourself, when you've realised what it was you wanted it for.

Enough of buttons. What exactly is this Embedded LiveCode, how does it work? Well in principle, it lets you directly drop a LiveCode component into an Objective C app (at the moment its iOS only, we're anticipating Android to join it with only a modest delay). The advantage of this is that if you need a feature that LiveCode itself doesn't directly support, you are not looking at rewriting the entire project in Objective C. Just build it into an Embedded stack, and drop it into an Objective C framework to add the missing feature. You can also now create LiveCode components directly targeted at selling to other developers working in Objective C.

The following is great technical information directly from the man who knows, Mark Waddingham our CTO.

Trying it out
This release comes with a simple example Xcode project EmbeddedView. You can download a prebuilt Xcode project here for iOS 5 (if you're still on Snow Leopard) or here for iOS 5.1 (Lion and Mountain Lion). To run it just unzip, and load the Xcode project into Xcode 4. Choose the appropriate target and run. This is a very basic example but should give you some idea of how it works.

To make the project yourself using Embedded LiveCode, the first thing to do is to build the component's static library:

  1. First of all make sure the IDE is loaded and has been relicensed after purchase to ensure the ios-embedded deployment license is present.
  2. Open up the builder plugin from the Plugins menu.
  3. Open the EmbeddedViewStack.livecode stack from the EmbeddedView project at which point you should be able to choose it from the stack drop-down in the plugin:


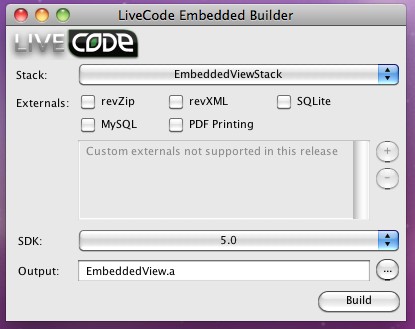
  4. As you can see, this stack is (initially) configured to use the 5.0 SDK and output a static library called EmbeddedView.a – it will be created in the folder next to the stack.
  5. Choose an appropriate SDK (whether you can use 5.0 or 5.1 will depend on the iOS SDKs you have installed and which developer roots are configure in the IDE – either will work fine).
  6. Click 'Build' and after a few moments the static library should appear. Note that the library is quite big as its a universal build for both devices and the simulator – you can choose to build for either in Xcode using the same library.


With the component's static library built, the next step is to load up the Xcode project:

  1. Load up the EmbeddedView Xcode project into Xcode 4.
  2. Choose to target the iOS iPad Simulator – making sure you select the version that matches the SDK version that was chosen in the plugin.
  3. Click 'Run' and the application should leap into life into the simulator:
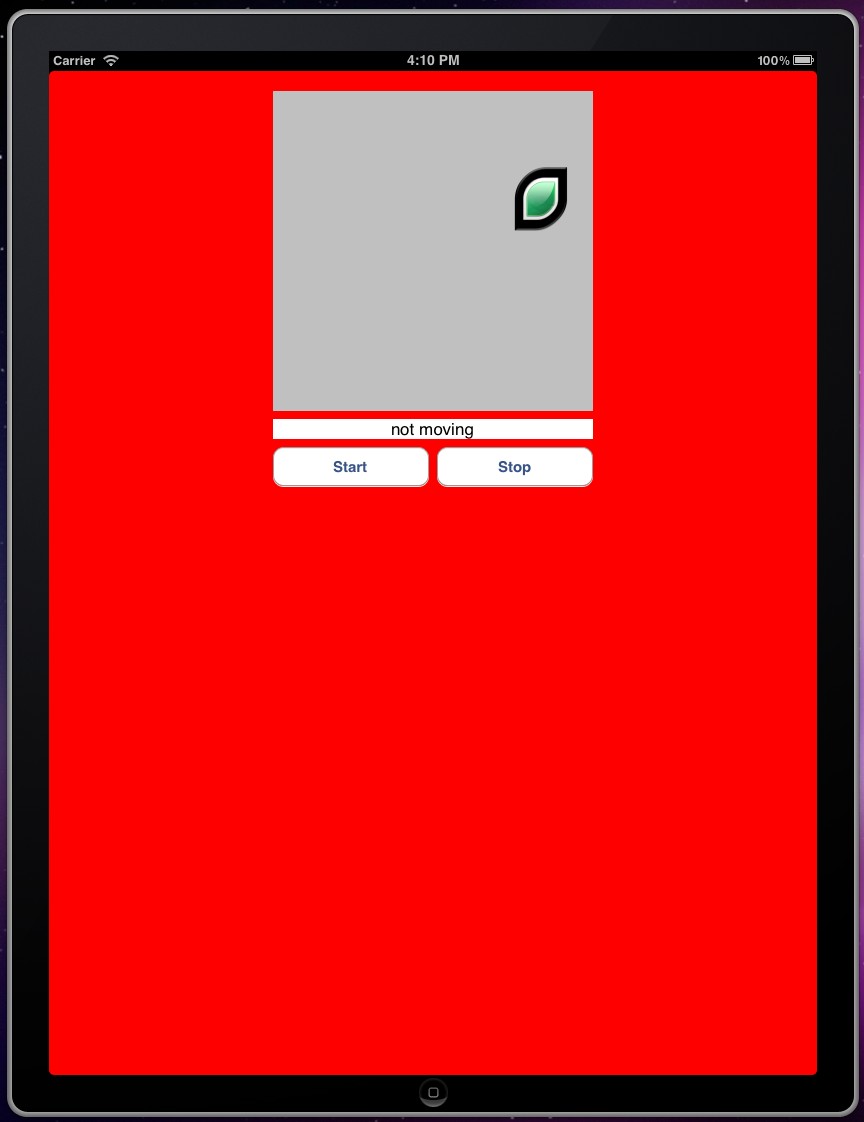
  4. This simple application consists of the LiveCodeView containing the stack we used in the plugin along with a number of native iOS elements created by the native code side of the project. Clicking Start will post a message to the component to tell it to start moving the logo, whilst clicking Stop will post a message to the component telling it to stop moving the logo. Additionally, the component dispatches a message imagePositionChanged which the native code project connects to and updates the label in response.

Using an existing Xcode project
To add a LiveCode embedded component to an existing Xcode project is similarly straightforward, needing you to do three things.

First of all, copy the LiveCodeView.h header file into the source folder for the project – this contains the LiveCodeView interface definition and external reference to LiveCodeGetView(). The LiveCodeGetView() function returns the UIView (at runtime) that you can then place wherever you wish.

Next build the static library for your component using the builder plugin and drag the resulting file to your project so that Xcode knows to link with it.

Finally, make sure the list of Frameworks and libraries your application links with includes all those listed in the 'deps' file that is created alongside the static library. (The easiest way to add these dependencies is to select them all in the example project, copy, and then paste them into your project).

With these steps done, the existing Xcode project should build and link with your LiveCode component – the only thing left for you to do being to write the code that uses it!

For more information about how to use the LiveCode view, take a look at the example project and the LiveCodeView.h header file, but at its simplest:

  1. Create the LiveCodeView by calling LiveCodeGetView() when your application starts up and place it somewhere in your UIView hierarchy.
  2. Configure the location and bounds of the view by using the setViewBounds: method (at the moment you can't use setFrame: or setBounds: to do this so you must do it manually).
  3. Use the startup method to initialise the engine and open the component's stack into the view and the shutdown method on termination to finalise the engine and clean up its resources.

Thanks for that Mark, and we're looking forward to seeing you, our customers, trying out this new technology. Let us know how you get on!

*if you didn't get this Embedded LiveCode Founders offer, and you're interested, contact me and I'll get you a special offer code too.

About the Authors

Heather Nagey is Customer Services Manager for RunRev Ltd

Mark Waddingham is CTO for Runtime Revolution Ltd.


Main Menu

What's New


transform your students with LiveCode 2 for 1 this month