revUp - Updates and news for the LiveCode community
Issue 108 | April 21st 2011 Contact the Editor | How to Contribute

Vision: Blur
Continue learning how to manipulate images, with this handy lesson on blur

by Hanson Schmidt-Cornelius

This lesson describes how to blur an image, using a smoothing mask. Sample code and example screen captures are provided.

Introduction

The lesson continues along the theme of image processing and introduces an algorithm that can be used to smooth images in order to remove fine detail texture or noise. This is often useful when applying image processing algorithms that look at larger detail objects in an image.
The code in this lesson works with both grayscale and color images, although the performance can be greatly improved, if you tailor the algorithm to work with grayscale images only.

Note: The examples shown here assume that you are familiar with lesson Vision: How do I Convert a Color Image to Grayscale?, and that you have a working LiveCode stack that implements the code shown there.

The smoothing process discussed here uses a configurable mask to perform operations on a number of neighboring pixels in an image. The generic image processing code is stored in the Stack Script, rather than a Button Script, making the architecture more hierarchical and relevant code segments easier to access from other buttons that may also want to use a mask for image processing.

Adding Stack Code Variables

Open the stack you created under lesson Vision: How do I Convert a Color Image to Grayscale? and add the following variables to the Stack Script:

local sXsize, sYsize, sImage

These variables hold the dimensions of the image to be processed and a copy of the image data itself.

Adding Stack Code Functions and Commands

First add the command convolve that sits at the upper most level and takes two parameters: the image to be processed and the mask that is be applied to the image.
This command loops through each pixel of the image and calls a function that applies the mask to a number of neighboring pixels.

command convolve xImage pMask
    local tImageTarget, tX, tY, tImagePosition, tConvolveValue
    # set up the global variables
    put the width of image xImage into sXsize
    put the height of image xImage into sYsize
    put the imageData of image xImage into sImage
    # take a copy of the image that is to be processed
    put the imageData of image xImage into tImageTarget
    # loop through every pixel of the image
    # and apply the mask to each color channel
    repeat with tY = 0 to sYsize - 1
        repeat with tX = 0 to sXsize - 1
            put (tX + tY * sXsize) * 4 into tImagePosition
            put applyMask (pMask, tX, tY, 2) into tConvolveValue
            put numToChar (tConvolveValue) into char (tImagePosition + 2) of tImageTarget
            # comment out the following line
            # if you are only going to process grayscale images
            put applyMask (pMask, tX, tY, 3) into tConvolveValue
            put numToChar (tConvolveValue) into char (tImagePosition + 3) of tImageTarget
            # comment out the following line
            # if you are only going to process grayscale images
            put applyMask (pMask, tX, tY, 4) into tConvolveValue
            put numToChar (tConvolveValue) into char (tImagePosition + 4) of tImageTarget
        end repeat
    end repeat
    set the imageData of image xImage to tImageTarget
    set the cHiddenImageData of image xImage to tImageTarget
end convolve

Add the function applyMask that applies the mask to a number of neighboring pixels. This function takes the mask, the image X and Y coordinates and the color channel as arguments.

function applyMask pMask pX pY pChannel
    local tResult, tImagePosition
    put 0 into tResult
    # loop through each grid position of the mask
    repeat for each key tKeyX in pMask
        repeat for each key tKeyY in pMask[tKeyX]
            # get the image position that lies under
            # a particular grid position of the mask
            put getImagePosition (pX+tKeyX, pY+tKeyY) into tImagePosition
            if tImagePosition is -1 then
                return 0
            else
                # multiply the weight of the grid position with the
                # respective image position and add that product to the result
                put pMask[tKeyX][tKeyY] * \
                    charToNum (char (tImagePosition + pChannel) of sImage) + \
                    tResult into tResult
            end if
        end repeat
    end repeat
    # some masks can generate negative results,
    # so ensure the result is positive
    return abs (tResult)
end applyMask

Add the function that returns an image index, calculated from X and Y coordinates.

function getImagePosition pX pY
    local tResult
    if (pX >= sXsize or pY >= sYsize or pX < 0 or pY < 0) then
        return -1
    else
        return (pX + pY * sXsize) * 4
    end if
end getImagePosition

Creating the Smoothing Button

Drag a button onto the stack. Then open the Property Inspector and change the name of the button to Smoothing. Next, open the Script Editor for this button and insert the following code:

on mouseUp
    local tMask
    # set up the 3x3 mask
    put 0.111 into tMask [1][1]
    put 0.111 into tMask [1][0]
    put 0.111 into tMask [1][-1]
    put 0.111 into tMask [0][1]
    put 0.111 into tMask[0][0]
    put 0.111 into tMask [0][-1]
    put 0.111 into tMask [-1][1]
    put 0.111 into tMask [-1][0]
    put 0.111 into tMask [-1][-1]
    # apply the mask
    convolve "Image", tMask
end mouseUp

This code sets up a smoothing mask in the shape of a 3x3 array with values of 0.111 in each array entry. This effectively allows each pixel that lies under the mask to contribute roughly 1/9 to the overall value of the pixel entry that is being updated.
The mask array is indexed from -1 to 1 along the X and Y coordinates, with the center grid position 0,0 representing the location at which the new pixel value is inserted.

Loading an Image

People01_display

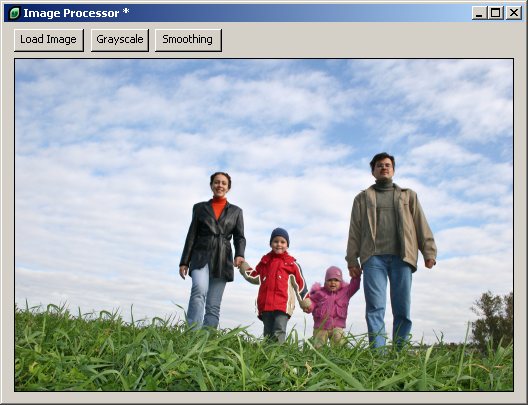
Your application may look something like the one shown in this example. After selecting the Load Image button you should get a file selection dialog that allows you to select an image from your file system. The image is then displayed in the Image Area.

Processing a Color Image

People02_display

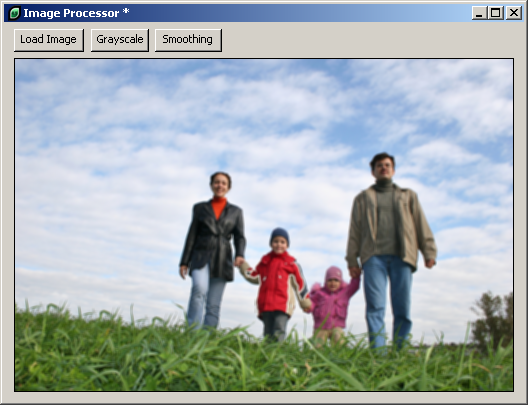
A color image is smoothed by selecting the Smoothing button.

Note: Smoothing color images can take a long time, as the smoothing mask is applied to each color channel of each pixel of the image.

Processing a Grayscale Image

People04_display

The performance of the smoothing process can be improved by processing grayscale images. You can do this by using the Grayscale button before you use the Smoothing button.

Note: In order to get the performance increase, you have to comment out two lines of code in the Stack Script, as highlighted by comments under step: Adding Stack Code Functions and Commands.

Hanson Schmidt-Cornelius

About the Author

Hanson Schmidt-Cornelius is an experienced software developer with an interest in artificial intelligence.


Main Menu

What's New

sanjose