

Localizing with NativeSpeak Part 3
Designing your first application with NativeSpeak
This is part three in our tutorial series on using NativeSpeak to create localized software that looks great in all languages and on all platforms. Click here to read part one, and here to read part two.
This part is the most fun!
Creation of a menu
To create a menu, use the Revolution Menu Manager to design your menu. Once it has been designed, you have to tell NativeSpeak that it has to manage this menu.
Our menu is the following:
File
- Open
- Close
- (-
- Quit
Edit
- Copy
- (-
- Preferences
Help
- Mini Text Reader Help
- (-
- About Mini Text Reader
Currently, the menu manager create what some would consider to be ugly menu buttons on Windows. NativeSpeak will fix that.
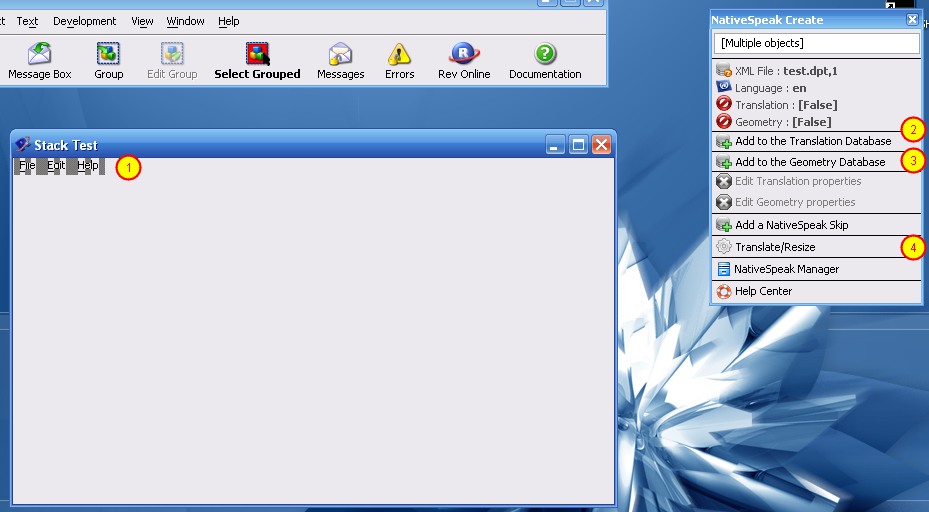
To include the menu in the NativeSpeak Database, first select objects that you want to add in the databases (1). (Tip: Select "File" first and "Help" at the end, explanation for this follows). Second, click "Add to the Translation Database" And then "Add to the geometry Database"
To see the result, click "Translate/Resize" (4) and select "Translate and Resize", NativeSpeak Create will launch the translation engine, and your objects will be adapted to the font/font size/OS Gui. But in order to have a perfect result and prevent clipping of any text, we have to set their geometry relations.
Creation of a menu - Setting the Geometry
NativeSpeak comes with a powerful Geometry Manager. This gives you the ease of use of the Revolution Geometry Manager plus the power of writing your own script.
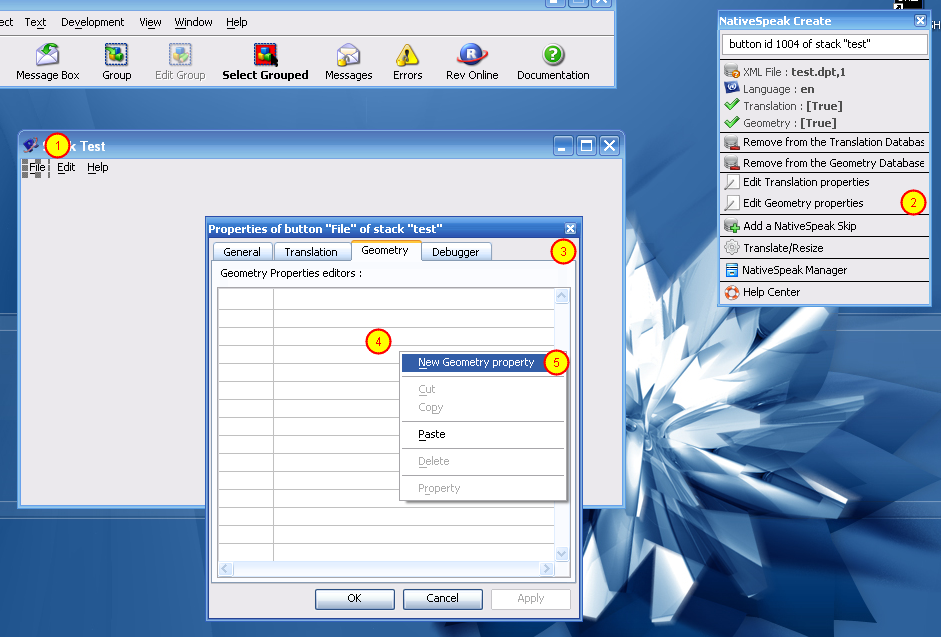
First, select the object "File" (1), and click on "Edit geometry properties" (3). The NativeSpeak Create property editor will open (4), now double-click or right click on the field to create a new geometry relation. (5)
The first Geometry Property

The NativeSpeak Create Geometry Editor is a powerful tool, that enables you to do many operations. In this tutorial we will not cover "Advanced" Geometry scripts, click "Yes" (1) or "Wizard" (2) to use the Geometry Property wizard creator.
The first Geometry Property

Our first geometry is fairly easy, it will lock the left of the button "File" to "0"
So, to set the left position, click (1) in the cross. A summary of the action to be done is located in (2).
Click "Next >" (3)
Setting the geometry property

Currently we do not have to use this screen, so simply click "Next >" (1)
Setting the geometry property - 2

The geometry property created by the wizard is located in (1), you can modify it as required.
We have to modify this geometry property to lock the left of our object to 0. So replace "the left of + (0)" by "0".
Explanation:
Click "Finish" to add the geometry relation. (2)
Setting the new geometry property - 3

As you see, the new property has been added to the geometry list of the selected object.
Now, re-do the previous step but for the top of this object. (Set the top of btn "File" to 0)
Do not forget to click "Apply" or "Ok", or nothing will be saved.
To see the result of your modifications, click on "Translate/Resize" in the NativeSpeak Create palette, and select "Translate and Resize" or "Resize".
Setting your second geometry properties.

Now, a bit harder. Select the button "Edit" and "Help", and edit their geometry properties.
We want to have those two buttons sharing the same top as the button "File". Create a new geometry property like before, and select "Top".
Now, in this screen, we will configure the geometry property. Follow these steps:
- First select the reference object. (1)
- Second, select what borders of the reference object you want to use. (Top in our case) (2)
- Third, set the number of pixels that you want to add/remove compared to the reference object. (3) (0 in our case)
- Then click next and finish on the next screen, apply and re-launch the resizing process. You will see that everything has the same top!
Setting your third geometry property

Now you want to have the button "Edit" to be on the right of btn "File". Let's set that.
Click the button "Edit", and create a new geometry property for it. Instruct NativeSpeak that you want to set its left, and click "Next >". Like the previous step, select the reference object, select the border that you want to take from the reference object, and click "Next >".
Apply modifications, and launch the resizing process. Your object will be on the right of the button "File"!
Re-do that for the button "Help", and you have a menu almost ready to be localized.
The result

This menu is much better looking on Windows than the menu created by the menu manager. In addition it follows the textfont/textsize/textstyle defined by the OS without any clipping. And it can be translated of course!
Important Note: About the selection order at the start of the process.
The geometry manager resizes objects in order! The first object selected will be resized first etc.
You can of course modify this order in the geometry manager, but it is easier to do it by selecting the objects in the right order at creation.
The script of the menu
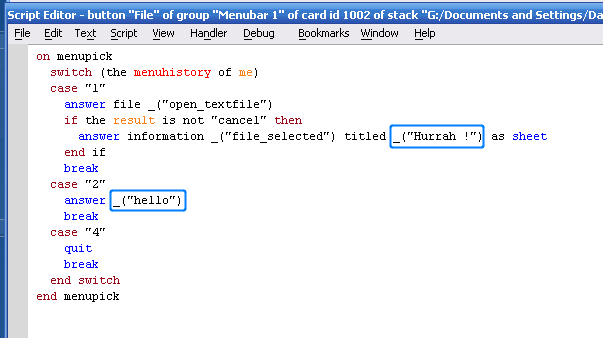
A thing to know about the menu script.
Because the menu text will change with each language, you must use the "MenuHistory" of the menu in order to set actions.
But, what are those "_()" in this script ? It is the famous NativeSpeak Skip.
The next step will show you how create a Skip in order to use it in your applications.
Create a NativeSpeak Skip
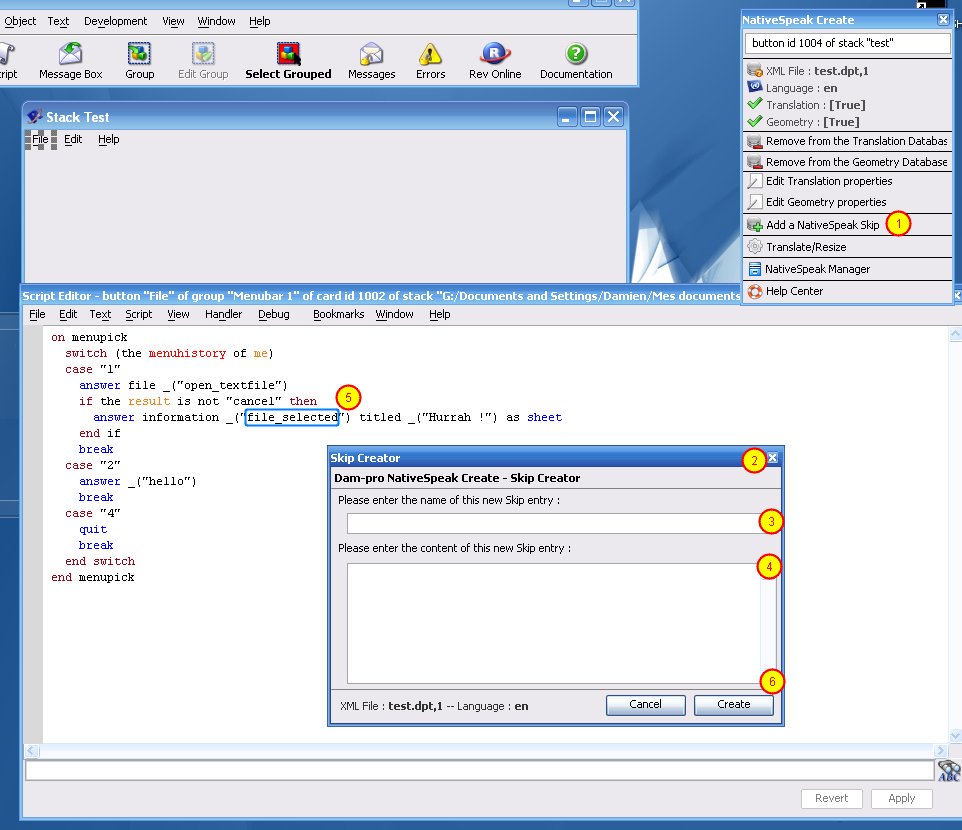
To create a skip, simply click "Add a NativeSpeak Skip" (1).
The Skip Creation editor will open (2).
Now, set the skip name (3) and the skip content (4). The skip name is the strings used insides scripts to call the entry. (5)
Click "Create" (6) to create the new skip entry.
Now, you can try the newly skip created by using the function _() inside the message box.
It is up to you now !

Now, you know how design a simple application with NativeSpeak. The next chapter will show you how build a standalone of your application.
Improve this little application (make what you want with it). Note: Now that you are using NativeSpeak, you need to use the Translation Properties Editor in order to modify object properties inside the NativeSpeak Database. If you do not use it, you will lose all your modifications once the Translation process is launched!
If you prefer the Revolution Editor to the NativeSpeak Create editor, NativeSpeak Create can read properties of the object. So one click is required in the properties editor, Click (1) to read the actual value of the object for the selected property.
If you want to know more about NativeSpeak Create, read the documentation! It covers all features of NativeSpeak Create.


 | Simply Visual |
| The Power of Merge |
| FileMaker Pro to Revolution Conversion Part 3 |
| Localizing with NativeSpeak Part 3 |


![]()