Drawing the path
We can see the ball move, but we have not drawn the path!
To see the path, we're going to draw a short line between the position the ball had at one time in the repeat and the position it takes the next time around the repeat. All these short lines together will draw the path.
Edit the Fly handler:
on Fly fVx,fVy
put 0.5 into lk1
put 0.5 into lk2
put 0.5 into lA
put item 1 of the loc of me into lX
put item 2 of the loc of me into lY
put lX into lOldX; put lY into lOldY
create image "Path"; set the rect of image "Path" to the rect of this card
choose line tool
repeat until lY >= the top of graphic "Grass"
set the loc of me to round(lX),round(lY)
add fVx*lk1 to lX
subtract fVy*lk1 from lY
subtract lA*lk2 from fVy
wait 1 ticks
drag from round(lOldX),round(lOldY) to round(lX),round(lY)
put put lX into lOldX; put lY into lOldY
end repeat
choose browse tool
end Fly
Let me write it again but with line numbers in front of each line so it's easier to discuss:
on Fly fVx,fVy
01 put 0.5 into lk1
02 put 0.5 into lk2
03 put 0.5 into lA
04 put item 1 of the loc of me into lX
05 put item 2 of the loc of me into lY
06 put lX into lOldX; put lY into lOldY
07 create image "Path"; set the rect of image "Path" to the rect of this card
08 choose line tool
09 repeat until lY >= the top of graphic "Grass"
10 set the loc of me to round(lX),round(lY)
11 add fVx*lk1 to lX
12 subtract fVy*lk1 from lY
13 subtract lA*lk2 from fVy
14 wait 1 ticks
15 drag from round(lOldX),round(lOldY) to round(lX),round(lY)
16 put put lX into lOldX; put lY into lOldY
17 end repeat
18 choose browse tool
end Fly
Ignore lines 6 to 8 for the time being. We need to remember where we were last time, so we need two more variables called lOldX and lOldY. After having set the location of the ball to the new location in line 10, we draw the line from the old to the new position in line 11, and then in line 12 we put the new location in the old one for next time when we will come around the repeat. The drag statement means exactly that: it is the equivalent of doing some movement with the mouse button held down.
But what are we dragging? Line 8 tells us we chose the line tool, i.e. the painting tool that is a line. The drag therefore draws a line. Once the repeat is over, we should pick the browse tool again, and that's what line 18 is for.
Since we use the old position in line 11, we better put something into that before we start the repeat, and that's what we do in line 6.
But on what are we drawing? Drawing needs an image object, so we must first create an image and also make it large enough and position it correctly. That's what happens in line 7. We give the image the name Path at the same time as we create it. Then we set the rect of it to that of the card. What is a rect? We know what a point is: two numbers separated by a comma. A rect is four numbers or, if you like, two points: the top-left and the bottom-right of a rectangle. You can see what it is by typing in the message box:
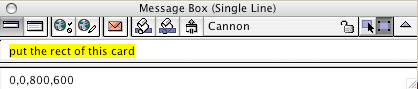
You get the four numbers, relative to the top-left of the mainstack window: the first two are 0,0 and are the point that is the top-left of the card. The next two are 800,600 and are the point that is the bottom-right. The four together form the rect of the card. The image will be the same size and at the same position.
You cannot see the image because it is empty: it has no visible pixels. We will draw in it.
You can now apply the script changes and run the program. You should get something like:
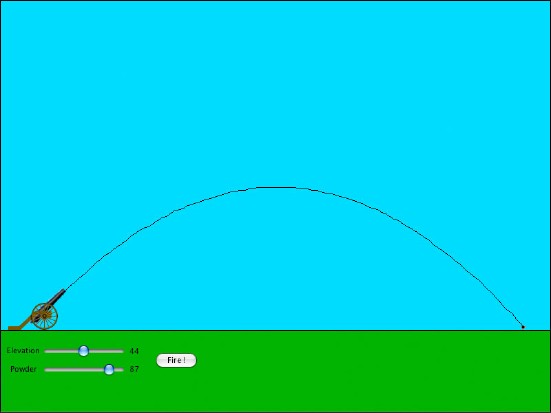
Good. Somewhat jittery path. That's because we draw a lot of very short lines and although they represent the path in the closest way, it does not look too good. We will not try to improve this here, drawing smoothly is a subject by itself.
Save your work. Now try a different elevation and powder amount. OK, so that seems fine: we can compare different paths:

The previous paths remain there. That may be OK, but on the other hand we are creating a new image object each time we fire the ball. Worse, all these image objects are called by the same name Path!
When the ball starts flying we should create a new Path image only if none exists yet. Change the Fly handler to:
on Fly fVx,fVy
...
if there is no image "Path" then
create image "Path"; set the rect of image "Path" to the rect of this card
end if
...
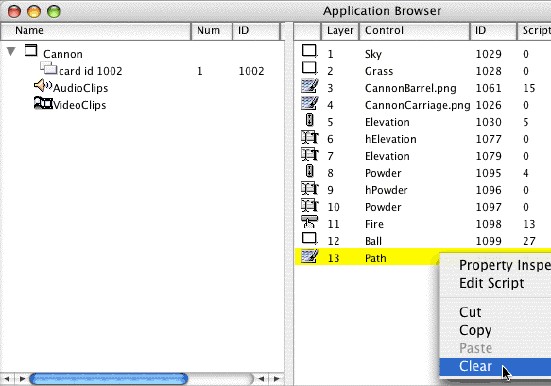
Save your work and experiment with different elevations and powder amounts again. After a while, you will get a very cluttered drawing. We want a way to erase all the paths. We will create a button under the Fire button and call it Clear all paths.
However, before we create the button, we should remove the Path image or the multiple images that we created so far. To do this, use the application browser, look at the card and clear all objects with name Path:
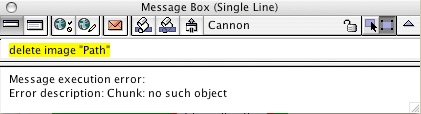
You can also use the message box, type delete image "Path" once, then press return several times until you get an error because there is no longer an image with name Path:
Then create the button:

(for some reason I could not draw the button in the grass, I had to do it in the sky and then drag it down.)
And write its MouseUp handler:
on MouseUp
if there is an image "Path" then
delete image "Path"
end if
end MouseUp
Note that we test first if the image does exist: it is an error to delete an object that does not exist, as we saw with the message box.
Comments
There are many comments to make about this program, and we have not really spent any time noting down what we did. The job is not done yet!
|