Hands on LiveCode Android
Get started with LiveCode Android - what you can do already and how to get up and running on your Android device by Hanson Schmidt-Cornelius
 As promised and on schedule, the first pre-release of the LiveCode deployment pack for Android is now available. As promised and on schedule, the first pre-release of the LiveCode deployment pack for Android is now available.
This release contains the first version of the Android LiveCode engine together with an IDE plugin that can be used to launch stacks into a virtual device in the Android emulator or onto a real Android device. Being the first pre-release, the current feature-set of the Android LiveCode engine is limited, although it already allows many self-contained stacks to be developed and run successfully.
This release is just the beginning and plans are in place to add numerous new features to the Android LiveCode engine over the next few months, bringing it up to a similar level of features as are already available in our current iOS LiveCode engine.
Although the Android platform is new to LiveCode, the plugin integrates seamlessly into the flexible LiveCode framework that already makes this early release intuitive and easy to use.
If you are new to LiveCode or a seasoned LiveCode developer, interaction with Android via LiveCode will be new to you, and I would like to take a few moments to run you through some of the features available and the steps to get the Android development environment up and running on your machine.
Regardless of whether you are a Windows PC developer or an Apple Mac developer, we can provide you with a LiveCode platform that allows you to develop Android applications. Our multi platform philosophy allows you to develop on the hardware you are accustomed to and deploy to the platforms you want to support.
Android - What Have we Done so far?
The capabilities of our Android LiveCode pre-release are impressive, to say the least. We already have support for a number of features you are familiar with from the other platforms we support:
- Rendering of controls with non-system themes (default is Motif theme).
- Date and time handling.
- Gradients, graphic effects and blending.
- Any non-platform, non-system dependent syntax (maths functions, string processing functions, behaviours etc.).
- Object snapshot commands.
- Simple single stack window management, allowing one stack to be displayed at a time.
- Non nested simple version of the answer command to display dialogs.
Android Specific Features that Work
Similar to our iOS support, each platform has its own list of specific features that are not transferable to other platforms. This is also the case for the Android platform. This pre-release supports the following Android specific features:
- Shake motion support. This provides support for detecting motions changes of the device.
- Multi-touch events. Touch messages work the same way on both Android and iOS platforms.
- Mouse events. Mouse messages work the same way on both Android and iOS platforms.
- Hardware and system version query support. It is possible to fetch information about the current hardware and system version using the standard LiveCode syntax.
- Resolution handling. The engine makes no attempt to scale or adjust layout of stacks based on the resolution or density of the display the application is running on. A single pixel on the desktop maps to a single screen pixel on Android, giving you full access to all the pixels on the display of a device, regardless of the DPI it might have.
- File and folder handling. In general the low-level support for handling files and folders in the Android engine is the same as that on the desktop, allowing the usual syntax associated with such operations will work. Including:
- open file/read/write/seek/close file
- delete file
- create folder/delete folder
- setting and getting the folder
- listing files and folders using the [ detailed ] files and the [ detailed ] folders
- storing and fetching binfile: and file: urls
This striking list of pre-release features already allows you to implement many useful applications that allow you to test the interaction and performance of LiveCode and Android Devices.
Setting up the LiveCode Android Plugin
You need to go through a number of installation and configuration steps in order to start developing LiveCode for the Android platform. The rest of this article will lead you through the complete set up stage and provide you with a small example that you can deploy to an Android platform.
Software Requirements
First let us look at what you need to set yourself up as an Android developer. You will need some of the following software packages, depending on the hardware you are using:
- Mac OS 10.5.x or later (Apple Mac only)
- Windows XP, Windows Vista or Windows 7 (PC only)
- Java SDK (PC only)
- LiveCode 4.5.3 or later
- Android SDK
- LiveCode revAndroidPlugin.rev
Setting up the Software Environment
At this point it is assumed that you have a working hardware platform with one of the required operating systems.
Next, install the Java SDK (PC only) if required, and the Android SDK. Follow the installation instructions as laid down in the respective installation guides. You will have to run the Android SDK Manager once it has been installed. This downloads a number of packages that are required by the Android SDK. You will require a reasonable bandwidth as some of the Android packages are large.
In order to use the Android LiveCode development environment, you will at least require the SDK Platform Android 2.2, API 8, revision 2 package.
If you do not have LiveCode 5.4.3 or later installed, you can install this now , then place the revAndroidPlugin.rev file in your LiveCode plugins customisation folder. On an Apple Mac, the installation path is typically:
Documents/My LiveCode/Plugins
On a Windows PC the installation path is typically:
My Documents/My LiveCode/Plugins
You will have to create the relevant paths, if they do not already exist in your development environment.
Make sure you restart the LiveCode IDE, if you installed software components while the LiveCode IDE was up and running.
You have now installed the software and set up the development environment you require to implement Android applications.
Configuring a Virtual Android Device
The Android SDK allows you to set up virtual devices that can be used in your development environment to test the applications you develop under LiveCode. This allows you to test your applications without requiring a physical Android device. Virtual devices can easily be set up as follows, using the Android SDK Manager:
- Make sure the Android SDK Manager is running.
- Choose Virtual devices from the left hand panel.
- Select New... to open a new dialog that allows you to create a new virtual device.
- Choose the Name for your virtual device.
- Set the Target to at least Android 2.2 - API Level 8.
- Fill in the SD Card Size.
- Optionally enable Snapshot. This speeds up the launch of the emulator.
- Select Create AVD to save the device settings and create the virtual device.
You can launch the emulator with the device by highlighting the virtual device you created and selecting Start... .
Configuring a Physical Device
In addition to setting up virtual devices, it is possible to set up physical devices to which you can deploy your applications. These devices can be accessed after they have been appropriately configured for debugging.
If you are developing on a Windows PC, you will have to install appropriate drivers for the devices to which you would like to deploy your applications. Details of how to do this can be found on the Android Developer Website.
The relevant devices must be set to debug mode, once the necessary drivers are installed (if required). You can set up the devices as follows:
- Go to the home screen, and select MENU.
- Select Applications -> Development and enable USB debugging.
- Connect the device via USB to your development machine.
- The device should now be available and accessible in the Android Plugin device list that is accessible via the Android Deployment Plugin Window in LiveCode.
The LiveCode Deployment Plugin for Android
The next step is to launch LiveCode and develop applications that are to run on your Android devices. You do this by launching the LiveCode IDE and selecting revAndroidPlugin from the Development -> Plugins menu. This opens the revAndroidPlugin.
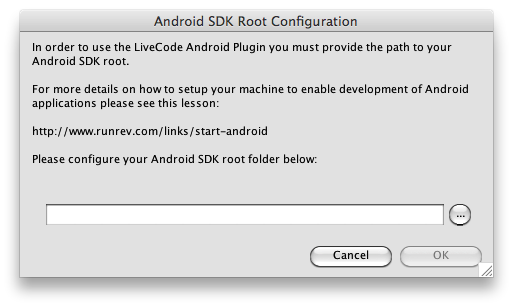
The first time the plugin is run, you are presented with an Android SDK Root Configuration window that allows you to specify the location of the Android SDK Root path, which should already be present on your file system and was created when the Android SDK was installed.
The LiveCode IDE makes validation checks once you specify the location of the Android SDK root. This ensures that you have selected a valid location and have the required Android components installed.
The Android Deployment Plugin Window
The Android Deployment Plugin window allows you to interface between LiveCode and an Android device. This interface window has the following active window regions that can be configured when interacting with Android devices:
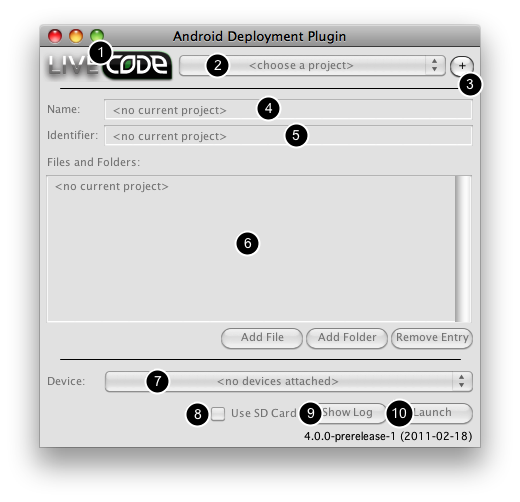
- The LiveCode logo. You can double-click here to reconfigure access to the Android SDK root path, or set one up if it was not previously configured.
- The currently active project menu. This drop-down allows you to choose between currently loaded LiveCode Android projects.
- The new project button. This button allows you to choose a mainstack that is to be marked as a LiveCode Android project.
- The application name. This is the label of the application on the Android home screen.
- The application identifier. This is used to uniquely identify the application in the Android ecosystem. This feature will be implemented after this pre-release.
- The project file list and related buttons. This feature will be implemented after this pre-release.
- The currently active device menu. This drop-down allows you to choose from currently connected Android devices, including virtual and physical devices.
- The Use SD Card option. If this is checked the LiveCode Android project is built and installed on the SD Card of the the currently selected device (if the device has an SD Card), as opposed to its internal storage.
- The Show Log button. This button displays the device system log that assists with basic debugging.
- The Launch button. This button causes the currently active project to be built, installed and run on the selected device.
You should ensure that the emulator is running or an adequately configured physical device is connected before launching the Android Development Plugin from within LiveCode. This ensures that LiveCode has something to connect to when you try to deploy an application.
Writing an Application
Developing software for Android is not much different from developing software for one of the many other platforms that LiveCode supports.
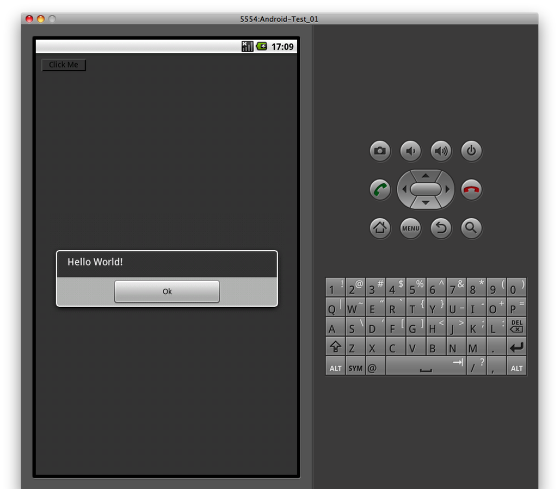
You can create a very simple "Hello World" application as follows:
- Open the LiveCode IDE.
- Create a new mainstack via File -> New Mainstack.
- Rename the new mainstack to Hello World using Object -> Stack Inspector.
- Drag and drop a button onto the new mainstack, and call it Click Me.
- Edit the Click Me button script by selecting Object -> Object Script and enter the following code:
on mouseUp
   answer "Hello World!" with "Ok"
end mouseUp
- Save the Hello World stack (a stack has to be saved to disk before it can be used by the revAndroidPlugin).
- Launch the Android Deployment Plugin dialog, and use the New Project button to choose the Hello World mainstack.
- Ensure the Android emulator is running or an Android device is connected, then choose the target device.
- Select the Launch button and wait while the necessary files are transferred and the engine is launched on the device.
- Click or touch the Click Me button on the screen and see your script in action.
Sheep Herder
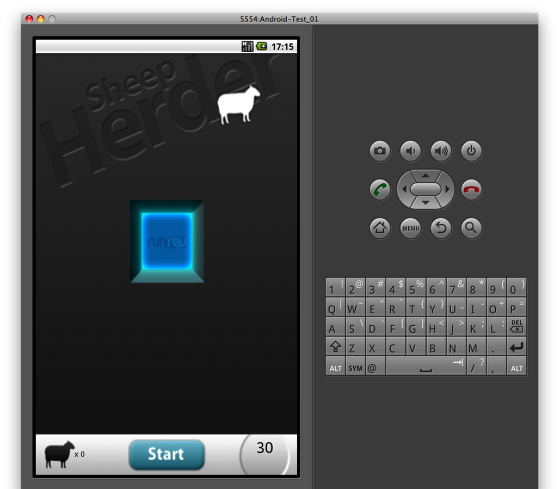
If you have been following Runtime Revolution and LiveCode, you may be familiar with the Sheep Herder game that we developed in 3 hours and 16 minutes. This application was deployed to the iPhone and also runs on Android. You can see how we developed this application here.
Debugging
To assist with basic debugging needs, the Android plugin provides easy access to the system log of the currently selected device. A log window can be displayed that is continuously updated with any new messages the device writes to its log. The display can be toggled, allowing the display of messages to be paused or resumed.
By default, messages other than those output by a running the LiveCode Android engine are suppressed, but a switch is available that allows device generated messages to be displayed.
Important Notes
In order to use the Android pre-release you need to have an Android deployment license.
You should also be aware that the packages built by the Android plugin are not suitable for anything other than deploying on test devices. Support for building packages suitable for general distribution will be added in a later pre-release.
I hope you will enjoy working with LiveCode and Android as much as we are looking forward to expanding the capabilities of the existing development environment. We will keep you posted as we progress with our ongoing development.
|
About the Author
Hanson Schmidt-Cornelius is an experienced software developer with an interest in artificial intelligence.
|
|