Rev 4.5 Preview - Part 1
A sneak peek at some of the tasty new features coming in 4.5
Introduction
Since the release of Rev 4.0 in November last year we've been hard at work working on the next big Rev release - 4.5.
Apart from the usual array of bug fixes and minor enhancements you can expect from any Rev release, in this upcoming version we've also added a number of bigger things. Two of these are improved image export and pdf printing - both of which I'll be talking about in this article.
The features discussed in this article are currently in active development and if you are a revEnterprise with an active update pack then you can try them out right now - just do Check for Updates and make sure you have 4.5.0-dp-2.
Image Export and Color Reduction
Rev has always had quite strong image export features - with a single command you can produce snapshots or export image objects in a variety of formats. However, one area which has always been a little lacking is the ability to control the palette size or colors used when exporting an image.
In 4.5 we've augmented the export command syntax to allow the addition of a palette specification. Indeed you now have several options when exporting in this way:
• Use the standard 'websafe' palette
• Use a specified palette of up to 256 colors
• Compute an optimized palette with a specified number of colors up to 256
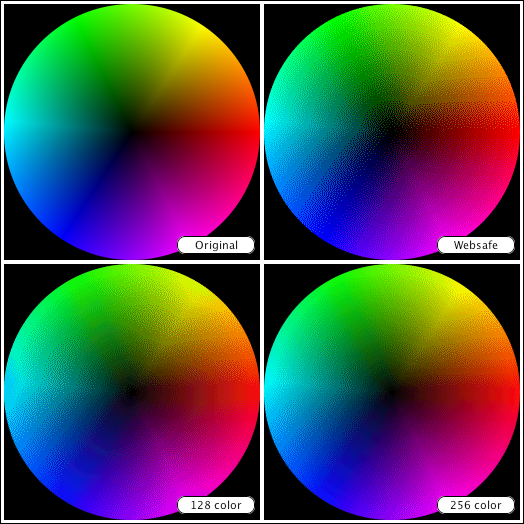
So what does this mean exactly? Well, first of all here are some examples of a color wheel - originally in 24-bit RGB color - recolored using the websafe palette, and then optimized palettes for 128 and 256 colors:
The code that does this is really simple, assuming you have four images with the source image in image 1 then you just need to do:
local tImageText
export image 1 to tImageText as png with websafe palette
set the text of image 2 to tImageText
export image 1 to tImageText as png with 128 color optimized \
       palette
set the text of image 3 to tImageText
export image 1   to tImageText as png with 256 color optimized \
       palette
set the text of image 4 to tImageText
This code simply exports the first image 3 times, each against different palettes. Although we've used as png here, you can also use as gif if you want the resulting image to be in that format.
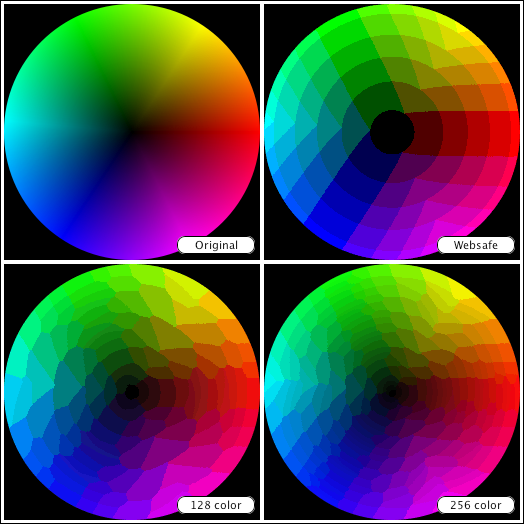
To see more clearly what colors are actually being used in resulting images, we can turn off dithering. Dithering is a process which is (by default) performed when remapping an image's colors to give the appearance of more colors than there actually are. You can turn off dithering when exporting by adjusting the dontDither property of the source image. Here is the same example as above, but repeated with this property set to false:
The code for this is almost identical as before except for adjustment of the dontDither property:
local tImageText
set the dontDither of image 1 to false
export image 1 to tImageText as png with websafe palette
set the text of image 2 to tImageText
export image 1 to tImageText as png with 128 color optimized \
       palette
set the text of image 3 to tImageText
export image 1   to tImageText as png with 256 color optimized \
       palette
set the text of image 4 to tImageText
Another example of something that might be necessary is that of reducing an image to a known fixed palette. For example, here we see the revEnterprise icon reduce to monochrome and to the 16-color (EGA) palette:

The code for this is as simple as before, we simply specified a return-delimited of colors as a palette rather than 'websafe' or 'optimized':
local tImageText
export image 1 to tImageText as png with palette white & return \
       & black
set the text of image 2 to tImageText
get \
       "#000000,#FFFFFF,#0000FF,#00FF00,#FF0000,#00FFFF,#FF00FF,#FFFF00," & \
          \
       "#AAAAAA,#555555,#000077,#007700,#770000,#007777,#770077,#777700"
replace comma with return in it
export image 1 to tImageText as png with palette it
Finally, for a slightly more interactive example, I've prepared a very simple sample stack that allows you to recolor an image with a differently-sized palette interactively:
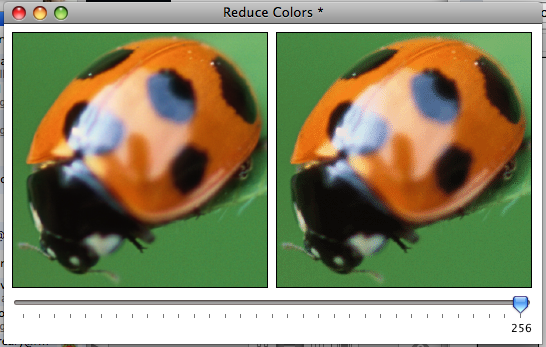
Here you can double-click the left image to choose an image file, and then dynamically change the number of colors by moving the slider. The stack can be retrieved by doing the following in the message box:
go stack url "http ://www.runrev.com/newsletter/february/issue86/ReduceColors.rev "
Full details of the new export syntax and its capabilities can currently be found in the engine ChangeLog.txt that comes with 4.5.0-dp-2.
Printing to PDF
Perhaps the biggest new feature (so far) coming in 4.5 (for revEnterprise users only) is the ability to produce PDF files. Rather than create an entirely separate mechanism for this in the engine, we've augmented Rev's existing 'print loop' mechanism meaning you can easily add a Print to PDF option to your existing Rev apps with virtually no code changes.
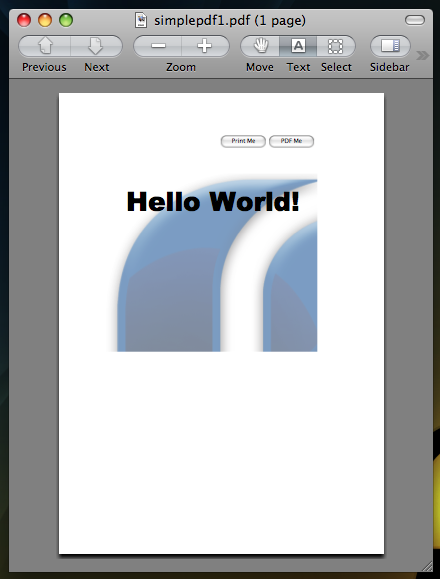
Here is a very simple example stack that prints a basic card either normally, or to PDF:
go stack url "http ://www.runrev.com/newsletter/february/issue86/SimplePrintToPDF.rev "
This card has two buttons, the first will ask you to configure the printer and then print (if you don't press cancel). Its script is simply:
answer printer
   if the result is not "cancel" then
         open printing
         print this card
         close printing
   end if
Nothing particularly new there. The second button, on the other hand, uses the new pdf printing capability - it uses this script:
  ask file "Choose a file for the PDF:"
   if it is not empty then
         open printing to pdf it
         print this card
         close printing
         launch document it
   end if
Here it is easy to see that the main printing command remains completely unchanged - indeed (not counting configuration) it required a single code change! The PDF it produces looks something like this:
In fact, this will be typical - printing to pdf supports all the standard print command syntax and will use any printing properties that make sense such as the printMargins and the printPaperSize .
Rather than turn this into a tutorial about general print syntax and the Rev printing loop, I'll move onto a feature that is very specific to printing to PDFs - the adding of interactivity. Perhaps one of the more useful features of PDF documents is that you can augment them with interactive links. To support this, we have added two new print commands:
      print anchor <name> at <location>

      print link to <anchor or url> with rect <area>
The first of these commands defines a named anchor at the given point on the current page - the location being given in page co-ordinates (measured in points, relative to the top-left of the page). The second of these commands adds a link rectangle covering the given area on the current page. The link area will either link to an (external) url or a named anchor - depending on what it is given.
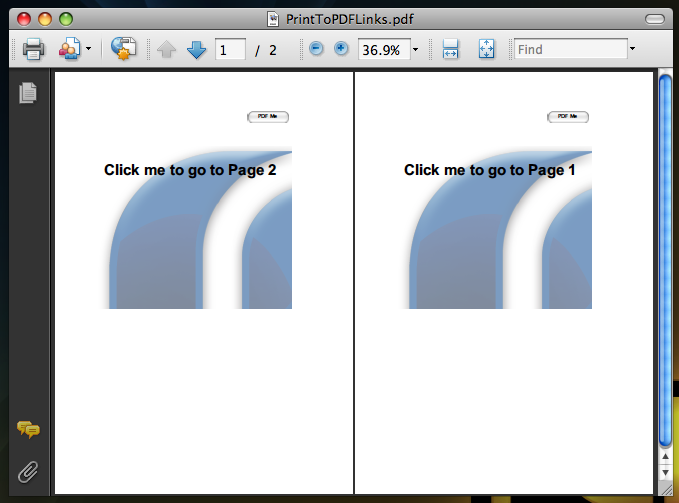
As an example of this ability, here is another simple stack:
go stack url "http ://www.runrev.com/newsletter/february/issue86//PrintToPDFLinks.rev "
This simple stack creates a PDF with two pages, allowing navigation between the two by clicking on a link. The (important) code is as follows:
set the printMargins to 72 , 72 , 72 , 72
open printing to pdf it
print anchor "Page 1" at 0 , 0
print link to "Page 2" with rect 72 , 72 , \
            72 + the width of this card , 72 + the height of this card
put "Click me to go to Page 2" into field 1
print this card
print break
print anchor "Page 2" at 0 , 0
print link to "Page 1" with rect 72 , 72 , \
            72 + the width of this card , 72 + the height of this card
put "Click me to go to Page 1" into field 1
print this card
close printing
Here you can see the use of not only the standard print commands, but also the new link and anchor ones. The PDF it produces looks something like:
Full details of the new export syntax and its capabilities can currently be found in the engine ChangeLog.txt that comes with 4.5.0-dp-2.
Next Time
Well, the 4.5 story doesn't finish here! Next time round, I'll be talking almost exclusively about another major enhancement 4.5 wil have - a significantly improved field...
 |
|