Introducing Data Tree
A Tree Control for Rev Developers Arrives in revSelect
I love Rev. If you're reading this article, it's highly likely that you love it too! Developing software with it is an absolute cinch. You're given the basic building blocks: buttons, fields, graphics and the like, and with some easy to write code to stitch it all together away you go!
Trouble is, what if you need more powerful controls? A few versions ago, we were given the Data Grid, which has solved one set of problems but what if you need a tree control? Well, today it gives me great pleasure to announce that my Data Tree library has been accepted into RevSelect and a licence is available to buy for $45.00.
In this article, we'll take a brief look at Data Tree and then see how I've used it to quickly knock together an XML viewer. Don't worry if this example is on the advanced side of things. The manual contains a simple step-by-step guide to creating trees and you can pick apart the demo stack to discover yet more methods getting started.
What is Data Tree?
Put simply, Data Tree is a fast, robust and easy to use tree library that looks like a native control on both Windows and Mac OS X.
In summary, you can:
- easily create and manipulate tree controls using a set of commands and functions
- work with huge numbers of nodes within a tree and display up to 1,200 at once
- create multiple parent/child levels
- easily apply icons and set other properties of nodes to fine tune the way they behave
- insert a tree into the tabbing order of the card
- receive keyboard and mouse events
- add your own properties to nodes, allowing you to store data within the tree
- even incorporate code within a node to execute when the user interacts with it
Over time, I'll be improving upon this release, adding things like checkboxes, customs skins and the like (no need to bombard me with requests - I have plenty planned!). You can follow its developmental progress on my blog over at www.theworcestersource.com.
As I'm all about making things as easy to use as possible, I've written a comprehensive manual and specially for this RevSelect release, a demo stack called the Arboretum that showcases what the library can do and how to achieve certain functionality like contextual menus.
How do I use it?
Like any custom control, each Data Tree is a collection of RunRev objects that are grouped together. With a template copied to your card, you just need to put the library into use for it to come alive.
While you're testing Data Tree, you'll notice that the control nags you from time to time to buy a licence key. To remove it, you should visit the RevSelect web site to buy a licence key.
Full instructions on using and licensing, together with example code can be found in the manual.
How do I create and modify items in the tree?
There are two methods for creating items in a Data Tree and you can use either interchangeably.
The first and easiest method is to use the various commands that have been written for this purpose. We'll take a look at one in a moment.
Alternatively, you can construct an array of tree data and pass this to the control. This is particularly useful when creating trees with many nodes (more than 300) or when constructing them from external data sources (such as a database or XML) as there's a tangible performance increase. See the manual for more information about this.
Examples of commands
All of Data Tree's commands and functions have a similar format, helping to make them easy to learn. 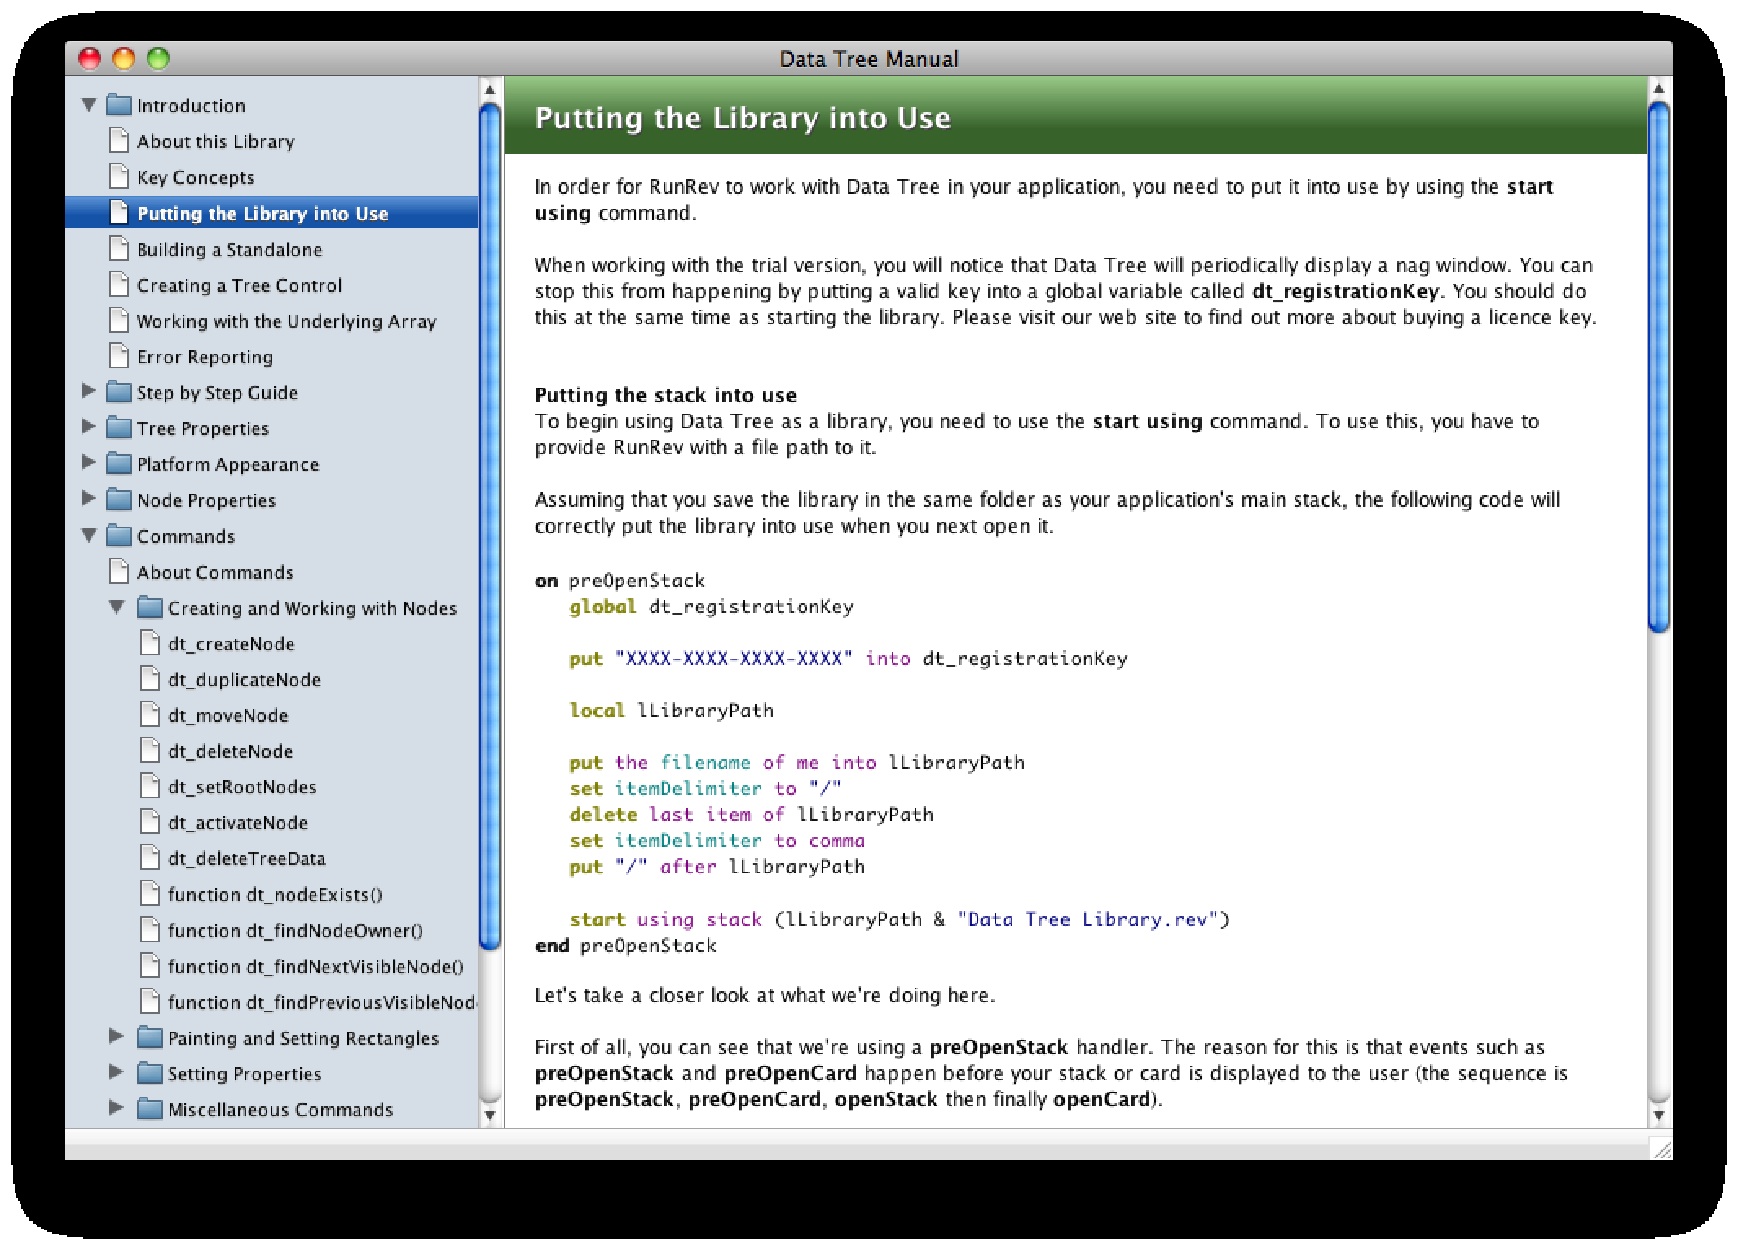
Let's a take a look at the dt_createNode command. It has the following parameters:
dt_createNode id of tree , new node ID , [ owner node ID ] , [ suppress redraw ] , [ label ] , [ icon ] , [ other properties list ] , [ set expand state ]
So what does each parameter do?
| id of tree | is the group id of the tree control, which you can find from the RunRev property inspector |
|---|---|
| new node ID | is a unique id that is given to the new node |
| owner node ID | is the id of the node that you wish to attach the new node to, or the word "root" to make it appear at the leftmost level |
| suppress redraw | when "true" tells Data Tree not to redraw the tree, handy when making many changes in one go |
| label | is the text label given to the new node |
| icon | is the id of an image to be used as the node's icon |
| other properties list | is a list of other properties that can be set |
| set expand state | determines whether the parent node should be automatically expanded |
As you might expect, there are more commands and functions to help you work with the tree, to include:
- duplicate, move, delete and activate nodes
- find nodes or test for their existence
- paint and resize the tree
- set and read back general properties of the tree, platform specific properties and node specific properties
- focus on a tree and enabling and disabling trees
Again, the manual contains full documentation on the commands and functions at your disposal.
Data Tree events
As you interact with a Data Tree, various new events are sent to it. You can catch these by putting RunRev code into the tree itself.
For example, when the user clicks on a node, messages such as nodeDown and nodeUp are sent to it. If you don't wish to bother with distinguishing between the two, there's also a nodeClick event. Similarly, there are also nodeDoubleDown and nodeDoubleUp events.
Likewise, other messages are sent when nodes are expanded or collapsed, and when it receives keyboard input.
Each message that is passed can contain a couple of parameters. In the above mouse event cases, these are the mouse button number that was used (helpful in deciding whether to pop a contextual menu or not), the ID of the node that was clicked on and the value of the command property that you can set when creating the tree, which can be used to help to filter the response that should be delivered to your user.
Building an XML viewer
So I thought that a practical application for Data Tree would be useful for this article and as I have an urgent need for a simple XML viewer, knocking one together seemed like a good idea.
As you'll need the library to make it work, I've included the finished stack as part of the download. Click here to download the whole caboodle.
When it's downloaded, fire up the Data Tree library and click on the "Start Using Library" button to put it into use.
The XML viewer stack is based around a handful of objects:
- a field where you can dump your XML (called "XML Source")
- a button to process it
- a Data Tree to display the XML structure (called "XML Tree")
- two further fields to display XML values and attributes (called "value" and "attributes")
All the magic happens in the Process button but there's a little bit of script in the Data Tree control to change the contents of the "value" and "attributes" fields.
So what does it have to do? Well, RunRev has an XML library that will parse the code, make sure it's formed properly and set it up in memory. This will help us to step through the parent/child relationships that exist and we can use this to build a Data Tree from it.
As we don't know how many levels deep the XML may go to, I'll use a technique called recursion, 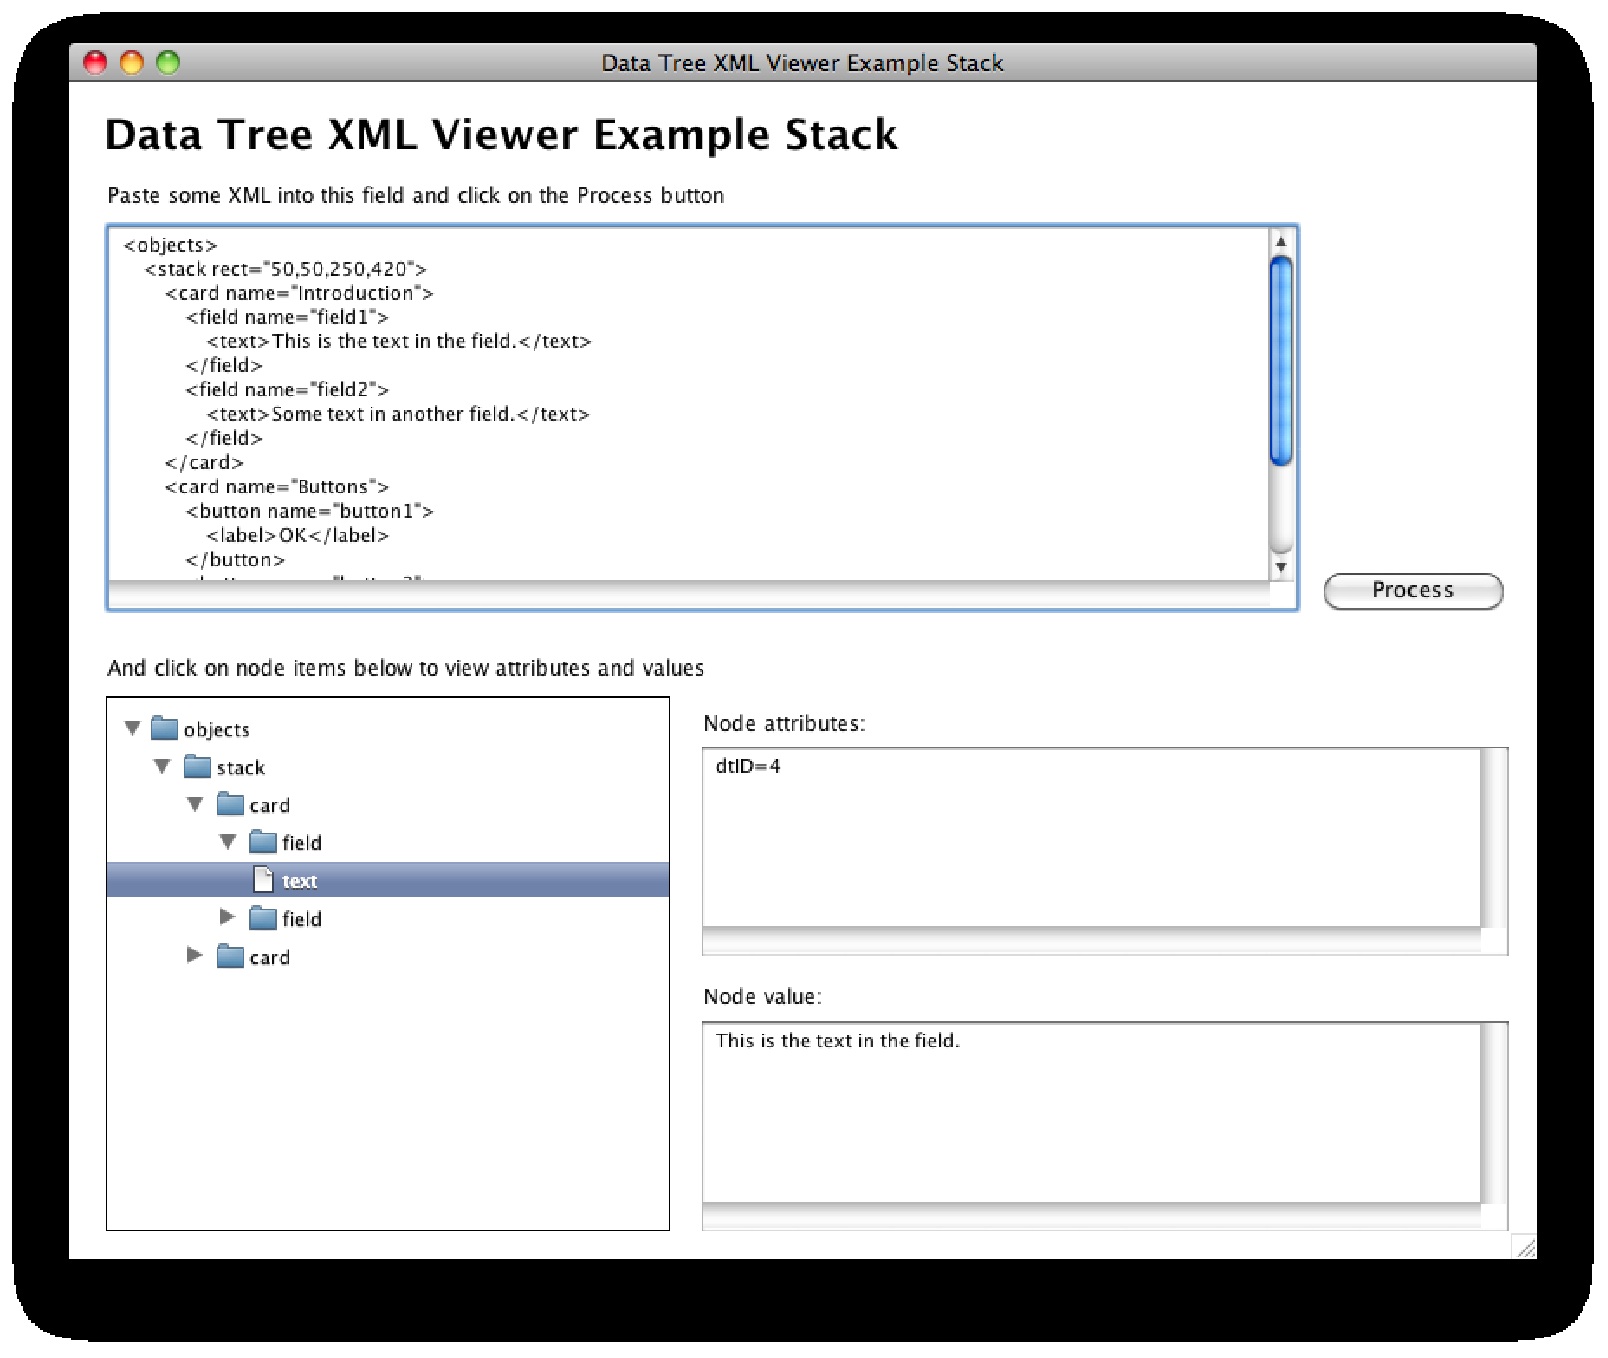 which is where a process can call itself. As we encounter a new parent element in the body of the XML, we'll call the same routine again to look through its children, and so on.
During the process, we need to assign each node in the Data Tree an ID, not just so Data Tree can tell one node from another but also so we can work out where to attach new nodes as we build up the tree. We can make life easy for ourselves:
- Our unique IDs will simply be a number counter, incremented each time we create a new node.
- We'll modify the XML as we walk though it and assign this ID to each element (calling it "dtID"). Then, as we build the Data Tree, we can quickly find the new node's parent and use this attribute to work out where to put it.
Finally, we'll set some custom properties of each node in the Data Tree to contain the value and attributes of the XML element. This way, we won't have to go back to the original source to find this information.
Here's the code that turns the XML into a Data Tree and does everything above. We'll look at the mouseUp handler first and then the processChild handler after. The included comments should help with understanding what's going on.
on mouseUp
      local theTreeID, theRootNode, theEvalNodePath, \
          theEvalNodeName, theNumberOfChildNodesToProcess

   --//   Set things up.
      dt_deleteTreeData ( id of group "XML tree" ), true
      put revCreateXMLTree( field "XML Source" , true , true , \
          false ) into theTreeID
      put revXMLRootNode(theTreeID) into theRootNode

      --//   Create the first node in the Data Tree.
      dt_createNode ( id of group "XML tree" ), 0 , "root" , \
          true ,theRootNode, 1017
      dt_setNodeProperty ( id of group "XML tree" ), 0 , \
          "nodeAttributes",revXMLAttributes(theTreeID,theRootNode,\
 "=", return ), true
      dt_setNodeProperty ( id of group "XML tree" ), 0 , \
          "nodeValue" ,revXMLNodeContents(theTreeID,theRootNode), true

      --//   Begin stepping through the first level of child
   -- nodes. In XML, you find each element by building up a path to it.
      put 1 into theUniqueNodeID
      put revXMLFirstChild(theTreeID,theRootNode) into \
          theEvalNodePath
      repeat revXMLNumberOfChildren(theTreeID,theRootNode, \
          empty , 0 )
            set cursor to busy

            --   From the pathname, we'll extract the text
      -- label for the node.\
      --  I also want to clean it up a little, hence removing
      -- the square brackets.
            put theEvalNodePath into theEvalNodeName
            set the itemDelimiter to "/"
            put the last item of theEvalNodeName into \
             theEvalNodeName
            if theEvalNodeName contains "[" then
                  set the itemDelimiter to "["
                  delete last item of theEvalNodeName
            end if

            --   Record the ID of the XML element in case we
      -- need to use it later.
            revSetXMLAttribute theTreeID,theEvalNodePath, \
             "dtID" ,theUniqueNodeID

            --   Create the node in the Data Tree and store the
      -- value and attributes in custom properties.
            dt_createNode ( id of group "XML tree" \
             ),theUniqueNodeID, 0 ,
      true ,theEvalNodeName, 1016 , empty , false
            dt_setNodeProperty ( id of group "XML tree" \
             ),theUniqueNodeID, "nodeAttributes" ,\
      revXMLAttributes(theTreeID,theEvalNodePath, "=" , return \
             ), true
            dt_setNodeProperty ( id of group "XML tree" \
             ),theUniqueNodeID, "nodeValue" ,\
      revXMLNodeContents(theTreeID,theEvalNodePath), true
            add 1 to theUniqueNodeID

            --   Check to see whether this node has children
      -- and if so, \
             -- call a routine to process them.
            put \
             revXMLNumberOfChildren(theTreeID,theEvalNodePath, empty , 0 ) \
             into theNumberOfChildNodesToProcess
            if theNumberOfChildNodesToProcess > 0 then
                  processChild theTreeID, \
                revXMLFirstChild(theTreeID,theEvalNodePath),\
         theNumberOfChildNodesToProcess,theUniqueNodeID
            end if

            --   Find the next sibling down.
            put revXMLNextSibling(theTreeID,theEvalNodePath) \
             into theEvalNodePath
      end repeat

      --   As each Data Tree command tells the library not to
   -- redraw, we'll execute dt_paint to update it.
      dt_paint ( id of group "XML tree" )
end mouseUp
Let's take a look at the first dt_createNode that we encounter
        dt_createNode ( id of group "XML tree" ), 0 , "root" , \
       true ,theRootNode, 1017
The first parameter works out the id of the group that is called "XML tree". The node will be given an id of zero and will be created at the "root" level. As we are making many changes to the tree in one go, the "true" parameter stops the tree from updating. The variable "theRootNode" contains the text label that the node will be created with and "1017" is the image id to be used as its icon (the image is in the stack).
The second time that we use this command, there are two extra parameters.
dt_createNode ( id of group "XML tree" \
       ),theUniqueNodeID,theParentNodeID, true,
theEvalNodeName, 1016 , empty , false
This time around, the "empty" parameter could include a list of additional node properties, such disabling node highlighting, which we could set in one go. The final parameter determines whether we want the parent node to expand to reveal the new node. However, in this case, we want it to remain collapsed, so we use "false".
Note how the dt_setNodeProperty command is used to create two properties called nodeAttributes and nodeValue ? These will come in handy later.
command processChild theTreeID, theEvalNodePath, \
       theNumberOfChildNodes, @theUniqueNodeID
      local theParentNodePath, theParentNodeID, \
          theNumberOfChildNodesToProcess
      repeat theNumberOfChildNodes

            --   From the pathname, we'll extract the text
      -- label for the node.
      --  I also want to clean it up a little, hence
      -- removing the square brackets.
            put theEvalNodePath into theEvalNodeName
            set the itemDelimiter to "/"
            put the last item of theEvalNodeName into \
             theEvalNodeName
            if theEvalNodeName contains "[" then
                  set the itemDelimiter to "["
                  delete last item of theEvalNodeName
            end if

            --   Find the parent element in the XML and get the
      -- ID that we assigned to it
            set the itemDelimiter to "/"
            put theEvalNodePath into theParentNodePath
            delete last item of theParentNodePath
            put revXMLAttribute(theTreeID,theParentNodePath, \
             "dtID" ) into theParentNodeID

            --   Record the ID of the XML element in case we
      -- need to use it later.
            revSetXMLAttribute theTreeID,theEvalNodePath, \
             "dtID" ,theUniqueNodeID

            --   Create the node in the Data Tree and store the
      -- value and attributes in custom properties.
            dt_createNode ( id of group "XML tree" ),\
      theUniqueNodeID, theParentNodeID, true, \
             theEvalNodeName, 1016 , empty , false
            dt_setNodeProperty ( id of group "XML tree" ),\
      theUniqueNodeID, "nodeAttributes" , \
             revXMLAttributes(theTreeID, theEvalNodePath, "=" , return \
             ), true
            dt_setNodeProperty ( id of group "XML tree" ),\
      theUniqueNodeID, "nodeValue" , \
             revXMLNodeContents(theTreeID, \
             theEvalNodePath), true
            dt_setNodeProperty ( id of group "XML tree" ), \
             theParentNodeID, "Icon" , 1017 , true
            add 1 to theUniqueNodeID

            --   Check to see whether this node has children
      -- and if so, call a routine to process them.
            put \
             revXMLNumberOfChildren(theTreeID,theEvalNodePath, empty , 0)\
      into theNumberOfChildNodesToProcess
            if theNumberOfChildNodesToProcess > 0 then
                  processChild theTreeID, \
                revXMLFirstChild(theTreeID, theEvalNodePath), \
                theNumberOfChildNodesToProcess, theUniqueNodeID
            end if

            --   Find the next sibling down.
            put revXMLNextSibling(theTreeID,theEvalNodePath) \
             into theEvalNodePath
      end repeat
end processChild
What's clever here is that whenever we create a new node, we're giving it an icon of 1016, which is the document icon that you can see. However, if we later assign a child node to it, we change it for 1017, which is the folder icon. We don't need to work it out from the start, just change things as we go along.
Also clever is declaring the variable called "theUniqueNodeID" in the parameter list with "@" in front of it. What this means that when the handler has finished adding to it, when it return to the previous handler, the new value persists. In some ways, it's a bit like a global variable. More information about this technique can be found in the RunRev dictionary.
So that creates the Data Tree and sets up its data. When you go to click on a node, we need to update the "value" and "attributes" field.
To do this, I'm going to trap the nodeClick message in the tree itself (edit the script of the group to see it).
on nodeClick pButton, pNodeID
      put dt_getNodeProperty( id of group me ,pNodeID, \
          "nodeAttributes" ) into field "attributes"
      put dt_getNodeProperty( id of group me ,pNodeID, "nodeValue" \
          ) into field "value"
end nodeClick
Remember how we recorded the XML element's attributes and value in two custom properties? When the message is received by the control, you're given the ID of the node that was clicked on. By using the dt_getNodeProperty , we can find the values in the custom properties and put them into relevant field. How easy is that?
Wrapping up
Hopefully this article has created some inspiration and triggered some ideas of what could be done with Data Tree.
From assisting with navigating your way around your application to building more complex views of data, I'm looking forward to finding out how you use it! If I've got you all excited already you can purchase it here.
All the best,
Steve Checkley
|