| Issue 129 | February 23rd 2012 | Contact the Editor | How to Contribute |
|
| ||
|
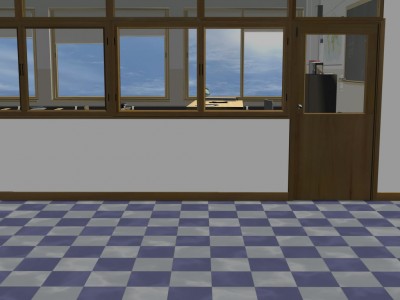
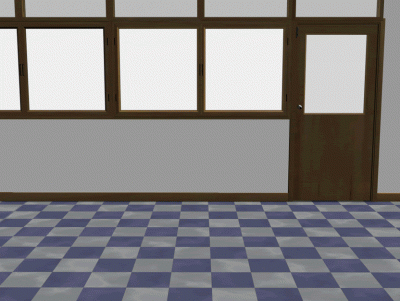
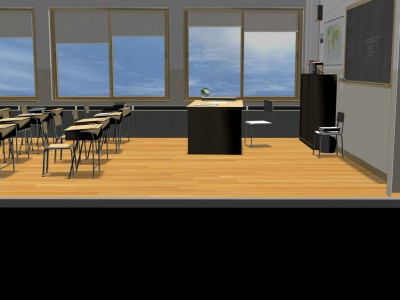
RPG in LiveCode: Layers and Animation You can read part one in this series here. Part two is here. I was going through my notebook today and thought I'd post some more of the ideas I had jotted down during my early design process. Locations, locations, locations... Again, I'm basing this RPG on anime/manga, so I want to include some of the iconic locations that are usually featured in those stories. Here's a partial list I brainstormed: School/Hallway My card game, Wind and Water, is based on the 5 Feng Shui elements, so each of these locations is associated with a specific element. Some NPCs are attached to specific locations, whereas others might appear in any location of the same element. I'll be using color and other cues to indicate these associations. I decided to split my background up into layers after all. This will make it possible for me to show people (teachers, students, monsters, etc.) in the classroom before the character enters it. To do this, I created one scene in DAZ Studio, with a classroom and a hallway.
Then, I first deleted the classroom, and rendered as png to preserve transparency.
Then I reloaded the scene, and without changing the camera angle or any of the lighting, I removed the hallway and rendered again.
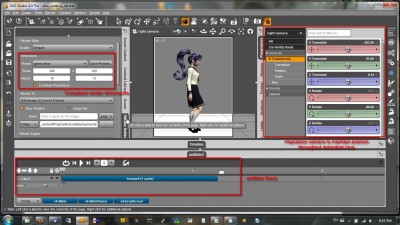
Now I can layer these images in livecode and I'll be able to show a character either in front of or behind the classroom wall. I want to cover a bit about how to render the animated sequences for this game. In this case, I'm using a tool called aniMate2. The "light" version ships with DAZ Studio. You can also buy an upgrade that offers more functionality. I'm using the light version here. The aniMate2 tool lets you drag "blocks" into a special timeline that control the movement of the character. In this case, I'm using a walking loop block. The key thing I want to point out is that I'm not going to render and record an entire animation. Instead, I'm going to select points within the animation to render. Using an animation sequence will help me ensure that the elements all flow together naturally, but selecting only a few frames helps me keep file size low.
I'm also using a render preset I've saved to ensure that my figure renders will all come out the same size, and I've adjusted the position of the camera at the end of the sequence so that the figure is in the same place as at the start of the sequence, so all the renders will seem to be in the same place. I'll be controlling location by moving a button in LiveCode, so I don't want the image of the character moving around within the frame.
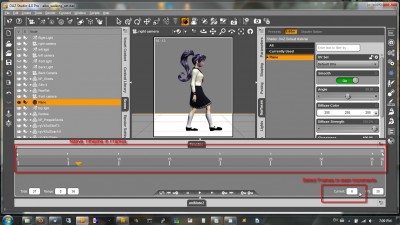
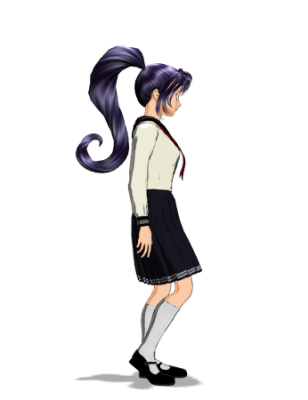
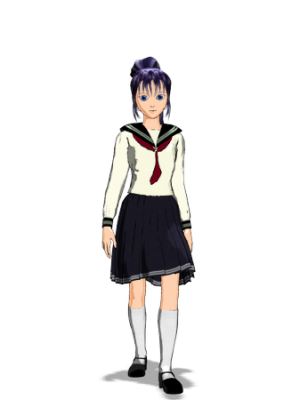
Having used the aniMate2 tab to add the animation sequence, I now want to switch to the native "Timeline" tab so I can see and adjust the action frame by frame. This animation is 36 frames long, with the last frame being essentially identical to the first. After reviewing some of the games I listed in my inspirations, I've decided to use 6 frames per cycle. This is fewer frames than contemporary games would probably use, but it will keep response nimble, even on a portable platform, and will give my game a nostalgic feel that I'm looking for. With this in mind, I render at frames 0, 6, 12, 18, 24, and 30. I'll give each render a name like girl_right_0, girl_right_1, etc., up to girl_right_5. (You can start numbering with 1 instead of 0 if you prefer-- it really doesn't matter. As before, I've set the lighting to be primarily from the upper right, with a fill light at lower left, and a top light casting a shadow onto the "shadow catcher" plane. Here's an example of a render of the first frame in this sequence.
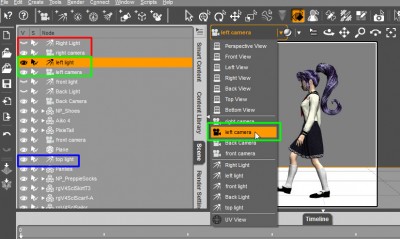
This is a transparent png file. The shadow is part of the render, so it will constantly update as the figure moves. We'll also need to arrange frames of the figure walking left. You may be tempted to simply flip the right-walk frames. I advise against it. The lighting will look wrong, with the highlights on the wrong side, and while many people won't consciously notice this, it will look slightly "off" to most people. Half the point of rendering your own graphics is to be able to control things like the lighting to keep them consistent. So instead, set up another camera and another set of lights on the other side of the figure, and turn off the first set of lights. Leave the top light alone. Switch the view to the other camera.
This will give you a new render with appropriate lighting:
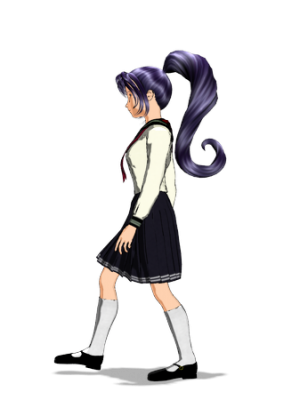
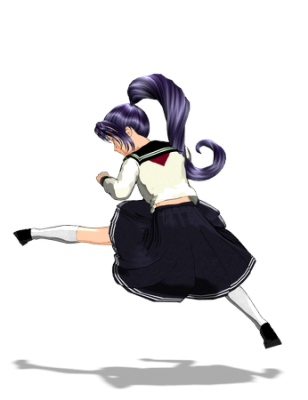
You'll then do the same thing for front and back views (just the front shown here, 5th frame).
Again, create lights to be consistent with the new camera angle, and adjust the camera distance so the figure takes up the same amount of space in the scene as she walks forward (or backward). Of course, we are not limited to rendering frames of the character walking.
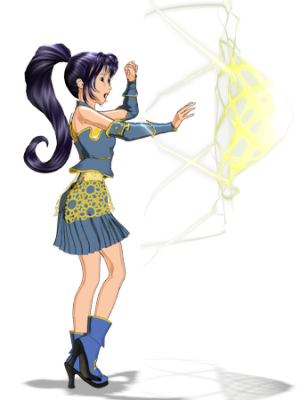
and what would be the point of having an anime RPG without a transformation and magical attacks?
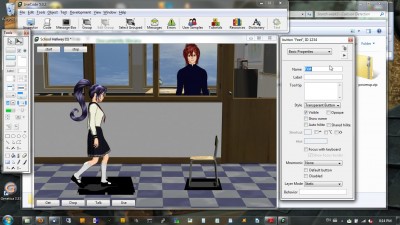
Next up will be either collisions (mostly the kind that just stop movement, not the kind that hurt the character, though that will be a natural extension), or other interactions, like picking up an object from the scene. But that will have to wait until tomorrow. It's been a long day. Ok. Tonight's post is about collisions. With a game like this, we can't just check for pixel intersections for the whole figure image and an object like a chair. The figure should be able to walk behind or in front of the chair, after all. What we'll do instead is create a group consisting of the figure and another button I'll call "Feet." Then, for objects like chairs, I'll include an extra button called "chair collision" or similar. Each of these buttons will have an image assigned that will define how much "floor space" the figure or object is taking up.
We will modify our "move" handlers to affect the group the figure and "foot" button are in, rather than moving just the figure button. (This will be handy later when we want to be able to alter the appearance of the figure, e.g. changing clothes or hair.)
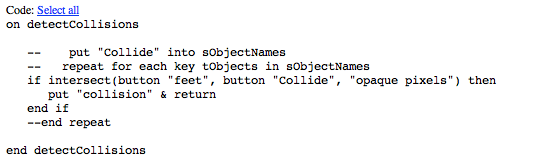
We add the detectCollisions call to the updateScreen handler, and define detectCollisions as follows:
This won't actually stop the figure from walking through an object, but will display a message in the message box to let us know the collision is working correctly. Naturally, we won't want to have these black trapezoids showing in our scene, but fortunately the intersect function works whether or not the buttons are visible. So we can set the "visible" property of both buttons to "no" and this function will still work. Probably I don't want to call detectCollisions in updateScreen in this game, since the figure isn't constantly moving. Instead, I'll modify the individual moveleft, moveright, etc. handlers to check for a collision before moving the figure. This means I'll be using detectCollisions as a function, rather than as a handler. Additionally, I'll need to define a more flexible way to populate the list of objects to check collisions (sObjectNames) rather than hard-coding the "Collide" button as I did here. I'll probably define a custom property "Collision-Object" and iterate through the objects on the card as the card is opened to populate the list of collision objects. But once this is done, I can use collision objects to define the floor and back wall of the scene, as well as any solid objects in the scene. Similarly, I'm going to need to define a "detectPortal" system to handle when the figure walks off the edge of the screen or through a door. The code for this will be very similar to the detectCollisions code above. I may want to set up a third system called "detectInventory" that will allow the character to walk over objects to pick them up. If I come up with too many different "detect" cases, it will probably make more sense to have a single "detectCollision" and handle the result based on the value in the custom property. Is anyone still following this thread? I'll keep posting, if so....
| 
|